
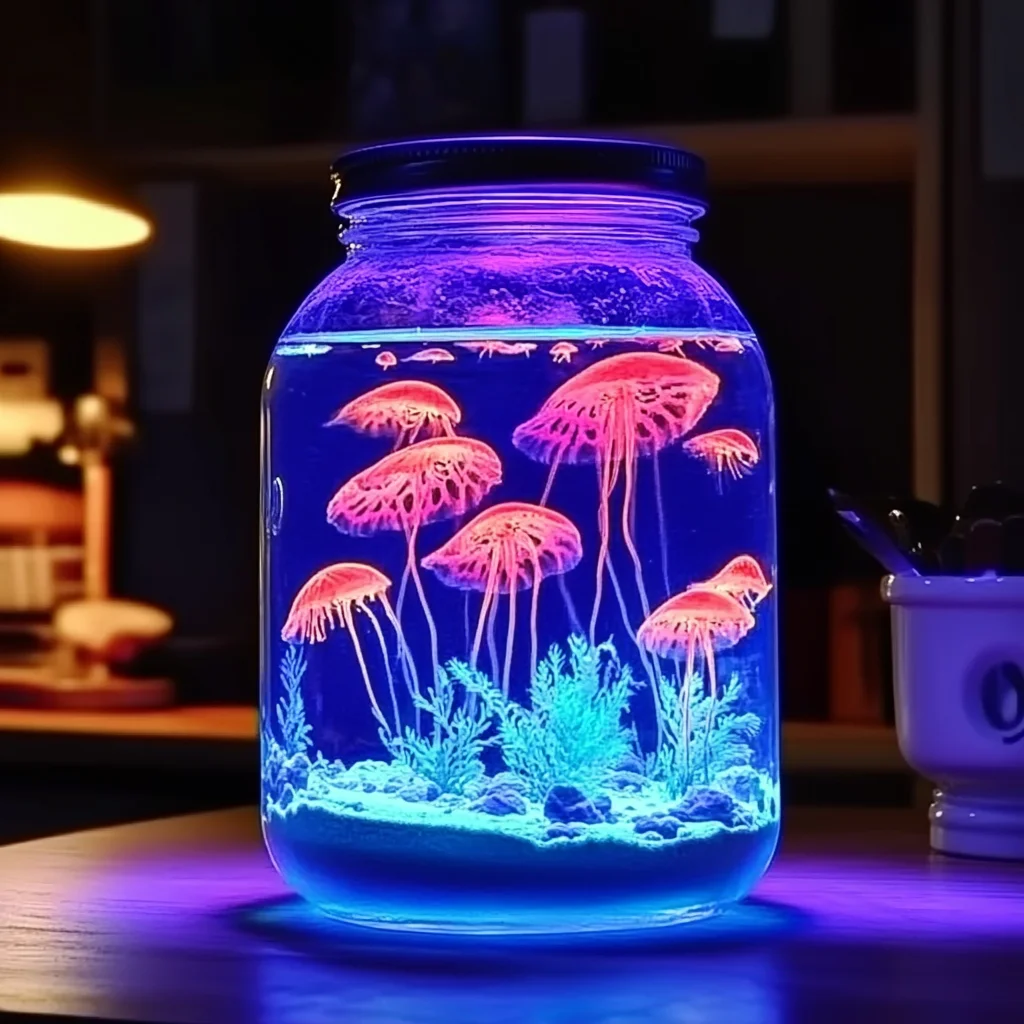
Remember those magical nights as a kid, wishing for a little bit of wonder to brighten your room? I certainly do! There’s something so enchanting about things that glow, isn’t there? Today, we’re going to recreate that sense of wonder with a super simple, incredibly fun DIY project: a Glow-in-the-Dark Aquarium Jar. It’s the perfect craft to do with the little ones, a unique handmade gift, or even just a charming way to add a touch of whimsy to your own space. Get ready to be amazed as this little jar comes to life in the dark!
Why You’ll Love This Glow-in-the-Dark Aquarium Jar
- Super Fast: You can whip this up in minutes!
- Incredibly Easy: Even the littlest hands can help with this one.
- Perfectly Giftable: Imagine the smiles when they receive this glowing creation.
- Guaranteed Crowd-Pleaser: Everyone loves a little glow!
Gather Your Supplies: The Glow-in-the-Dark Aquarium Jar Ingredients
You won’t need much for this dazzling project, which is part of its charm! Here’s what you’ll need:
- 1 clear glass jar or plastic mason jar (with lid): Any size will work, but a medium-sized jar is usually perfect. You want to be able to see all the magic inside!
- Water: Just enough to fill your jar about 3/4 of the way. Tap water is perfectly fine.
- 1–2 Tbsp glow-in-the-dark or fluorescent paint (non-toxic): This is the star of the show! Look for paints specifically designed to glow in the dark or those that are fluorescent. Make sure they are non-toxic, especially if kids will be involved. I’ve found that brighter, more vibrant paints tend to give the best glow.
Let’s Get Glowing: How to Make Your Own Glow-in-the-Dark Aquarium Jar
Alright, grab your supplies, and let’s dive into making this awesome glow-in-the-dark jar. It’s as easy as 1-2-3!
- Fill ‘er Up! Take your clean jar and fill it with water, leaving about a quarter of the jar empty at the top. This gives us a little room to swirl and keeps things from overflowing.
- Add the Glow! Now, carefully pour in your glow-in-the-dark or fluorescent paint. Start with 1 tablespoon and see how it looks. You can always add a little more if you want a more intense glow.
- Mix and Swirl: Gently stir the water and paint mixture. You want the paint to be evenly distributed throughout the water, creating a cloudy, luminous effect. Avoid stirring too vigorously, or you might create too many bubbles.
- Seal the Deal: Screw the lid on your jar nice and tight. This keeps the water inside and prevents any accidental spills.
- Charge It Up! Now for the fun part! Place your finished jar in a dark room or near a light source for a few minutes. The light will “charge” the paint, and when you turn off the lights, your aquarium jar will begin to glow! It’s like magic!
Creativity Unleashed: Substitutions & Additions
While the basic recipe is wonderfully simple, there are so many ways you can personalize your Glow-in-the-Dark Aquarium Jar. Here are a few ideas:
- Glitter Galore: For an extra bit of sparkle, add a pinch of fine glitter to the water along with the paint. It catches the light beautifully!
- Theme It Up: Think about what you want inside your “aquarium.” You could add small plastic sea creatures or tiny glow sticks (make sure they are securely sealed!) to create a mini underwater scene. If you’re feeling crafty, you might even try making some DIY bioplastic suncatchers to hang inside!
- Layered Effects: For a really unique look, try using different colors of glow paint. Let one color settle, then carefully add another. You might get some cool layered effects.
- Scented Serenity: For a calming sensory experience, you could add a drop of essential oil. Something like lavender would be lovely. If you’re exploring DIY home scents, perhaps check out these DIY Aroma Stones for more inspiration.
Tips for a Truly Glowing Success
Here are a few pointers to help you achieve the best glow and make your project a breeze:
- Paint Quality Matters: Not all glow paints are created equal. If you find your glow isn’t as bright as you’d hoped, try a different brand or a paint with a higher concentration of phosphors.
- Charging is Key: The brighter and longer you expose the jar to light, the brighter and longer it will glow. Sunlight is fantastic for charging, but a bright lamp works well too.
- Seal it Tight: If you’re using a glass jar and plan on placing it somewhere where it might get knocked over (especially if kids are around!), ensure the lid is screwed on very securely. A bit of strong tape around the lid could also add extra security.
- Prep Ahead: You can prepare the jars ahead of time for a party or event. Just keep them in a dark place until you’re ready to reveal their glow!
How to Store Your Glow-in-the-Dark Aquarium Jar
These jars are pretty low-maintenance! To keep your glow-in-the-dark aquarium jar looking its best:
- Storage: Keep the jar in a cool, dry place. When not in use, you can store it with the lid off if you’re worried about pressure buildup over time, or just keep it lid-on in a cupboard or drawer.
- Shelf Life: The glow effect might diminish over time, especially if the paint quality isn’t top-notch. However, the jar itself will last as long as the container holds up! If the glow fades, you can always refresh it by adding a bit more glow paint or just enjoying it as a pretty water-filled jar.
Frequently Asked Questions (FAQs)
Got questions? We’ve got answers!
Q1: Will the paint come off on my hands?
A: As long as you use non-toxic paint and ensure the lid is sealed tightly, the paint should stay within the jar. Always supervise young children during the creation process.
Q2: How long does the glow last?
A: The duration of the glow depends on the type of glow paint used and how long it was charged. Typically, a well-charged glow paint can last anywhere from a few minutes to a few hours. You can reactivate the glow by exposing it to light again.
Q3: Can I use any kind of paint?
A: It’s best to use paints specifically labeled as “glow-in-the-dark” or “fluorescent” for the best results. Regular acrylic paints won’t glow. Always ensure they are non-toxic.
I hope you have as much fun making this Glow-in-the-Dark Aquarium Jar as I do! It’s a simple project that brings a lot of joy. If you love creative DIYs, be sure to check out more of my fun projects, like these DIY clear glue suncatchers or how to make DIY lava lamps. Happy crafting!
For more creative inspiration and delicious recipes, be sure to follow us on Pinterest!
DIY Glow-in-the-Dark Aquarium Jar
Ingredients
Equipment
Method
- Step 1: Fill your clean jar with water, leaving about a quarter of the jar empty at the top. This gives us a little room to swirl and keeps things from overflowing.
- Step 2: Carefully pour in your glow-in-the-dark or fluorescent paint. Start with 1 tablespoon and see how it looks. You can always add a little more if you want a more intense glow.
- Step 3: Gently stir the water and paint mixture. You want the paint to be evenly distributed throughout the water, creating a cloudy, luminous effect. Avoid stirring too vigorously, or you might create too many bubbles.
- Step 4: Screw the lid on your jar nice and tight. This keeps the water inside and prevents any accidental spills.
- Step 5: Place your finished jar in a dark room or near a light source for a few minutes. The light will "charge" the paint, and when you turn off the lights, your aquarium jar will begin to glow!
Trong những năm đầu hoạt động, 66B chỉ tập trung vào việc xây dựng nền tảng kỹ thuật vững chắc và thu hút người chơi bằng các ưu đãi hấp dẫn. Sau một thời gian ngắn, nhà cái đã mở rộng danh mục trò chơi của mình, không chỉ giới hạn ở cá cược thể thao mà còn phát triển thêm nhiều trò chơi khác như poker, blackjack và slot games. TONY04-24H
Thank you for your sharing. I am worried that I lack creative ideas. It is your article that makes me full of hope. Thank you. But, I have a question, can you help me?
Your article helped me a lot, is there any more related content? Thanks!