
Remember those childhood days filled with endless imagination and tactile exploration? There’s something so wonderfully nostalgic about a sensory experience that sparks creativity. Today, we’re diving into a super fun, super simple DIY project that will bring hours of joy – homemade kinetic sand! It’s the kind of activity that gets everyone involved, from little hands eager to mold and shape, to grown-ups rediscovering their inner child.
Why You’ll Love Homemade Kinetic Sand
- Fast to Make: Seriously, you can whip this up in minutes!
- Incredibly Easy: Minimal ingredients and straightforward steps.
- Perfectly Giftable: Package it up in a cute jar or container for a delightful handmade gift.
- Guaranteed Crowd-Pleaser: Kids and adults alike are mesmerized by its unique texture.
Ingredients
Gathering your supplies is a breeze. You probably have most of these in your pantry or craft stash already!
- 2 cups fine sand (play sand or craft sand – make sure it’s clean and dry!)
- 1 cup cornstarch or flour (cornstarch gives a slightly smoother feel, but flour works great too!)
- 1/2 cup clear or white school glue (PVA glue is your best friend here!)
- 1–2 tablespoons water (this is key for getting that perfect kinetic texture, so add it slowly!)
- Optional additions for extra fun: a few drops of food coloring, a sprinkle of glitter, or a tablespoon of cocoa powder for a different sensory experience.
How to Make Homemade Kinetic Sand
Let’s get our hands a little messy and create some magic! Follow these simple steps:
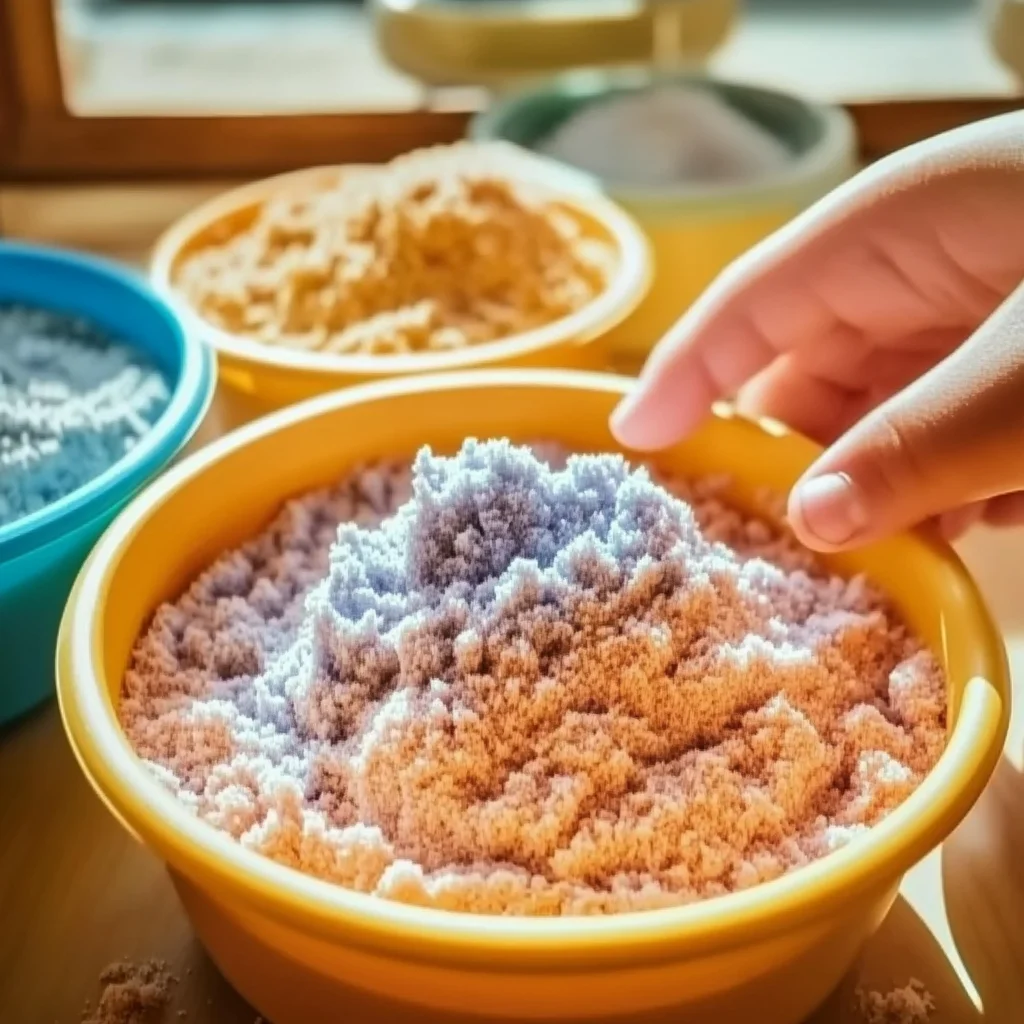
- Mix the Dry Ingredients: Grab a large bowl and pour in your fine sand. Then, add the cornstarch (or flour). Give it a good stir with a spoon or your hands until everything is well combined and there are no clumps.
- Add the Glue: Now, pour in the school glue. Start stirring everything together. You’ll notice the mixture will start to clump up and feel a bit sticky – that’s exactly what you want!
- The Magic Water Step: This is where the kinetic magic happens! Gradually add the water, just 1 tablespoon at a time. As you add the water, start kneading the mixture with your hands. Keep adding and kneading until you reach that perfect kinetic sand consistency. What are we looking for? It should hold its shape when you squeeze it, but then softly flow and crumble apart when you move your hands through it. If it feels too dry, add a tiny bit more water. If it’s too sticky, add a touch more sand and cornstarch. It’s all about finding that sweet spot!
- Get Creative with Colors and Sparkles: If you want colored kinetic sand, now’s the time to get creative! I like to add a few drops of food coloring directly into the glue before I mix it into the sand. This helps distribute the color more evenly. You can also mix in glitter for some sparkle, or even cocoa powder for a fun sensory twist.
- Store it Right: Once your glorious kinetic sand is made, it’s time to store it. The best way to keep it fresh and ready for play is in an airtight container or a sturdy ziplock bag. This prevents it from drying out.
Substitutions & Additions
Feeling adventurous? You can totally customize your kinetic sand!
- Flour vs. Cornstarch: While cornstarch is often preferred for its smoother feel, all-purpose flour is a perfectly good substitute if that’s what you have on hand.
- Glue Options: Clear school glue gives a slightly more transparent look, while white school glue results in a more opaque sand. Both work beautifully!
- Sensory Additions: Think outside the box! You can add fine glitter, mica powder for shimmer, or even a sprinkle of instant coffee granules for a unique scent and texture. For a nature-inspired feel, consider adding finely ground dried herbs or spices.
- Coloring Techniques: Instead of food coloring, you could also try natural food colorings derived from vegetables for a more natural hue.
Tips for Success
A few little tricks to ensure your kinetic sand creation is a hit:
- Don’t Over-Wet: The most common pitfall is adding too much water too quickly. It’s much easier to add a little more water than it is to fix overly wet sand. Patience is key here!
- Knead, Knead, Knead: Really work the mixture with your hands. This helps the glue and water bind with the sand and cornstarch, creating that signature texture.
- Test the Texture: Keep squeezing and molding. You’re looking for that perfect balance between holding shape and crumbling.
- Prep Ahead for Playdates: If you’re making this for a party or playdate, you can easily make a big batch a day or two in advance. Just be sure to store it in an airtight container.
- Clean Hands = Clean Sand: Always start with clean hands to keep your kinetic sand free from dirt and debris.
How to Store Homemade Kinetic Sand
Proper storage is essential to keep your kinetic sand in top-notch condition. Store it in an airtight container or a resealable bag. When stored correctly, your homemade kinetic sand should last for a good few weeks, staying soft and moldable.
FAQs
Is kinetic sand safe for toddlers?
Yes, this homemade kinetic sand is generally safe for toddlers, but always supervise them during playtime, especially if they are prone to putting things in their mouths. Ensure the sand is made with non-toxic glue and ingredients.
My kinetic sand is too dry/crumbly. What should I do?
If your sand feels too dry or crumbly, add a teaspoon of water at a time and knead it in thoroughly. It might take a few small additions to get it just right.
My kinetic sand is too sticky. How can I fix it?
If it’s too sticky, try adding a little more cornstarch or flour, a tablespoon at a time, and kneading it in until the stickiness reduces.
Making this kinetic sand is such a rewarding process, and seeing the joy it brings is truly special. If you loved this fun DIY, you might also enjoy other creative projects like our easy colorful DIY play dough or the fascinating mini volcano jar science experiment!
Happy playing!
Don’t forget to follow us on Pinterest for even more creative ideas and recipes!
DIY Kinetic Sand
Ingredients
Equipment
Method
- Step 1: Mix the Dry Ingredients: Grab a large bowl and pour in your fine sand. Then, add the cornstarch (or flour). Give it a good stir with a spoon or your hands until everything is well combined and there are no clumps.
- Step 2: Add the Glue: Now, pour in the school glue. Start stirring everything together. You'll notice the mixture will start to clump up and feel a bit sticky – that’s exactly what you want!
- Step 3: The Magic Water Step: This is where the kinetic magic happens! Gradually add the water, just 1 tablespoon at a time. As you add the water, start kneading the mixture with your hands. Keep adding and kneading until you reach that perfect kinetic sand consistency. What are we looking for? It should hold its shape when you squeeze it, but then softly flow and crumble apart when you move your hands through it. If it feels too dry, add a tiny bit more water. If it’s too sticky, add a touch more sand and cornstarch. It’s all about finding that sweet spot!
- Step 4: Get Creative with Colors and Sparkles: If you want colored kinetic sand, now’s the time to get creative! I like to add a few drops of food coloring directly into the glue before I mix it into the sand. This helps distribute the color more evenly. You can also mix in glitter for some sparkle, or even cocoa powder for a fun sensory twist.
- Step 5: Store it Right: Once your glorious kinetic sand is made, it’s time to store it. The best way to keep it fresh and ready for play is in an airtight container or a sturdy ziplock bag. This prevents it from drying out.
Đây là nơi tôi thường xuyên truy cập 188v nổ hũ TONY06-18