
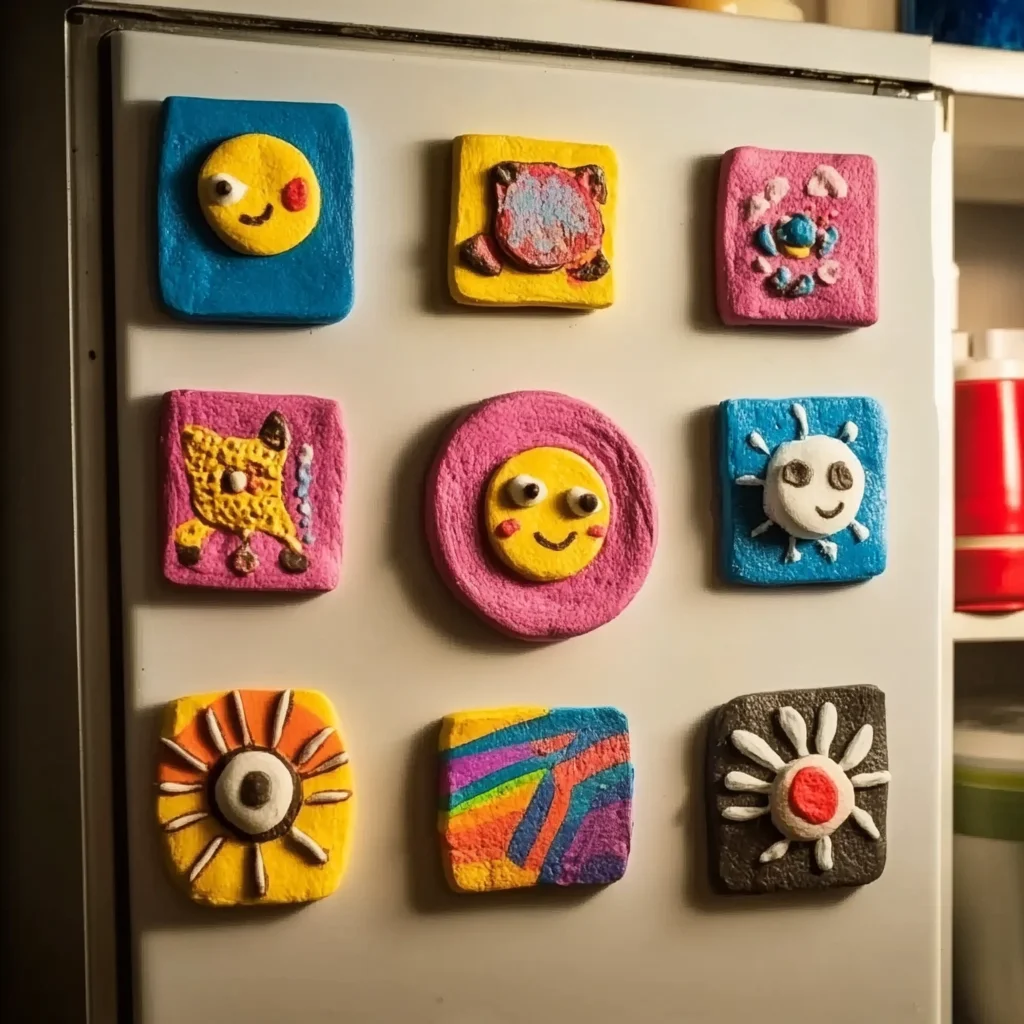
Is there anything more satisfying than crafting something beautiful with your own hands? Imagine sitting down with a lump of soft clay, your favorite colors of acrylic paint at your fingertips, and the freedom to create whatever your heart desires. DIY Clay Magnets are not only a fun way to express your creativity but also a delightful project that can bring a smile to your face each time you see them on your fridge or gift them to a loved one. This project is perfect for both beginners and families, making it a great way to bond while creating something special.
Why You’ll Love DIY Clay Magnets
- Beginner-friendly
- Budget-friendly
- Creative and fun
- Great for kids and families
- Perfect for gifts or decorations
- Customizable
The Heart Behind This DIY
Crafting DIY Clay Magnets is more than just a fun activity; it’s a way to connect with your creative side. The process encourages mindfulness, allowing you to immerse yourself in the tactile experience of kneading and shaping the clay. As you roll, cut, and paint, you’ll find that your worries fade away, replaced by the joy of creating something unique. This project not only boosts your creativity but also helps build confidence as you watch your ideas come to life. Plus, it’s a wonderful opportunity to bond with family or friends, sharing laughter and inspiration as you craft together.
A Gentle Look at the Process
In this DIY project, you can expect to enjoy the delightful sensation of kneading soft clay, the satisfying sound of rolling pins gliding over surfaces, and the thrill of seeing your designs take shape. As you cut out your clay pieces and add personal touches, you will feel a sense of accomplishment that comes from creating something beautiful. And when you finally attach magnets to the back, you’ll envision your colorful creations proudly displayed on your fridge, constantly reminding you of your creativity and hard work.
Materials You’ll Need
- Air-dry clay: This is the main material for your project, easy to work with and requires no baking.
- Acrylic paint (optional): Use this to add vibrant colors to your magnets.
- Clear sealant (optional): This will protect your painted designs and enhance durability.
- Strong adhesive magnet strips or round magnets: These will allow your creations to stick to metal surfaces.
- Craft knife or shaping tools: Essential for cutting and detailing your clay shapes.
- Rolling pin: This will help you roll your clay to the perfect thickness.
- Cookie cutter or knife: Use these to shape your clay into fun designs.
- Paintbrush (if using paint): For applying paint smoothly to your clay creations.
Step-by-Step Directions
Step 1
Start by kneading the air-dry clay until it is soft and pliable. This step is like giving your clay a warm-up; it should feel smooth and elastic under your fingers.
Step 2
Roll out the clay to a uniform thickness using a rolling pin. Aim for about a quarter-inch thick, as this will make for sturdy magnets. The sound of the rolling pin gliding over the clay is soothing, isn’t it?
Step 3
Cut out shapes using a cookie cutter or knife, and remove any excess clay. Let your imagination run wild here! You can create hearts, stars, or even your favorite animals.
Step 4
Use a craft knife or shaping tools to add details or designs if desired. This is where you can really personalize your magnets! Think about adding patterns or textures that will make each piece unique.
Step 5
Allow the clay shapes to dry completely according to the manufacturer’s instructions. While you wait, you can clean up your workspace or plan how you want to decorate your magnets.
Step 6
Once dry, you may paint the shapes with acrylic paint if you wish. Choose colors that make you happy! Let the paint dry completely before moving on to the next step.
Step 7
Apply a clear sealant to protect the paint and enhance durability, if desired. This will also give your magnets a lovely finish that makes them shine.
Step 8
Attach strong adhesive magnet strips or round magnets to the back of each shape. Make sure they are firmly secured for the best hold.
Step 9
Allow the adhesive to cure as per the manufacturer’s instructions before using the magnets. This final step ensures that your creations are ready to go!
Creative Ways to Use DIY Clay Magnets
Once your colorful clay magnets are complete, the fun continues! You can display them on your fridge, use them to hold up important notes or photos, or even gift them to friends and family. They make wonderful personalized gifts for birthdays or housewarming parties. You can also create themed sets for holidays, enhancing your home decor with your unique touch. Imagine a set of festive magnets for Christmas or fun shapes for summer!
How to Store, Preserve, or Reuse DIY Clay Magnets
To keep your DIY Clay Magnets in great condition, store them in a cool, dry place when not in use. If they get dirty, simply wipe them with a damp cloth. If you want to change your designs with the seasons, simply peel off the magnets and re-use the clay for new creations. The best part? You can always make more!
Creative Variations and Customizations
- Color variations: Experiment with different shades or even mix colors for a marbled effect.
- Theme ideas: Create magnets based on holidays, favorite animals, or personal interests.
- Seasonal adaptations: Design magnets that celebrate each season, like flowers for spring or snowflakes for winter.
- Kid-friendly modifications: Let kids add glitter or stickers to personalize their creations.
- Advanced creative upgrades: Consider adding small embellishments like beads or sequins for extra flair.
Tips for Success
- Common mistakes to avoid: Ensure the clay is fully dry before painting or attaching magnets to prevent damage.
- Safety tips: Always supervise children when using sharp tools like craft knives.
- Preparation suggestions: Lay down a protective covering on your workspace to catch any clay crumbs.
- Cleanup recommendations: Clean your tools immediately after use to prevent the clay from hardening on them.
- Expert crafting tips: Embrace imperfections; they often add character to your handmade pieces!
FAQs About DIY Clay Magnets
Can beginners make this?
Absolutely! This project is perfect for beginners and requires minimal materials.
Can children participate?
Yes! Kids can enjoy this project with adult supervision, especially during the cutting and painting stages.
How long does it last?
With proper care, your clay magnets can last for years, brightening up your space.
Can I customize it?
Definitely! Personalization is one of the best parts of this project. You can create any shape, color, or design you like.
A Final Creative Note
As you wrap up your DIY Clay Magnets, take a moment to appreciate the creativity and effort you’ve poured into this project. Each magnet is a little piece of art that tells a story, whether it’s a memory shared with family or a moment of inspiration. So go ahead and celebrate your crafting journey! For more delicious recipes, check out the delightful No-Bake Marshmallow Slice or the scrumptious Peach Cobbler No Mix for treats you will love!
If you’re looking for more DIY inspiration, be sure to follow Pinterest for endless creative ideas.
DIY Clay Magnets
Ingredients
Equipment
Method
- Step 1: Start by kneading the air-dry clay until it is soft and pliable.
- Step 2: Roll out the clay to a uniform thickness using a rolling pin.
- Step 3: Cut out shapes using a cookie cutter or knife, and remove any excess clay.
- Step 4: Use a craft knife or shaping tools to add details or designs if desired.
- Step 5: Allow the clay shapes to dry completely according to the manufacturer's instructions.
- Step 6: Once dry, you may paint the shapes with acrylic paint if you wish.
- Step 7: Apply a clear sealant to protect the paint and enhance durability.
- Step 8: Attach strong adhesive magnet strips or round magnets to the back of each shape.
- Step 9: Allow the adhesive to cure as per the manufacturer's instructions before using the magnets.
I’ve tried many sites but the user interface here is by far the most intuitive. Easy to navigate and easy to win. Visit 49betlogin for the best action.
I was searching for a reliable platform and finally found one that actually works as advertised. The onboarding process is simple and the support team goes above and beyond to help you get started. It is a breath of fresh air compared to the usual cluttered sites out there. ecuabrtec
Really happy with the transparency of this site. No hidden fees and the registration process took me less than two minutes. vnnc88 is definitely becoming my go-to spot.
Signing up was a breeze and the welcome bonuses are actually worth it. If you are looking for a fresh start, jiliplay888register is the way to go.
Really impressed with the quality here. It is rare to find a site that is this stable and user friendly these days. Big thumbs up! bd09bt
Just downloaded the app and it is super lightweight. I can play anywhere without draining my battery too fast. Very convenient! vnhz88app
Been playing on a few sites lately and this one really stands out from the crowd. The interface is super clean, bonuses are straightforward and I never felt stuck waiting for payouts. Solid choice for anyone who wants a stress free experience. alanodt2
Love the slot selection on this app. The graphics are crisp and the bonuses keep me coming back. Just downloaded winlislotsgamedownloadapk and I am already hooked.