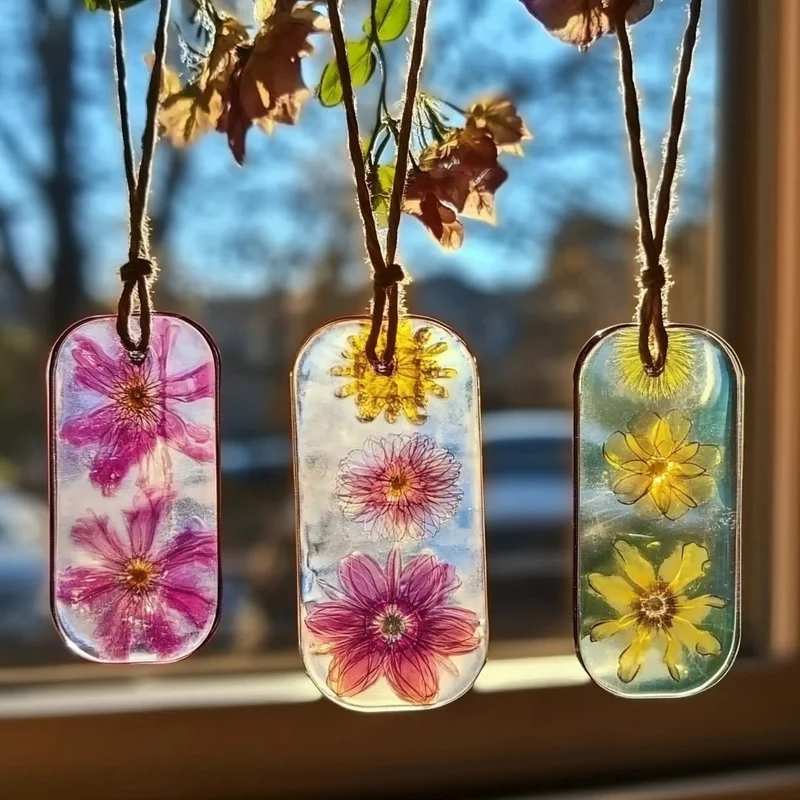
Hey there, crafty friends! Remember those simple joys of childhood? The way sunlight could transform a room, or the magic of creating something beautiful with your own two hands? Well, today, I want to share a project that brings back a little bit of that wonder: making your own stunning suncatchers right in your kitchen! These aren’t just any suncatchers; they’re made from simple, natural ingredients you likely already have, creating a lovely, translucent disc that catches the light just beautifully. It’s an easy, fun activity perfect for a rainy afternoon, a quick craft session with the kids (with supervision, of course!), or just because you want to add a little sparkle to your window. They’re quick to mix up, incredibly satisfying to watch dry, and honestly, hanging them up feels like adding a little piece of sunshine to your home. Let’s get started!
Why You’ll Love This Recipe
- Fast (to mix up!)
- Easy (seriously, anyone can do this!)
- Giftable (package them up for friends!)
- Crowd-pleasing (a fun activity for all ages!)
Ingredients
The best part about this project is that you probably have most of these ingredients hiding in your pantry right now. It feels a little like kitchen magic!
- ½ cup water: Just plain old tap water works perfectly.
- 2 tbsp cornstarch: This is the key to giving our suncatcher body and structure.
- 1 tbsp white vinegar: Helps with the science part, making the bioplastic flexible. Don’t worry, you won’t smell it after it dries!
- 1 tbsp unflavored gelatin: The kind you’d use for desserts or jello. It helps everything set up nicely.
- Natural or food-safe coloring: Get creative! You can use a tiny drop of liquid food coloring, or try natural options like a little beet juice for pink/red, turmeric for yellow/orange, or spirulina for green. A little goes a long way!
- Optional: fine glitter, flower petals, or tissue paper: This is where you add your personal touch! Small bits of dried petals, fine craft glitter, or tiny pieces of colorful tissue paper can make them extra special.
- Non-stick surface: You’ll need something to pour your mixture onto. A plastic sheet protector, a silicone baking mat, or even just parchment paper taped down to a tray works great.
- String or suction hook: For hanging your finished masterpiece!
- Hole punch: A standard single hole punch is perfect for adding the hanging spot.
How to Make It
Okay, let’s turn these simple ingredients into something beautiful. Grab a small saucepan and let’s get cozy in the kitchen!
- First, measure out your water, cornstarch, white vinegar, and unflavored gelatin directly into your saucepan. Give it a good stir with a whisk or spoon until everything looks smooth and there are no clumps, especially the cornstarch and gelatin. You want a nice, milky, uniform liquid before you turn on the heat.
- Now, place your saucepan over medium-low heat. Here’s the important part: you need to stir constantly. Seriously, don’t walk away! Keep stirring for about 3 to 5 minutes. You’ll notice the mixture will start to thicken and become translucent or gel-like. Once it’s thick enough to coat the back of a spoon and has lost its cloudy look, take it off the heat immediately. Don’t let it boil vigorously.
- Carefully divide the warm (but not boiling hot!) mixture into a few small bowls – one bowl for each color you want to make. Stir your chosen coloring into each bowl. Start with just a tiny bit and add more until you get the shade you like. Remember, the color will look more concentrated in the bowl than it will when spread thin.
- Now for the fun part! Pour thin layers of your colored mixture onto your non-stick surface. You can pour different colors side-by-side, swirl them together gently with a toothpick, or create abstract shapes. This is where you can also sprinkle on your optional decorations like glitter, small dried flower petals, or tiny bits of tissue paper while the mixture is still wet. I like to use a toothpick to gently arrange petals or swirl glitter around.
- Time for patience! Let your suncatchers dry completely at room temperature. This will take anywhere from 24 to 48 hours, sometimes longer depending on how humid it is or how thick you poured them. After about 12-24 hours, they should be firm enough to carefully peel off your surface and flip over to help the other side dry fully. They’ll become firm and flexible as they dry.
- Once they are completely firm and feel dry to the touch (they’ll be hard but still a little pliable), grab your hole punch. Carefully punch a hole near the top edge of each suncatcher. Thread some string or wire through the hole, tie a loop, and they are ready to hang!

Substitutions & Additions
Want to switch things up or get extra creative? Here are a few ideas!
- Coloring: If you don’t have the natural options or food coloring, you could experiment with a tiny amount of craft acrylic paint (make sure it’s non-toxic, especially if kids are involved, although these aren’t for eating!). However, food-safe options are always recommended for kitchen-based crafts.
- Shape: Instead of pouring freeform, you could try pouring the mixture into shallow, silicone molds (like ice cube trays or candy molds) as long as the shapes aren’t too deep. This might affect drying time, though!
- Inclusions: Try pressing small, flat dried leaves or tiny lightweight feathers into the wet mixture for a different look. Make sure they are fully submerged or they might fall off later.
- Sparkle Boost: Add iridescent glitter for extra shimmer that catches the light beautifully.
Tips for Success
Making these is pretty straightforward, but a few little tips can help ensure yours turn out perfectly!
- Don’t skip the stirring: When heating the mixture, constant stirring is key to prevent lumps and ensure it thickens evenly.
- Get the right consistency: The mixture should be thick like a thin pudding or a thick syrup when you take it off the heat. If it’s too watery, it won’t set properly. If it gets way too thick and clumpy, it might have cooked too long.
- Pour thinly: Thicker suncatchers take much longer to dry and might not be as translucent. Aim for about the thickness of a credit card or slightly thicker.
- Be patient with drying: This is the hardest part! Don’t try to move or punch them before they are fully dry and firm, or they might tear. Drying time really does vary based on humidity and thickness.
- Flipping is important: Flipping them halfway through the drying process helps air circulate and ensures both sides dry evenly, preventing curling.
How to Store It
These suncatchers are meant to be hung and enjoyed! Since they are made from natural, biodegradable ingredients, they aren’t designed for indefinite storage. Once they are dry, the best place for them is hanging in a window, catching the light!
- For Gifting: If you’re gifting them, make sure they are completely dry before packaging. Wrap them gently in tissue paper or place them in a small box to protect them.
- Shelf Life: Hung in a dry spot indoors, they should last quite a while! Avoid hanging them in areas with high moisture (like a steamy bathroom window) as they could potentially soften over time. They aren’t waterproof.
FAQs
Got questions? Let’s tackle a couple of common ones!
Can I make a bigger batch?
Absolutely! Just scale up the ingredients proportionally. Make sure you use a larger saucepan and have enough non-stick surface area to pour the mixture thinly so it can dry properly.
Why isn’t my suncatcher drying?
The most common reasons are humidity or pouring the mixture too thick. Make sure you are drying them in a relatively dry room. If they are very thick, they will just take longer. Patience is key here!
Can I hang these outside?
These bioplastic suncatchers are best for indoor use. Rain or high humidity outside can cause them to get soft or even dissolve over time, since they are made from water-soluble ingredients.
There you have it! A simple, beautiful craft that brings a little extra light and color into your home using just a few pantry staples. I hope you have as much fun making these as I do. Happy crafting!
Easy DIY Bioplastic Suncatchers: Capture the Rainbow!
Ingredients
Equipment
Method
- Measure out water, cornstarch, white vinegar, and unflavored gelatin directly into your saucepan. Stir with a whisk or spoon until smooth and no clumps remain. You want a nice, milky, uniform liquid.
- Place your saucepan over medium-low heat. Stir constantly for about 3 to 5 minutes. The mixture will start to thicken and become translucent or gel-like. Once it’s thick enough to coat the back of a spoon and has lost its cloudy look, take it off the heat immediately. Do not let it boil vigorously.
- Carefully divide the warm (but not boiling hot!) mixture into a few small bowls – one bowl for each color you want to make. Stir your chosen coloring into each bowl. Start with just a tiny bit and add more until you get the shade you like.
- Pour thin layers of your colored mixture onto your non-stick surface. You can pour different colors side-by-side, swirl them together gently with a toothpick, or create abstract shapes. While the mixture is still wet, sprinkle on your optional decorations like glitter, small dried flower petals, or tiny bits of tissue paper. Use a toothpick to gently arrange petals or swirl glitter around.
- Let your suncatchers dry completely at room temperature. This will take anywhere from 24 to 48 hours, sometimes longer depending on humidity or thickness. After about 12-24 hours, they should be firm enough to carefully peel off your surface and flip over to help the other side dry fully. They will become firm and flexible as they dry.
- Once they are completely firm and feel dry to the touch (they'll be hard but still a little pliable), grab your hole punch. Carefully punch a hole near the top edge of each suncatcher. Thread some string or wire through the hole, tie a loop, and they are ready to hang!
Notes
- Constant stirring while heating is key to prevent lumps and ensure even thickening.
- Mixture should be thick like thin pudding or thick syrup when removed from heat.
- Pour thinly (about credit card thickness) for faster drying and better translucency.
- Be patient with drying; do not move or punch holes until fully dry and firm.
- Flipping them halfway through drying helps even drying and prevents curling. Substitutions & Additions:
- Experiment with non-toxic craft acrylic paint for coloring (use food-safe options for kitchen-based crafts).
- Pour into shallow silicone molds (like ice cube trays) for different shapes (may affect drying).
- Press small, flat dried leaves or lightweight feathers into the wet mixture.
- Add iridescent glitter for extra shimmer. Storage:
- Suncatchers are best hung in a dry spot indoors. Avoid high moisture areas.
- For gifting, ensure completely dry before packaging gently in tissue paper or a box.
- They are not waterproof and not designed for indefinite storage or outdoor use.
Your point of view caught my eye and was very interesting. Thanks. I have a question for you.
I am truly grateful to the holder of this web page who has shared
this great piece of writing at at this place.
Review my homepage reputation rhino plauge
Thank you for your sharing. I am worried that I lack creative ideas. It is your article that makes me full of hope. Thank you. But, I have a question, can you help me? gate io konto
I don’t think the title of your article matches the content lol. Just kidding, mainly because I had some doubts after reading the article. https://accounts.binance.com/register/person?ref=GGYHGRE