
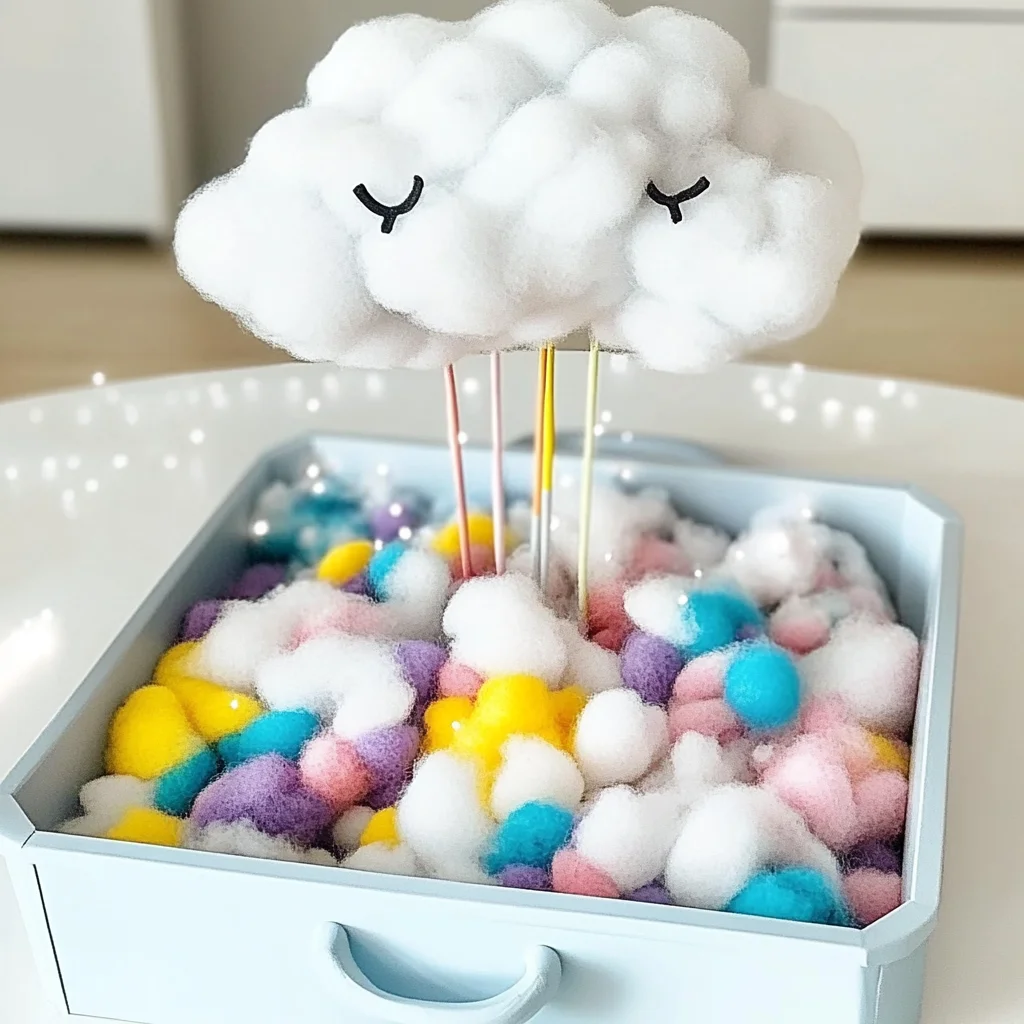
Imagine a cozy afternoon filled with the sound of laughter and the soft whisper of imagination. Crafting a Thundercloud Sensory Bin is not just a fun activity; it is an adventure that whisks you and your little ones away into a world of creativity and exploration. This project is special because it engages multiple senses, allowing you to touch, see, and even hear the magic of a thunderstorm without the rain. Picture yourself creating fluffy clouds, sparkling raindrops, and swirling winds—all from the comfort of your home. As you dive into this delightful DIY, you will find joy not only in the creation but also in the shared moments of discovery and play.
Why You’ll Love Thundercloud Sensory Bin
- Beginner-friendly
- Budget-friendly
- Creative and fun
- Great for kids and families
- Perfect for gifts or decorations
- Customizable
The Heart Behind This DIY
The beauty of the Thundercloud Sensory Bin lies in its ability to spark imagination and encourage sensory exploration. As you create, you and your children can engage in conversations about weather, colors, and textures. Crafting like this fosters mindfulness, allowing you to be present in the moment and appreciate the simple joy of making something with your own hands. It’s a wonderful way to build confidence, creativity, and connection as you share stories and ideas while bringing your thundercloud to life.
A Gentle Look at the Process
In the process of creating your Thundercloud Sensory Bin, you will experience the satisfaction of layering textures and colors to form a whimsical scene. You will start with the soft cotton balls representing clouds, adding pops of color with pom-poms and beads that mimic raindrops. The gentle mist from the spray bottle will create an enchanting atmosphere, transforming your sensory bin into a magical thunderstorm. It’s all about the experience, the laughter, and the wonder that unfolds as you watch your creation come to life.
Materials You’ll Need
- 1 large plastic bin: This will be the base of your sensory bin.
- 2 cups of cotton balls: These fluffy clouds will form the foundation.
- 1 cup of silver or gray pom-poms: To add dimension and a touch of sparkle to your clouds.
- 1 cup of blue and white beads or marbles: These will represent the delightful raindrops.
- 1 cup of shredded blue and white tissue paper: For a splash of color and added texture.
- 1 cup of water in a spray bottle: To create a misty effect, enhancing the sensory experience.
- 1 small container of glitter (optional): For a magical, twinkling touch.
- 1 plastic thunder or lightning bolt toy (optional): To bring your scene to life with a fun visual element.
Step-by-Step Directions
Step 1
Begin by placing your large plastic bin on a flat, stable surface. This is where your thundercloud adventure will unfold, so choose a spot that invites creativity and play.
Step 2
Add the cotton balls to the bin, forming a soft, fluffy layer that represents the clouds. As you place them in, you can enjoy the texture and feel of the cotton, encouraging your little ones to explore as they help.
Step 3
Scatter the silver or gray pom-poms throughout the cotton balls. This will enhance the cloud effect and add a delightful sparkle. Invite your children to help with this step, encouraging them to create their own unique cloud formations.
Step 4
Pour in the blue and white beads or marbles, allowing them to cascade like raindrops falling from the sky. Watch as they roll and clink together, creating a soothing sound that mimics a gentle rain.
Step 5
Next, add the shredded blue and white tissue paper. This will not only add more color to your sensory bin but also create exciting textures for little hands to explore.
Step 6
Lightly spray the contents of the bin with water from your spray bottle. This adds a lovely misty effect, making the scene feel alive and vibrant. Be mindful to spray gently, so the cotton balls don’t get too wet.
Step 7
If you wish, sprinkle glitter over the top for that magical touch. It will catch the light and add an enchanting sparkle to your clouds.
Step 8
Optionally, place the plastic thunder or lightning bolt toy in the bin. This fun addition will stimulate imaginative play, helping children envision their own thunderstorm stories.
Step 9
Now, step back and allow your children to explore and play with the sensory bin. Encourage them to use their imagination to create thunderstorm adventures, fostering creativity and sensory exploration.
Creative Ways to Use Thundercloud Sensory Bin
Your Thundercloud Sensory Bin is not just for play; it can be a beautiful display piece as well. Consider using it as a centerpiece for a weather-themed party or a unique gift for a child. This sensory bin can also be an educational tool, helping little ones learn about weather patterns while they play. Additionally, it makes for a calming sensory experience during quiet time, inviting children to explore at their own pace.
How to Store, Preserve, or Reuse Thundercloud Sensory Bin
When playtime is over, you can easily store your Thundercloud Sensory Bin. Simply cover it with a lid or plastic wrap to keep the contents fresh and ready for the next adventure. If you notice any moisture, allow it to air out before storing. This sensory bin can be reused by simply refreshing the materials or adding new elements to keep the experience exciting.
Creative Variations and Customizations
- Color variations: Experiment with different shades of blue or add other colors for a rainbow effect.
- Theme ideas: Create a seasonal sensory bin, like a winter wonderland with white cotton balls and silver accents.
- Seasonal adaptations: Use autumn colors for a fall-themed sensory bin with red and orange pom-poms.
- Kid-friendly modifications: Let kids choose their favorite colors and materials to personalize their sensory experience.
- Advanced creative upgrades: Incorporate scented oils for an olfactory experience, enhancing the sensory bin’s allure.
Tips for Success
- Avoid over-spraying the contents to keep the cotton balls fluffy.
- Ensure all materials are safe for children, especially if they are young.
- Prepare a cleanup station with damp cloths to make post-play tidy-up easy.
- Encourage creativity by asking children open-ended questions about their sensory bin.
- Remember to join in the fun and play along; it makes the experience even more special!
FAQs About Thundercloud Sensory Bin
Can beginners make this?
Absolutely! This project is designed to be simple and enjoyable for everyone, regardless of crafting experience.
Can children participate?
Yes! This DIY is perfect for children and can be a wonderful shared activity that encourages creativity and exploration.
How long does it last?
With proper care and storage, your sensory bin can last for weeks of play. Just refresh the materials as needed!
Can I customize it?
Definitely! Feel free to add your own unique touches, whether it’s different colors, themes, or additional sensory elements.
A Final Creative Note
As you embark on this crafting journey, remember that creativity is all about self-expression and exploration. Celebrate the time spent together, the stories shared, and the memories created. I hope you feel inspired to dive into your Thundercloud Sensory Bin project and let your imaginations soar. For more delightful recipes, check out my no-bake marshmallow slice or easy homemade cream cheese for treats you will love! Happy crafting!
For more DIY inspiration, follow our Pinterest account!
Thundercloud Sensory Bin
Ingredients
Equipment
Method
- Step 1: Begin by placing your large plastic bin on a flat, stable surface.
- Step 2: Add the cotton balls to the bin, forming a soft, fluffy layer that represents the clouds.
- Step 3: Scatter the silver or gray pom-poms throughout the cotton balls.
- Step 4: Pour in the blue and white beads or marbles, allowing them to cascade like raindrops falling from the sky.
- Step 5: Add the shredded blue and white tissue paper.
- Step 6: Lightly spray the contents of the bin with water from your spray bottle.
- Step 7: If you wish, sprinkle glitter over the top for that magical touch.
- Step 8: Optionally, place the plastic thunder or lightning bolt toy in the bin.
- Step 9: Step back and allow your children to explore and play with the sensory bin.
Solid platform with a lot of exciting options. I really appreciate the transparency in their terms. Give phkavbet a go
[6462]Krikya লগইন ও অ্যাপ ডাউনলোড | বিকাশ দিয়ে অনলাইন ক্যাসিনো গেম,krikya লগইন করার নিয়ম ও অ্যাপ ডাউনলোড লিঙ্ক এখানে পান। বিকাশ দিয়ে অনলাইন casino গেম খেলুন এবং সহজ পদ্ধতিতে অ্যাকাউন্ট খুলুন। আজই জয়েন করুন। visit: krikya