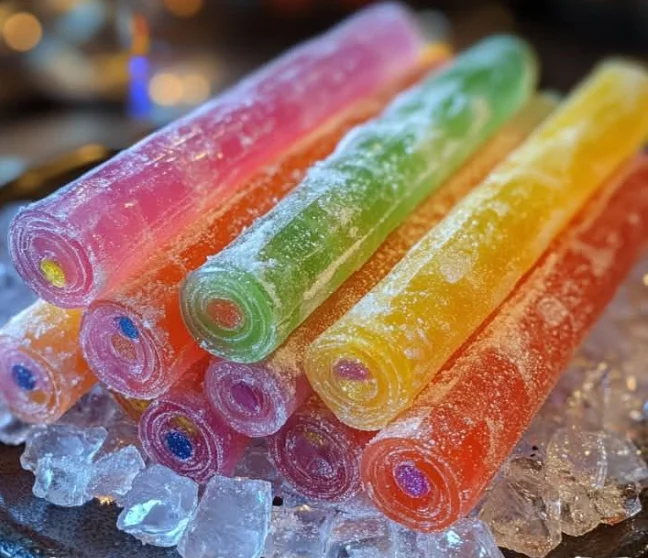
Hey there, friend! Remember those brightly colored, sugary, sometimes-sour candy strips you loved as a kid? The ones that were just pure, unadulterated fun? Well, what if I told you we could bring back a little bit of that joy, but with a fun, grown-up twist? Get ready for Sweet & Sour Vodka Rainbow Rollups! These little bites of happiness are everything you loved about childhood candy, infused with a touch of adult fun. They’re ridiculously easy to make, look super impressive, and are guaranteed to be the star of your next get-together. Trust me, you’re going to fall head over heels for these!
Why You’ll Love This Recipe
- Fast: While there’s chilling time involved, the active prep is super quick!
- Easy: Seriously, if you can boil water, you can make these. No fancy skills needed!
- Giftable: Pack these up in a cute container and you’ve got a unique, homemade gift for your adult friends.
- Crowd-pleasing: Who doesn’t love a little bit of sweet, sour, and boozy fun? These disappear fast!
Ingredients
Gather ’round, let’s talk ingredients! You won’t need anything too fancy here, just a few simple things to create magic.
- 1 cup sour rainbow candy strips: These are the foundation of our “rainbow”! Pick your favorite brand.
- 1 cup vodka: The grown-up magic! Use your favorite brand, nothing too expensive needed here.
- 2 cups fruit-flavored gelatin: Think cherry, lemon, lime, blue raspberry… whatever colorful combo makes your heart happy!
- 2 cups water: Just plain old water to dissolve our gelatin goodness.
- 1/2 cup granulated sugar: For that classic sweet balance.
- 1/2 cup corn syrup: Helps give the gelatin that perfect bendy, roll-up texture. Don’t skip it!
- 1/2 cup sour sugar (optional, for coating): If you want to take the sour factor up a notch and add some sparkle!
How to Make It
Alright, let’s get rolling! Making these is a breeze, I promise.
- First things first, get your saucepan out. Add 2 cups of water and bring it to a rolling boil over medium heat.
- Once it’s bubbling, carefully remove the pan from the heat. This is where the gelatin magic happens! Add your fruit-flavored gelatin packets right into the hot water. Stir, stir, stir until every single granule is completely dissolved. You want it smooth and beautiful.
- Now, whisk in the granulated sugar and corn syrup. Keep stirring until they’re fully dissolved and everything is perfectly incorporated.
- Let the mixture sit for just a few minutes. You want it to cool slightly so it’s warm, but not scorching hot. This helps the vodka mix in nicely.
- Time for the star of the show! Pour in your 1 cup of vodka. Stir it in really well until it’s evenly distributed throughout the gelatin mixture.
- Grab a baking dish or a shallow pan. A 9×13 inch pan works great, or two 8×8 inch pans if you prefer thinner rollups. Lightly grease it. I like to use a little non-stick cooking spray or a tiny bit of neutral oil wiped with a paper towel.
- Carefully pour the vodka-gelatin mixture into your prepared dish. Try to get it in an even layer so all your rollups are the same size.
- Now for the hard part (the waiting!): Place the dish in the refrigerator. Let it chill for 4 to 6 hours, or until it’s completely set and firm. It should feel solid to the touch.
- Once your gelatin is perfectly set, take the dish out of the fridge.
- To make it easy to get out, run a knife carefully around the edges of the dish to loosen the gelatin from the sides.
- Place a clean cutting board or a piece of parchment paper over the top of the dish. Holding them together firmly, quickly turn the dish upside down to release the gelatin block onto the cutting board. Give it a little tap if needed!
- Using a sharp knife or a pizza cutter (my secret weapon for straight lines!), cut the gelatin block into strips about 1 inch wide.
- Grab your sour rainbow candy strips and cut them into similar lengths as your gelatin strips.
- Now for the fun assembly part! Place one sour candy strip on top of a gelatin strip.
- Carefully roll it up tightly from one end to the other.
- Keep rolling until all your gelatin strips are paired up with candy!
- If you want that extra sour kick and a little sparkle, pour your sour sugar onto a plate. Gently roll the finished rollups in the sour sugar to coat them.
- Place the finished rollups on a plate or in an airtight container. Keep them refrigerated until you’re ready to enjoy!

Substitutions & Additions
Feeling creative? Here are a few ways to shake things up:
- Booze Swap: Not a vodka fan? Try white rum, gin, or even a flavored liqueur that pairs well with your gelatin colors (like coconut rum with blue raspberry or lemon liqueur with lemon gelatin).
- Non-Alcoholic Version: Want to make these kid-friendly? Simply omit the vodka and use an extra cup of cold water or fruit juice in step 5!
- Candy Options: Can’t find rainbow strips? Try sour belts, regular fruit leather, or even gummy worms cut lengthwise!
- Extra Sparkle: Add a pinch of edible glitter to the gelatin mixture before chilling for some extra flair.
- Flavor Combo Fun: Mix and match gelatin flavors! Strawberry-lime, orange-cherry, the possibilities are endless!
Tips for Success
A few little pointers to make sure your rollups turn out perfectly every time!
- Dissolve Completely: Make SURE your gelatin, sugar, and corn syrup are fully dissolved in the hot water. Any undissolved bits can make your gelatin uneven or grainy.
- Cool Slightly Before Adding Alcohol: Adding alcohol to super hot liquid can sometimes cause the alcohol to evaporate. Letting it cool just a little helps incorporate the vodka better.
- Grease Your Pan: Don’t skip the greasing step! It makes releasing the set gelatin so much easier.
- Chill Until FIRM: The gelatin needs to be totally set and firm before you try to unmold and cut it. Patience is key here!
- Sharp Knife is Your Friend: A sharp knife or pizza cutter will give you clean, crisp cuts on the gelatin without dragging or tearing.
- Prep Ahead: You can definitely make the gelatin block a day in advance. Just keep it covered in the fridge. Assemble the rollups closer to serving time, as the candy can sometimes get a little sticky if rolled too far ahead.
How to Store It
Keep your tasty rollups fresh! Store them in a single layer (if possible, or with parchment paper between layers) in an airtight container in the refrigerator. They’re best enjoyed within 3-5 days. The longer they sit, the more the candy and gelatin meld together, which isn’t necessarily a bad thing, but the textures might change slightly.
FAQs
Got questions? I’ve got answers!
- Can I use flavored vodka? Absolutely! Flavored vodkas can add an extra layer of deliciousness. Just make sure the flavor pairs well with your chosen gelatin.
- My gelatin is sticky when I try to roll it. What happened? It might not have been chilled long enough, or your kitchen is very warm. Try chilling it for a bit longer. Also, working quickly helps!
- Can I freeze these? I don’t recommend freezing these. The texture of the gelatin can become unpleasant and watery when thawed. They are best enjoyed fresh from the fridge.
- How many does this recipe make? This will depend on how big you cut your strips, but you’ll likely get anywhere from 20-30 rollups from one batch. Perfect for sharing (or not!).
Sweet & Sour Vodka Rainbow Rollups
Ingredients
Equipment
Method
- Step 1: First things first, get your saucepan out. Add 2 cups of water and bring it to a rolling boil over medium heat.
- Step 2: Once it's bubbling, carefully remove the pan from the heat. This is where the gelatin magic happens! Add your fruit-flavored gelatin packets right into the hot water. Stir, stir, stir until every single granule is completely dissolved. You want it smooth and beautiful.
- Step 3: Now, whisk in the granulated sugar and corn syrup. Keep stirring until they're fully dissolved and everything is perfectly incorporated.
- Step 4: Let the mixture sit for just a few minutes. You want it to cool slightly so it's warm, but not scorching hot. This helps the vodka mix in nicely.
- Step 5: Time for the star of the show! Pour in your 1 cup of vodka. Stir it in really well until it's evenly distributed throughout the gelatin mixture.
- Step 6: Grab a baking dish or a shallow pan. A 9x13 inch pan works great, or two 8x8 inch pans if you prefer thinner rollups. Lightly grease it. I like to use a little non-stick cooking spray or a tiny bit of neutral oil wiped with a paper towel.
- Step 7: Carefully pour the vodka-gelatin mixture into your prepared dish. Try to get it in an even layer so all your rollups are the same size.
- Step 8: Now for the hard part (the waiting!): Place the dish in the refrigerator. Let it chill for 4 to 6 hours, or until it's completely set and firm. It should feel solid to the touch.
- Step 9: Once your gelatin is perfectly set, take the dish out of the fridge.
- Step 10: To make it easy to get out, run a knife carefully around the edges of the dish to loosen the gelatin from the sides.
- Step 11: Place a clean cutting board or a piece of parchment paper over the top of the dish. Holding them together firmly, quickly turn the dish upside down to release the gelatin block onto the cutting board. Give it a little tap if needed!
- Step 12: Using a sharp knife or a pizza cutter (my secret weapon for straight lines!), cut the gelatin block into strips about 1 inch wide.
- Step 13: Grab your sour rainbow candy strips and cut them into similar lengths as your gelatin strips.
- Step 14: Now for the fun assembly part! Place one sour candy strip on top of a gelatin strip.
- Step 15: Carefully roll it up tightly from one end to the other.
- Step 16: Keep rolling until all your gelatin strips are paired up with candy!
- Step 17: If you want that extra sour kick and a little sparkle, pour your sour sugar onto a plate. Gently roll the finished rollups in the sour sugar to coat them.
- Step 18: Place the finished rollups on a plate or in an airtight container. Keep them refrigerated until you're ready to enjoy!
2cups flavored gelatin? How many pkgs is that?
AI slop. Go look at the about page.
Thanks for sharing. I read many of your blog posts, cool, your blog is very good.
Can you be more specific about the content of your article? After reading it, I still have some doubts. Hope you can help me.
Can you be more specific about the content of your article? After reading it, I still have some doubts. Hope you can help me. binance h”anvisningskod
So good