
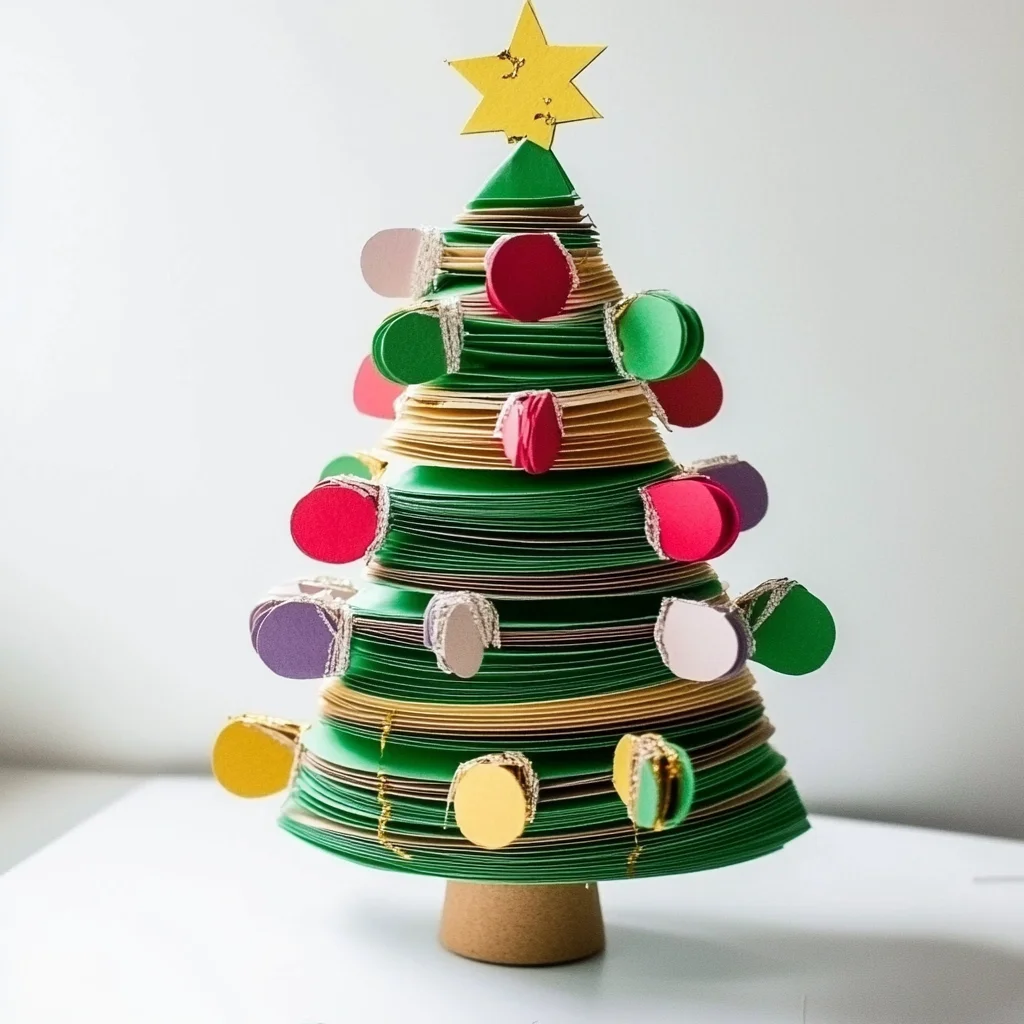
There’s something undeniably magical about the holidays, isn’t there? The air fills with joy, laughter, and the sweet scent of pine, and our homes transform into winter wonderlands. Today, I want to share a delightful DIY project that will bring a sprinkle of that festive magic to your space: making your very own Paper Christmas Tree Decoration. This project is not only a wonderful way to express your creativity but also a perfect opportunity to gather your loved ones and create something beautiful together. Imagine the soft rustle of paper, the gentle hum of holiday tunes in the background, and the joy of watching your unique creations come to life. Let’s dive into this heartwarming craft that’s sure to fill your home with cheer!
Why You’ll Love Paper Christmas Tree Decoration
- Beginner-friendly
- Budget-friendly
- Creative and fun
- Great for kids and families
- Perfect for gifts or decorations
- Customizable
The Heart Behind This DIY
Crafting has a special way of connecting us to our hearts and to each other. As you gather your materials and start this Paper Christmas Tree Decoration, you’ll find yourself immersed in the soothing rhythm of creation. This project encourages mindfulness as you focus on each cut and fold, allowing worries to drift away. The act of making something with your hands fosters creativity, boosts confidence, and nurtures a sense of accomplishment. Plus, it’s a fantastic way to bond with family or friends, creating cherished memories that will last long after the decorations are put away.
A Gentle Look at the Process
As we prepare to create, picture yourself surrounded by colorful construction paper and an array of decorative items. You’ll be cutting, gluing, and layering in a delightful dance of creativity. The process is simple yet rewarding, allowing you to craft a beautiful 3D tree that reflects your unique style. Each step is an opportunity for exploration and self-expression, making it a delightful experience for everyone involved.
Materials You’ll Need
- Construction paper (green and other colors) – this will form the base of your tree and decorations.
- Scissors – for cutting out tree shapes and ornaments.
- Glue or double-sided tape – to secure your decorations in place.
- String or ribbon – for hanging your beautiful creation.
- Decorative items (glitter, stickers, or markers) – to add sparkle and personality to your tree.
Step-by-Step Directions
Step 1
Start by cutting the green construction paper into the shape of a Christmas tree. You can create several layers by cutting different sizes of triangles, which will give your tree a lovely dimension. Picture those vibrant greens against the backdrop of your holiday decor!
Step 2
Next, let your imagination run wild! Cut out ornaments and decorations from the colored construction paper. Think about bright reds, cheerful blues, or sparkling golds. This is where you can truly personalize your tree and make it festive!
Step 3
Now comes the fun part. Use glue or double-sided tape to attach the decorations to the tree. If you have glitter or stickers, don’t hold back! Adorn your tree with these delightful accents and watch it come to life.
Step 4
To create a stunning 3D effect, stack the triangles on top of each other, securing each layer with glue or tape. As you build, take a moment to admire your work; each layer adds depth and character to your tree.
Step 5
Once you have your tree assembled, attach a piece of string or ribbon at the top of the tree for hanging. This little touch will make it easy to display your beautiful creation wherever you like.
Step 6
Finally, add any additional decorative items, such as glitter or extra stickers, to enhance the design. Allow the decoration to dry completely before displaying it proudly.
Creative Ways to Use Paper Christmas Tree Decoration
Once you’ve completed your Paper Christmas Tree Decoration, the possibilities are endless! Hang it on your holiday tree, display it on a mantel, or use it as a centerpiece for your festive table. You can even gift these charming creations to friends and family as a heartfelt gesture. Imagine their delight when they receive a handmade ornament that carries your personal touch!
How to Store, Preserve, or Reuse Paper Christmas Tree Decoration
To keep your beautiful creations safe for next year, store them in a flat box or a protective container. Avoid placing heavy items on top to preserve their shape. If you’d like to reuse them, consider refreshing your design with new decorations or colors each year for a fun twist!
Creative Variations and Customizations
- Color variations – try different shades of green or even go for a winter wonderland theme with blues and whites.
- Theme ideas – create a rustic tree with brown and gold or a whimsical tree with bright, playful colors.
- Seasonal adaptations – make a spring tree with floral decorations for a fresh look.
- Kid-friendly modifications – let children create their own designs with their favorite characters or themes.
- Advanced creative upgrades – consider adding lights or making a garland to hang alongside your trees.
Tips for Success
- Common mistakes to avoid – ensure your glue is completely dry before hanging to prevent any mishaps.
- Safety tips – supervise young children with scissors and glue to ensure a safe crafting experience.
- Preparation suggestions – gather all materials beforehand to create a smooth crafting session.
- Cleanup recommendations – keep a damp cloth nearby for easy cleanup of any glue spills.
- Expert crafting tips – don’t hesitate to experiment! The best creations often come from trying new ideas.
FAQs About Paper Christmas Tree Decoration
Can beginners make this?
Absolutely! This project is beginner-friendly and perfect for anyone looking to dive into the world of crafting.
Can children participate?
Yes! This is a fantastic project for kids, with adult supervision to help with cutting and using glue.
How long does it last?
With proper care, your paper decoration can last for many seasons. Just store it safely after the holidays.
Can I customize it?
Definitely! Feel free to use different colors, decorations, and themes to make it uniquely yours.
A Final Creative Note
As you wrap up your crafting session, take a moment to appreciate the joy of creating something with your own hands. Every snip and every layer tells a story, and I hope this Paper Christmas Tree Decoration brings warmth and cheer to your home. Embrace your creativity, share your finished pieces with loved ones, and enjoy the heartwarming spirit of the holidays! For more delightful recipes, check out the easy homemade cream cheese or the moist cinnamon applesauce bread for treats you will love!
For more DIY inspiration, follow our Pinterest account!
Paper Christmas Tree Decoration
Ingredients
Equipment
Method
- Step 1: Choose your preferred paper colors and patterns. Use a ruler and pencil to measure and mark triangles or conical shapes in several different sizes.
- Step 2: Carefully cut along the marked pencil lines with scissors to create multiple triangles of varying sizes.
- Step 3: Start with the largest triangle as the base. Apply glue or double-sided tape and stack the smaller triangles on top to form a layered Christmas tree shape.
- Step 4: Gently hold the paper pieces together for a few seconds until the adhesive grips securely. Allow the adhesive to set before decorating.
- Step 5: Decorate the finished tree with glitter, stickers, stars, small paper ornaments, or other festive embellishments.