Remember those magical summer nights filled with the crackle and pop of fireworks? There’s something so captivating about those bursts of color lighting up the night sky. Well, what if I told you that you could recreate that explosive magic right in your own home, without any of the fuss or loud noises? Today, we’re diving into a super fun and easy craft that’s guaranteed to bring a smile to your face: DIY Firework Salt Painting!
This project is perfect for a rainy afternoon, a festive celebration, or just a creative escape. It’s incredibly simple, surprisingly quick, and the results are absolutely stunning. You don’t need to be an artist to create these vibrant, shimmering masterpieces. In fact, it’s a fantastic way to introduce kids to the joy of art and color, or just to de-stress yourself after a long day. I love how this craft uses everyday items to create something truly special!
Why You’ll Love DIY Firework Salt Painting
- Fast: You can create a beautiful firework scene in under 30 minutes!
- Easy: Simple steps that are perfect for beginners and kids.
- Giftable: These vibrant paintings make thoughtful, handmade gifts.
- Crowd-pleasing: Guaranteed to impress everyone, from little ones to grown-ups.
Ingredients
Gathering your supplies is a breeze! Here’s what you’ll need:
- Black construction paper or watercolor paper: The dark background makes the fireworks pop beautifully. If you don’t have black, any dark paper will do!
- White liquid glue: This is what creates the magical lines for your fireworks.
- Table salt: The star of the show that makes the colors spread and shimmer!
- Watercolors: Grab your favorite vibrant colors to bring your fireworks to life.
- Small paintbrushes: Perfect for delicate color application.
- Water cup: To rinse your brushes and mix colors.
- Tray or baking sheet: This is super handy for catching any excess salt.
How to Make DIY Firework Salt Painting
Ready to create some magic? Let’s get started!
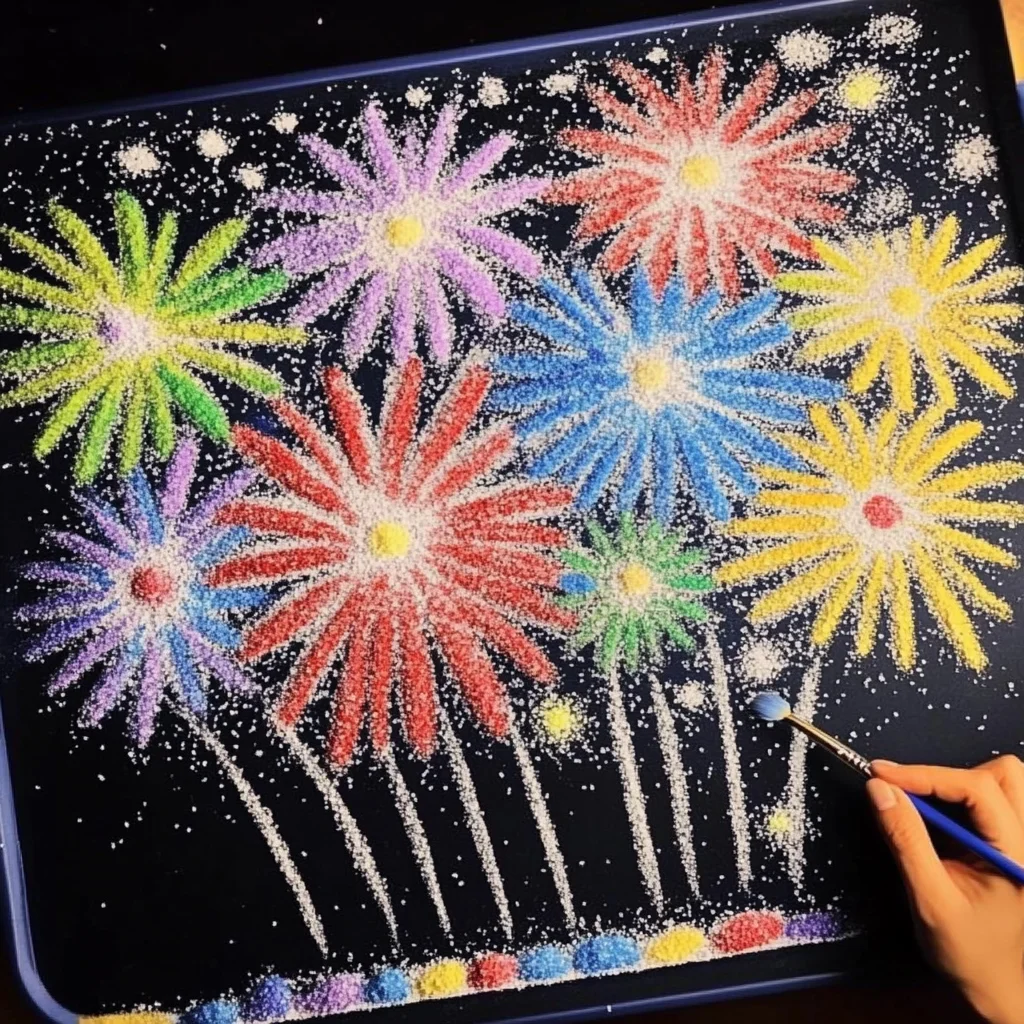
- Draw Your Fireworks: Grab your white glue and let your creativity flow! Draw firework designs onto your paper. Think about creating starburst shapes by drawing lines radiating from a center point, or make exploding patterns. Don’t worry about perfection; the salt will do its magic.
- Salt It Up!: While the glue is still nice and wet, generously sprinkle table salt all over the glue lines. You want to make sure the salt adheres well. Gently tap the excess salt back onto your tray. Now, let your masterpiece dry for about 15 minutes. The salt will stick to the glue as it dries.
- Add the Color: This is where the real magic happens! Dip a paintbrush into your watercolors. You can use a single color or mix a few. Gently touch the tip of the brush to the salted glue lines. Watch in amazement as the color travels along the salt, creating a beautiful, diffused effect! Use different colors for different fireworks – blues, reds, yellows, greens – go wild! If you’re looking for more colorful craft ideas, check out our easy colorful DIY play dough recipe for more vibrant fun.
- Let it Dry: Once you’re happy with your colorful explosions, let your artwork dry completely. This might take a bit longer depending on how much watercolor you used.

Substitutions & Additions
Want to switch things up or add a little extra sparkle? Here are some ideas:
- Glitter: For an extra dazzling effect, sprinkle some fine glitter over the wet glue before adding the salt.
- Different Papers: While black paper is stunning, experiment with deep blue or even purple paper for a different night sky feel.
- Washable Markers: Instead of watercolors, you can try using the tips of markers dipped in water for a more concentrated color.
- Embossing Powder: For a raised, textured effect similar to embossing, try sprinkling embossing powder over the wet glue, then heat setting it before adding watercolor.
- Add Star Details: Once dry, you can use a fine brush or a white gel pen to add tiny white dots for extra stars or a more defined center to your fireworks.
Tips for Success
A few little tricks to make your salt painting even better:
- Thicker Glue: Use a good amount of white glue; a thin layer won’t hold enough salt.
- Don’t Skimp on Salt: Be generous with the salt! It’s what creates the amazing color diffusion.
- Gentle Touch: When applying watercolors, touch the salt lines gently. Pressing too hard can cause the glue to break down and the colors to become muddy.
- Prep Ahead: If you’re doing this with a group, you can have all the papers with glued designs ready to go before starting the salting and painting process.
- Protect Your Surface: Always use a tray or newspaper underneath your work area, especially when salting and painting, to catch any spills.
How to Store DIY Firework Salt Painting
Once your beautiful firework paintings are completely dry, you can frame them, hang them on the fridge, or even use them as unique cards. They’re quite delicate, so handle them with care. They should last for years if stored flat and protected from moisture. If you’re looking for more creative projects to brighten your home, you might enjoy our DIY Melted Bead Suncatchers or our DIY Flower Salt Painting Craft.
FAQs
Can kids do this craft independently?
Yes, with supervision, this craft is very kid-friendly! Younger children might need help with the glue application, but they’ll have a blast with the salting and painting steps.
What kind of paper is best?
Watercolor paper is ideal as it can handle a bit of moisture from the watercolors. However, sturdy black construction paper works well too, just be a little gentler with the watercolor application.
Can I use glitter instead of salt?
You can definitely use glitter! Sprinkle it over the wet glue before it dries for an extra sparkly effect. For a similar texture-spreading effect as salt, glitter works wonderfully.
How do I make the colors brighter?
To achieve brighter colors, use more concentrated watercolors. You can mix a bit less water into your paints or use multiple layers of color once the first layer has dried slightly.
I hope you have as much fun creating these DIY Firework Salt Paintings as I do! They’re such a delightful way to add a splash of color and creativity to your day.
For more inspiring craft ideas and recipes, be sure to follow us on Pinterest!
DIY Firework Salt Painting
Ingredients
Equipment
Method
- Step 1: Draw Your Fireworks: Grab your white glue and let your creativity flow! Draw firework designs onto your paper. Think about creating starburst shapes by drawing lines radiating from a center point, or make exploding patterns. Don't worry about perfection; the salt will do its magic.
- Step 2: Salt It Up!: While the glue is still nice and wet, generously sprinkle table salt all over the glue lines. You want to make sure the salt adheres well. Gently tap the excess salt back onto your tray. Now, let your masterpiece dry for about 15 minutes. The salt will stick to the glue as it dries.
- Step 3: Add the Color: This is where the real magic happens! Dip a paintbrush into your watercolors. You can use a single color or mix a few. Gently touch the tip of the brush to the salted glue lines. Watch in amazement as the color travels along the salt, creating a beautiful, diffused effect! Use different colors for different fireworks – blues, reds, yellows, greens – go wild!
- Step 4: Let it Dry: Once you're happy with your colorful explosions, let your artwork dry completely. This might take a bit longer depending on how much watercolor you used.