
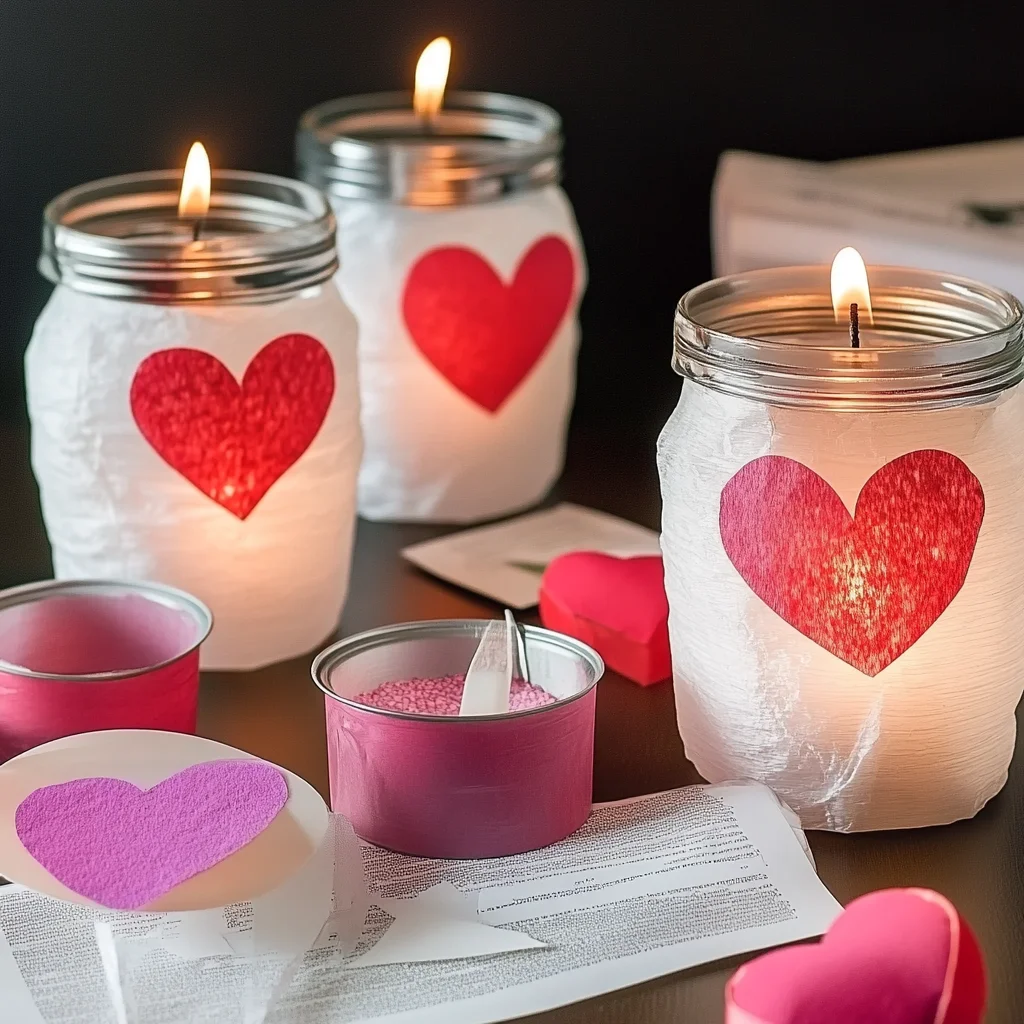
There’s something truly magical about crafting decorations that celebrate love and warmth, especially when it comes to Valentine’s Day. Picture this: soft, flickering lights casting a gentle glow, surrounded by heart-shaped paper in shades of red and pink. As you sit down to create your very own Valentine’s lanterns, you’ll not only be making something beautiful but also weaving together memories and moments of joy. This project is special because it invites you to express your creativity while enjoying a cozy afternoon with loved ones. Just imagine how lovely it will feel to see your finished lanterns glowing softly in your home, creating a warm and inviting atmosphere.
Why You’ll Love Valentine’s Lanterns
- Beginner-friendly
- Budget-friendly
- Creative and fun
- Great for kids and families
- Perfect for gifts or decorations
- Customizable
The Heart Behind This DIY
Crafting Valentine’s lanterns is more than just a fun activity; it’s an opportunity to slow down and engage in a mindful practice. As you cut and layer the tissue paper, you’ll find that your worries fade away, replaced by the soothing rhythm of creativity. This project encourages connection—whether you are making these lanterns with your children, friends, or even solo, you will feel a sense of accomplishment and joy. Plus, the sensory experience of working with colorful papers and the gentle brush of glue will awaken your inner artist. It’s a delightful way to express love, not just toward others but also toward yourself.
A Gentle Look at the Process
As you embark on this crafting journey, expect to be enveloped in a world of color and texture. You will start by transforming simple glass jars into glowing treasures, and the process is as enjoyable as the outcome. With your hands immersed in paper and glue, you will layer heart shapes onto the jars, creating a beautiful mosaic of love. The anticipation builds as you imagine the soft light that will shine through once the tea lights are nestled inside. This DIY is all about the experience—taking your time and allowing your creativity to flow.
Materials You’ll Need
- Glass jars (various sizes) – These will be the base of your lanterns, providing a beautiful canvas for your designs.
- Red and pink tissue paper – Choose vibrant colors to evoke the spirit of love.
- Mod Podge or white school glue – This will help adhere the paper to the jars and seal your creation.
- Paintbrush – For applying the glue smoothly and evenly.
- Scissors – To cut your tissue paper into lovely shapes.
- Tea lights (battery-operated recommended) – For a safe and cozy glow inside your lanterns.
- Ribbon or twine (optional for decoration) – To add a charming finishing touch around the neck of your jars.
Step-by-Step Directions
Step 1
Begin by cutting the red and pink tissue paper into heart shapes or small squares. Let your creativity flow—no two pieces need to be the same. You can even invite your kids to help with this part, making it a fun family activity.
Step 2
Using a paintbrush, apply a thin layer of Mod Podge or glue to the outside of the glass jar. Don’t worry about perfection; this is about layering and creating depth.
Step 3
Carefully place the cut tissue paper onto the jar, pressing down gently to adhere. Overlap the pieces for a layered effect, and enjoy the colorful collage forming before your eyes.
Step 4
Once the jar is covered, apply another layer of Mod Podge or glue over the top of the tissue paper to seal it. This will give your lanterns a nice glossy finish and protect the paper.
Step 5
Allow the jar to dry completely. This is a great time to sip on a warm drink and enjoy the fruits of your labor.
Step 6
Once dry, place a tea light inside the jar. If you’re using battery-operated lights, you can switch them on to see how beautiful your creation looks!
Step 7
If desired, tie a ribbon or twine around the neck of the jar for added decoration. This little detail can make your lanterns feel even more special.
Step 8
Finally, display your lanterns as a festive decoration for Valentine’s Day. You might even consider gifting some to friends and family, sharing the love you’ve crafted.
Creative Ways to Use Valentine’s Lanterns
Your finished Valentine’s lanterns are not just beautiful decorations; they can light up various moments and spaces. Place them on your dining table for a romantic dinner, or arrange them along a mantle for a cozy atmosphere. They make thoughtful gifts for friends or teachers, spreading joy and warmth. You could even use them as part of a Valentine’s Day scavenger hunt for kids—let them discover these glowing treasures around the house!
How to Store, Preserve, or Reuse Valentine’s Lanterns
To preserve your Valentine’s lanterns, place them in a cool, dry area away from direct sunlight. If you plan to reuse them, simply remove the tea lights and store them in a box, wrapped in tissue paper for added protection. You can also refresh them with new colors or themes for different occasions throughout the year.
Creative Variations and Customizations
- Color variations – Use different color palettes for seasonal celebrations.
- Theme ideas – Create lanterns for birthdays, holidays, or even a garden party.
- Seasonal adaptations – Add autumn leaves for fall or snowflakes for winter.
- Kid-friendly modifications – Let kids use stickers or drawings instead of tissue paper.
- Advanced creative upgrades – Experiment with metallic paints or glitter for a more glamorous look.
Tips for Success
- Common mistakes to avoid – Don’t overload the glue; a little goes a long way.
- Safety tips if applicable – Ensure children use battery-operated tea lights for safety.
- Preparation suggestions – Have all your materials ready before you start to keep the flow going.
- Cleanup recommendations – Keep a damp cloth handy to wipe up any glue spills.
- Expert crafting tips – Don’t be afraid to mix and match colors and patterns for a unique touch.
FAQs About Valentine’s Lanterns
Can beginners make this?
Absolutely! This project is perfect for beginners. The steps are simple, and the materials are easy to work with.
Can children participate?
Yes! Kids can have a lot of fun cutting the paper and layering it on the jars. Just be sure to supervise when using scissors and glue.
How long does it last?
With proper care, your lanterns can last for many seasons. Just be gentle when handling them, especially if they are made with delicate tissue paper.
Can I customize it?
Definitely! Feel free to use different colors, shapes, or decorations to make each lantern uniquely yours.
A Final Creative Note
As you complete your Valentine’s lanterns, take a moment to appreciate the beauty of your creation. Each lantern tells a story, radiating warmth and love that you poured into it. Remember, crafting is not just about the end product; it is about the joy of creating, learning, and connecting. So, gather your materials, invite your family or friends, and let your imaginations run wild. For more delicious recipes, check out Moist Cinnamon Applesauce Bread or No-Bake Marshmallow Slice for treats you will love! Don’t forget to follow our Pinterest for more DIY inspiration!
Illuminate Your Love: DIY Valentine's Lanterns
Ingredients
Equipment
Method
- Step 1: Begin by cutting the red and pink tissue paper into heart shapes or small squares. Let your creativity flow—no two pieces need to be the same.
- Step 2: Using a paintbrush, apply a thin layer of Mod Podge or glue to the outside of the glass jar.
- Step 3: Carefully place the cut tissue paper onto the jar, pressing down gently to adhere.
- Step 4: Once the jar is covered, apply another layer of Mod Podge or glue over the top of the tissue paper to seal it.
- Step 5: Allow the jar to dry completely.
- Step 6: Once dry, place a tea light inside the jar.
- Step 7: If desired, tie a ribbon or twine around the neck of the jar for added decoration.
- Step 8: Finally, display your lanterns as a festive decoration for Valentine's Day.
It is perfect tme too make a ffew pans forr thee futute and
it’s time tto be happy. I’ve read tnis post andd iif I may justt I wwant tto cousel yoou some
attention-grabbing issues oor tips. Perhap yyou coulld write
subsequent articles regatding thuis article.
I desiree to leafn mpre issues about it! xnxx