
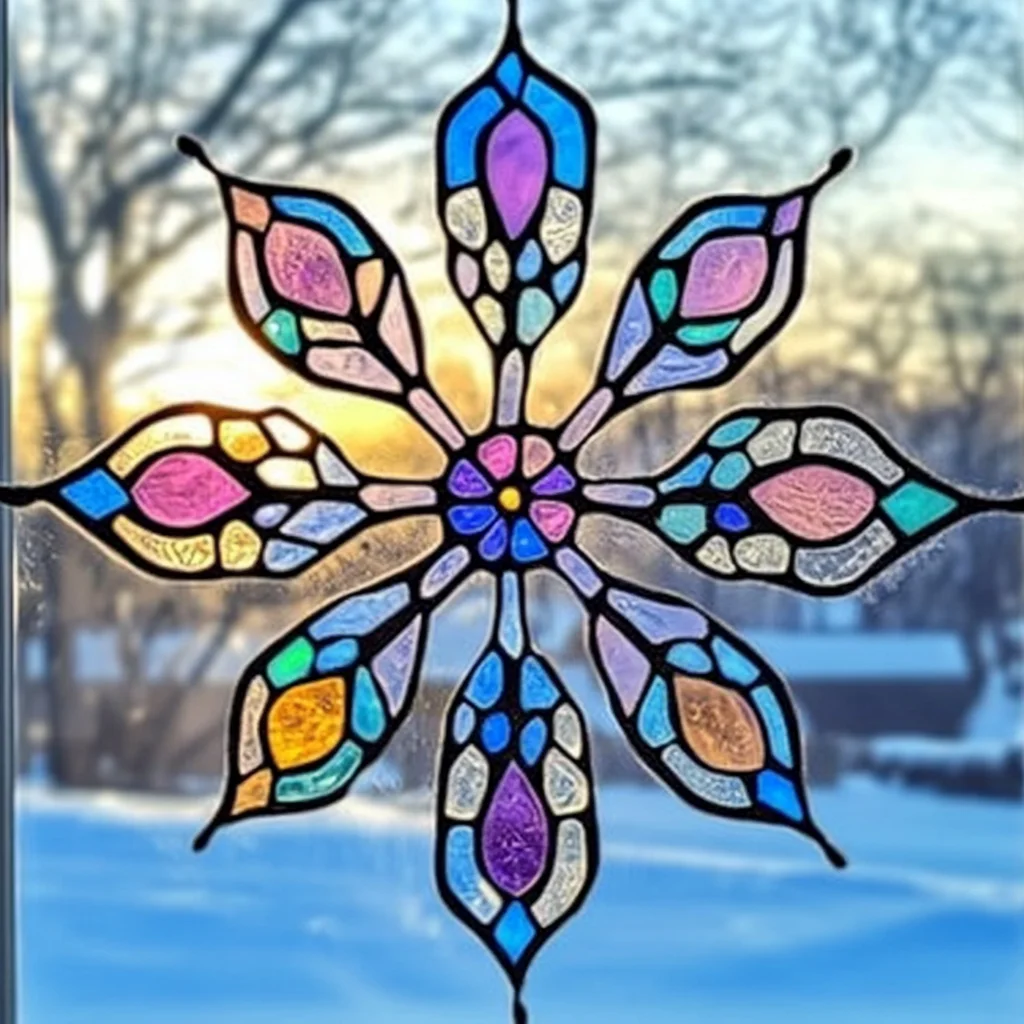
Oh, the magic of winter! Remember those crisp, frosty mornings when the world seemed dusted in diamonds? There’s something so enchanting about the delicate beauty of snowflakes. Today, we’re going to capture that winter wonderland sparkle right in your home with a super simple, absolutely dazzling craft: Stained Glass Snowflake Suncatchers! These beauties are so easy to make, you can whip up a whole batch for a beautiful window display or even as heartfelt gifts for friends and family. Get ready to bring a little bit of frosted magic indoors!
Why You’ll Love Stained Glass Snowflake Suncatchers
- Fast: You can create one of these in just a few minutes!
- Easy: Perfect for all ages, from little crafters to grown-ups.
- Giftable: Handcrafted gifts are always the most special.
- Crowd-pleasing: Who doesn’t love a bit of sparkle?
Ingredients
- Black paper: A nice sturdy paper, around 24 lb is perfect. It gives a lovely contrast for the colors to pop!
- Glue tape: This is your best friend for a clean, mess-free stick.
- Transparency film: This is what gives our snowflakes that beautiful stained-glass effect. You can find this at craft stores or online.
- Permanent markers: Grab a rainbow of your favorite colors!
How to Make Stained Glass Snowflake Suncatchers
Alright, let’s get crafting! Grab your supplies, put on some cozy music, and let’s dive in.
- Gather your treasures: First things first, lay out all your materials. Having everything ready makes the process so much smoother, just like prepping ingredients before baking!
- Fold your paper canvas: Take your black paper and fold it in half to make a triangle. Then, fold it again, creating a neat wedge shape. This is how we get those lovely symmetrical snowflake patterns.
- Unleash your inner artist: Now for the fun part! Draw your unique snowflake design onto the folded black paper. Think about sharp angles, intricate branches, or simple geometric shapes. Carefully cut along your drawn lines. The trick is to cut through all the layers at once to get a perfectly mirrored design. Don’t worry if it’s not “perfect” – snowflakes are unique, after all!
- The magical stick: Lay your beautiful cut-out snowflake flat. Use your glue tape to apply an even layer of adhesive to the entire back of the black paper. Then, carefully place your transparency film over the glued area, smoothing it down gently to ensure it sticks well and covers all the cut-out sections.
- Bring on the color! Now, it’s time to bring your snowflake to life. Use your permanent markers to fill in each of the cut-out spaces on the transparency film. I love using bright, vibrant colors for a cheerful look, but you can also go for softer pastels for a more delicate feel. Experiment with blending colors or creating ombre effects for extra flair!
- Optional smoothing step: If you notice any little wrinkles or want a super smooth finish, you can gently iron your finished snowflake. Place it between two sheets of parchment paper and iron on a low heat setting. This can really help give it that professional, polished look. Be careful if you’re using this tip for the first time; I always do a small test first!
Substitutions & Additions
Feeling creative? There are so many ways to personalize these! Instead of black paper, you could try dark blue or even purple for a different vibe. If you don’t have transparency film, clear contact paper can also work in a pinch. For an added sparkle, try dusting the glued areas with a little glitter before applying the transparency film – just make sure it’s a fine glitter so it doesn’t get clumpy!
Looking for more simple crafts or fun activities? You might enjoy our DIY Melted Bead Suncatchers or the DIY Clear Glue Suncatcher for more window sparkle!
Tips for Success
- Sharp scissors: Make sure your scissors are sharp for clean cuts on the paper.
- Even glue: A consistent layer of glue tape is key to the transparency film sticking properly.
- Marker pressure: Don’t press too hard with the markers, especially on thinner transparency film, to avoid tearing.
- Prep ahead: You can pre-cut the transparency film to the size of your snowflakes to save time when you’re ready to assemble.
How to Store Stained Glass Snowflake Suncatchers
These suncatchers are pretty durable, but to keep them looking their best, it’s best to store them flat between sheets of wax paper or parchment paper in a cool, dry place when they’re not on display. They should last for a very long time this way!
FAQs
Q: Can kids do this craft independently?
A: Yes, with adult supervision for the cutting step, younger children can definitely handle the coloring and gluing parts. It’s a fantastic activity for developing fine motor skills!
Q: What if I don’t have a glue tape runner?
A: You can use a glue stick, but be sure to apply it evenly and generously to ensure the transparency film adheres well. A spray adhesive could also work, but it’s best to do that in a well-ventilated area.
Q: Can I hang these outside?
A: I wouldn’t recommend hanging them outside as the sun and weather can fade the markers and damage the materials over time.
I hope you have as much fun making these as I do! They add such a charming, handmade touch to any window, catching the light beautifully. If you enjoyed this craft, you might also like our DIY Mason Jar Lid Sun Catchers for another lovely decorative project!
Don’t forget to follow our Pinterest for more amazing craft and recipe ideas!
DIY Stained Glass Snowflake Suncatchers
Ingredients
Equipment
Method
- Step 1: Gather all your materials.
- Step 2: Fold black paper in half to make a triangle, then fold again to create a wedge shape.
- Step 3: Draw your snowflake design onto the folded paper and carefully cut along the lines, cutting through all layers at once.
- Step 4: Lay the cut-out snowflake flat. Apply an even layer of glue tape to the back. Carefully place transparency film over the glued area, smoothing it down.
- Step 5: Use permanent markers to fill in each cut-out space on the transparency film. Experiment with colors and effects.
- Step 6 (Optional): For a smooth finish, place the finished snowflake between two sheets of parchment paper and iron on a low heat setting.
are these images ai generated?
Gibt es einen Einkaufstipp für transparency film