Remember those cozy afternoons, the scent of something wonderful filling the air, making your house feel like a true sanctuary? Today, we’re bottling that feeling with a super simple DIY project that brings beautiful, natural fragrance into your home. Get ready to whip up some amazing DIY Aroma Stones! They’re incredibly easy, quick to make, and they turn out so beautifully that you’ll want to make a batch for yourself and as gifts for everyone you know.
Why You’ll Love DIY Aroma Stones
- Fast: You can have these ready to shape in minutes!
- Easy: No special skills required, perfect for beginners.
- Giftable: Imagine gifting a set of these lovely, fragrant stones – pure thoughtfulness!
- Crowd-pleasing: Everyone loves a beautifully scented home, and these deliver.
Ingredients
Gather your supplies. You’ll need just a few common household items to create these little gems:
- 2 cups Baking Soda: This is the magic ingredient that helps hold the scent and shape.
- 1 cup Cornstarch: This helps to create a smooth, firm texture.
- 1 1/4 cups Water: Just enough to bring everything together.
- Food coloring (optional): For a pop of color if you’re feeling fancy!
- Essential oils of your choice (10-15 drops per batch): This is where the real aroma magic happens! Lavender for calm, citrus for a pick-me-up, or eucalyptus for freshness – the possibilities are endless.
How to Make DIY Aroma Stones
Let’s get crafting! It’s a wonderfully tactile and satisfying process.
- Mix the Dry Ingredients: Grab a nice big mixing bowl and pour in your baking soda and cornstarch. Give them a good whisk until they’re all friends and perfectly combined.
- Add Water Gradually: Now, slowly start adding the water, stirring as you go. You’re looking for a consistency that’s like wet sand – thick enough to hold its shape but not too sticky. Keep stirring until it all comes together beautifully.
- Color Your Creations (Optional): If you’re adding color, now’s the time! Divide your paste into a few smaller bowls. Add a few drops of your chosen food coloring to each portion and stir until the color is vibrant and evenly spread. You can even swirl colors together for a marbled effect!
- Infuse with Scent: Time to add the star of the show – your essential oils! Add 10-15 drops of your favorite oil (or a blend!) to the mixture. Stir it in really well to make sure that wonderful aroma is distributed throughout. I love using lavender for my bedroom and a citrus blend for my kitchen.
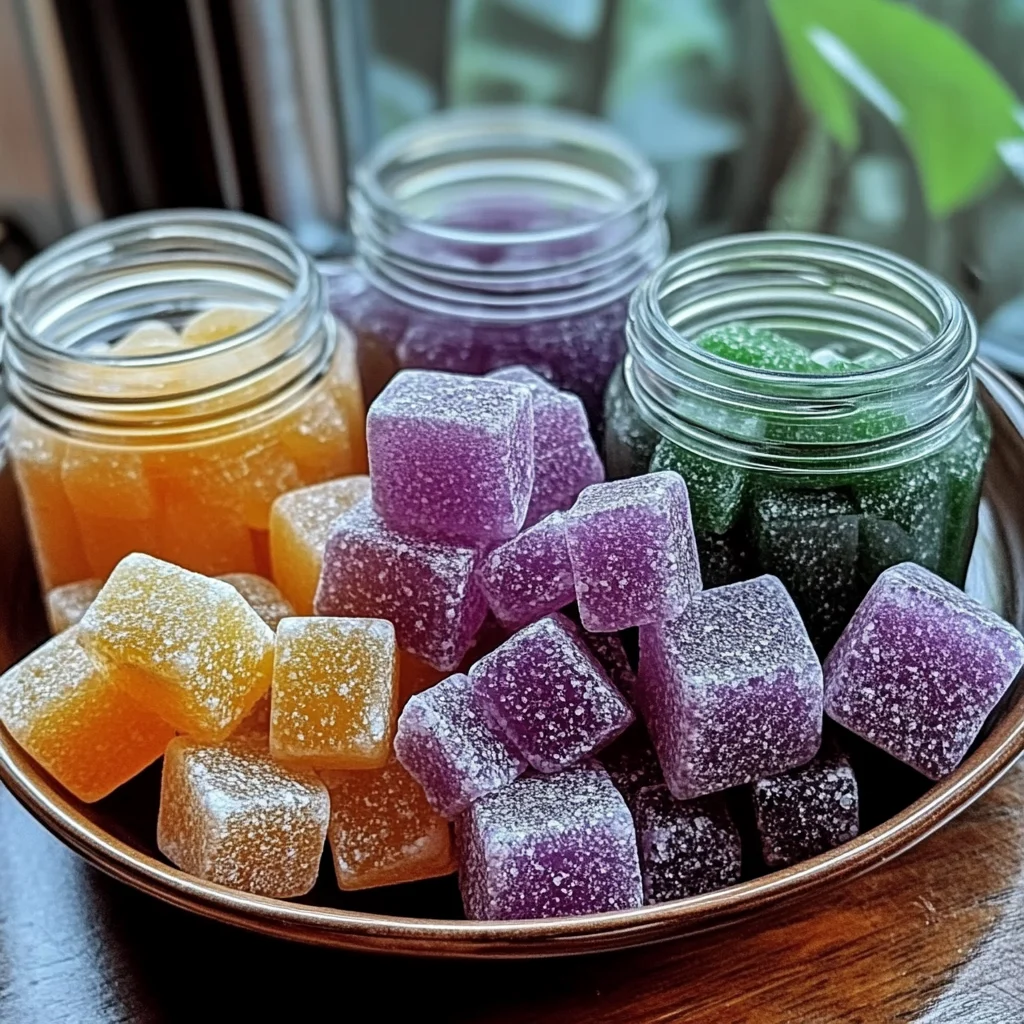
- Shape Your Stones: Now for the fun part! Take small portions of the scented mixture and shape them into little stones with your hands. You can make them round, square, or whatever shape your heart desires! Alternatively, you can press the mixture into cute silicone molds for more defined shapes.
- Let Them Dry: Place your beautifully shaped stones on some wax paper or a drying rack.
- Patience is a Virtue: Let your aroma stones dry completely. This usually takes about 24 to 48 hours, depending on the size of your stones and how humid it is where you are. They need to harden up nicely.
- Place and Enjoy: Once they’re rock hard, you can place your DIY aroma stones anywhere you want a touch of lovely fragrance. Pop them in drawers, place them on shelves, or even tuck them into your car for a natural scent boost. They are a fantastic way to add a subtle aroma to any space, much like how a delicious batch of sweet potato cheesecake cookies can elevate an afternoon tea.

Substitutions & Additions
Feel free to get creative with your aroma stones! Here are a few ideas:
- Dried Flowers or Herbs: Gently press tiny dried flowers like lavender buds or rose petals into the stones before they dry for an extra decorative touch.
- Glitter: For a bit of sparkle, add a pinch of craft glitter to the mixture.
- Different Scents: Don’t be afraid to experiment with different essential oil blends! Try peppermint and eucalyptus for a spa-like feel, or cinnamon and clove for a cozy autumn vibe. If you’re a fan of comforting scents, you might also enjoy our recipes for banana bread cake or snickerdoodle banana bread.
- Fragrance Oils: If you prefer, you can also use fragrance oils, but always ensure they are skin-safe and phthalate-free.
Tips for Success
A few little tips to ensure your aroma stones turn out perfectly every time:
- Consistency is Key: If the mixture is too wet, add a little more baking soda or cornstarch. If it’s too dry and crumbly, add a tiny splash more water.
- Don’t Over-Saturate with Oil: Too much essential oil can make the stones too soft or even oily. Start with the recommended amount and add more if needed.
- Drying Time: Ensure they are completely dry before handling them extensively. If they still feel a bit soft, give them another day or two.
- Prep Ahead: You can mix the dry ingredients and store them in an airtight container. Then, just add water, color, and oils when you’re ready to make your stones. This is great if you’re planning a craft day!
How to Store DIY Aroma Stones
Once your aroma stones are completely dry and you’re not using them right away, store them in an airtight container or a sealed bag. This will help keep their fragrance potent for longer. They should last for several months, but you might notice the scent fading slightly over time. When the scent diminishes, you can simply refresh them by adding a few more drops of essential oil.
FAQs
Here are some common questions you might have:
Q: How long do the aroma stones last?
A: They can hold their fragrance for several months, especially when stored properly in an airtight container. You can refresh them with more essential oils as needed.
Q: Can I use these in my car?
A: Yes! Just be careful not to place them directly on delicate surfaces that could be affected by moisture or oil. A small dish or fabric sachet works well.
Q: My stones are crumbling, what did I do wrong?
A: This usually happens if there wasn’t enough water or if they weren’t dried long enough. Try adding a tiny bit more water to the mixture next time, or ensure they are thoroughly dry before moving them.
Q: Can I add dried flowers to the mixture?
A: Absolutely! Gently press small dried flowers into the shaped stones before they dry for a beautiful decorative element. Just make sure they are small and flat so they don’t interfere with the shaping.
Enjoy making your beautiful, fragrant DIY aroma stones! They’re a lovely way to bring a touch of natural serenity into your home. Don’t forget to follow us on Pinterest for more delightful DIYs and delicious recipes!
DIY Aroma Stones
Ingredients
Equipment
Method
- Step 1: Mix the dry ingredients: Combine baking soda and cornstarch in a large bowl and whisk until well combined.
- Step 2: Add water gradually: Slowly add water while stirring until the mixture reaches a thick, wet sand consistency. Stir until it comes together.
- Step 3: Color your creations (Optional): Divide the paste into smaller bowls. Add a few drops of food coloring to each and stir until the color is vibrant and evenly spread. You can swirl colors for a marbled effect.
- Step 4: Infuse with scent: Add 10-15 drops of essential oils to the mixture and stir well to distribute the aroma.
- Step 5: Shape your stones: Take portions of the mixture and shape them into stones with your hands, or press into silicone molds for defined shapes.
- Step 6: Let them dry: Place the shaped stones on wax paper or a drying rack.
- Step 7: Patience is a virtue: Allow the aroma stones to dry completely, which typically takes 24 to 48 hours, depending on size and humidity.
- Step 8: Place and enjoy: Once dry and hardened, place your aroma stones in drawers, on shelves, or in your car for a natural scent boost.
Thanks for sharing. I read many of your blog posts, cool, your blog is very good. https://www.binance.info/register?ref=IXBIAFVY
Bạn có thể đánh bài theo level và điều chỉnh mức cược phù hợp như: 1K, 2K, 5K, 10K, 100K, 200K,… Chúng tôi cung cấp thêm chế độ trải nghiệm miễn phí cho bạn thoải mái làm quen. tai xn88 Hơn 150+ trò chơi cá cược đổi thưởng 3D đang được cập nhật liên tục mỗi ngày. TONY06-13