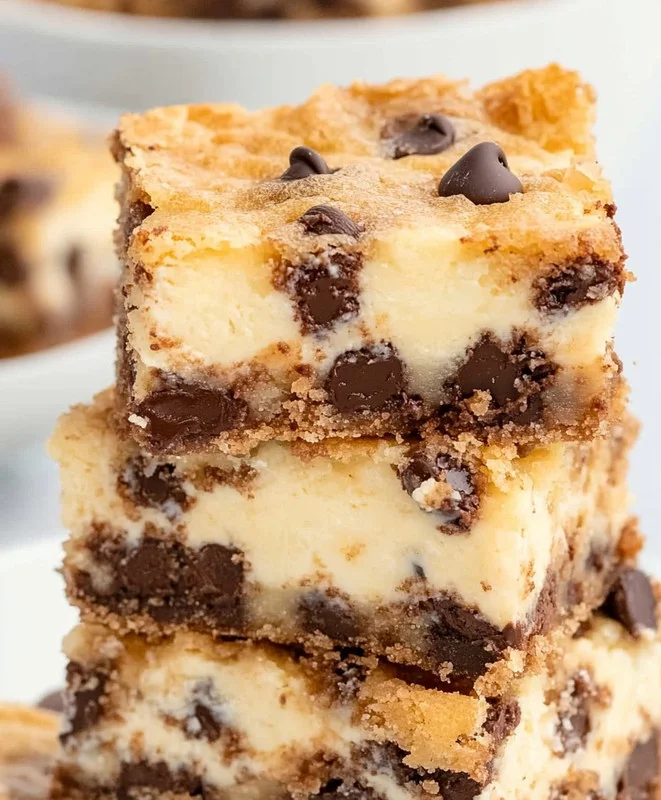
Hey there, baking buddies! Ever have one of those days where you’re craving something sweet, something comforting, but you just don’t want to wrestle with a complicated recipe? I hear you! That’s exactly how I felt when I first dreamt up these incredible Chocolate Chip Cheesecake Bars. They’re like a warm hug for your taste buds, combining the chewy goodness of a classic chocolate chip cookie with the silky, tangy magic of cheesecake, all in one easy-to-make bar. No fussy water baths, no delicate crusts to blind bake – just pure, unadulterated dessert joy that comes together quicker than you can say “more please!” Get ready to make some memories, because this recipe is an absolute keeper, perfect for sharing with loved ones or, let’s be honest, keeping all to yourself.
Why You’ll Love Chocolate Chip Cheesecake Bars
- Fast
- Easy
- Giftable
- Crowd-pleasing
Ingredients
Gathering your ingredients is the first step to deliciousness! Here’s what you’ll need for these dreamy bars:
- 1 (16-ounce) roll refrigerated chocolate chip cookie dough: This is our secret weapon for speed and convenience! It forms both the tender base and a delightful crumbly topping. You can use your favorite brand, or even a homemade cookie dough if you’re feeling ambitious.
- 8 ounces cream cheese, softened: Make sure this is at room temperature! Seriously, this is key for a super smooth, lump-free cheesecake filling. Take it out of the fridge at least an hour before you start baking. And speaking of cream cheese, if you’re feeling extra ambitious and want to try making your own creamy, dreamy cream cheese from scratch, check out my guide!
- ½ cup sugar: Just enough sweetness to balance the tang of the cream cheese, making our filling utterly irresistible.
- 1 egg, room temperature: Like the cream cheese, a room temperature egg incorporates much better into the mixture, ensuring a smooth, cohesive cheesecake layer.
- ½ teaspoon vanilla extract: A splash of good quality vanilla is essential! It deepens all the flavors and adds that classic comforting aroma we all adore.
How to Make Chocolate Chip Cheesecake Bars
Alright, let’s get baking! You’ll be amazed at how quickly these come together.
- Prep Your Oven & Pan: First things first, preheat your oven to a cozy 350°F (175°C). Then, grab a 9-inch square baking dish. This next step is crucial for easy removal: line your dish with parchment paper, leaving an overhang on the sides. Trust me, those “handles” will save you a headache later!
- Lay the Foundation: Take half of that glorious refrigerated chocolate chip cookie dough and press it firmly onto the bottom of your prepared baking dish. Don’t be shy; make sure it’s an even layer across the entire bottom. This will be your wonderfully chewy crust.
- Whip the Cream Cheese: Now for the star of the show! In a medium mixing bowl, using either a stand mixer with the paddle attachment or a hand mixer, beat your softened cream cheese until it’s light and fluffy. This usually takes a couple of minutes. You want it smooth, with no lumps in sight!
- Sweeten the Deal: Add the sugar to your cream cheese mixture and continue beating until it’s well combined and creamy. Scrape down the sides of the bowl to make sure everything gets mixed in evenly.
- Add the Essentials: Next, beat in the room temperature egg and the vanilla extract. Keep mixing until the cheesecake filling is perfectly smooth and looks absolutely dreamy.
- Assemble the Layers: Carefully pour your luscious cream cheese filling over the cookie dough base in the baking dish. Gently spread it evenly with a spatula, making sure it reaches all the corners.
- Crumble On Top: Now, crumble the remaining half of your chocolate chip cookie dough over the top of the cheesecake layer. Don’t worry about perfection here; irregular crumbs give it that charming, homemade look and extra texture.
- Bake to Golden Perfection: Pop your baking dish into the preheated oven and bake for 30 to 35 minutes. You’re looking for the top to be lightly golden, and the center should still have a slight jiggle when you gently shake the pan. It will set up more as it cools.
- Cool Down (The Hard Part!): This is arguably the most challenging step because the smell will be intoxicating! Remove the bars from the oven and let them cool completely on a wire rack. I mean completely. Trying to cut them warm will result in a delicious, but messy, disaster. Once fully cooled, you can use those parchment paper “handles” to lift the whole slab out of the dish, making cutting into neat bars a breeze.
Substitutions & Additions
Part of the fun of baking is making a recipe your own! These Chocolate Chip Cheesecake Bars are incredibly versatile. Here are some ideas to get your creative juices flowing:
- Cookie Dough Variations: Don’t limit yourself to chocolate chip! Try using peanut butter cookie dough for a peanut butter cup vibe, sugar cookie dough for a classic twist, or even brownie mix for an extra chocolatey explosion.
- Cheesecake Add-ins: Fold in mini chocolate chips, a swirl of raspberry or cherry jam, a tablespoon of lemon zest for a brighter flavor, or even a hint of espresso powder for a mocha-cheesecake kick.
- Toppings Galore: Once cooled, drizzle with caramel sauce, hot fudge, a sprinkle of sea salt, or a dusting of cocoa powder. A dollop of whipped cream and some fresh berries would also be divine!
- Seasonal Flavors: For fall, consider adding a pinch of pumpkin spice to the cheesecake filling and using a snickerdoodle cookie dough base. For summer, a citrus zest in the filling would be lovely. If you loved the bar format and want to explore other delicious variations, you absolutely have to try our delightful Sugar Cookie Cheesecake Bars next!
Tips for Success
Even though this recipe is super easy, a few little tips can make sure your Chocolate Chip Cheesecake Bars turn out absolutely perfect every time!
- Room Temperature Ingredients are Key: I’ve said it before, but it bears repeating! Make sure your cream cheese and egg are at room temperature. This helps them mix smoothly and prevents lumps in your cheesecake filling, ensuring a silky-smooth texture.
- Don’t Overmix the Cheesecake: Once you add the egg, mix just until combined. Overmixing can incorporate too much air, which can cause the cheesecake to puff up and then crack as it cools. For bars, a small crack isn’t a huge deal, but we’re aiming for perfection here!
- The Jiggle Test: When checking for doneness, you want the edges of the cheesecake to be set, but the very center should still have a slight “jiggle” when you gently shake the pan. It will continue to set as it cools, so don’t wait until it’s completely firm in the oven.
- Patience is a Virtue (Cooling): I know, I know, it’s hard to wait when your kitchen smells incredible. But letting these bars cool completely – ideally for at least 2-3 hours, or even in the fridge for an hour – is essential for clean, beautiful slices.
- Parchment Paper Overhang: That little overhang you leave when lining the pan is your best friend! Once cooled, you can use it to lift the entire slab of bars out of the dish, making cutting and serving a breeze.
- Sharp Knife for Clean Cuts: For super neat slices, use a sharp, non-serrated knife. Wipe the knife clean with a damp cloth between each cut, especially when dealing with gooey fillings like cheesecake! For even more wisdom on mastering all sorts of bar cookies, I’ve got a whole guide dedicated to it!
How to Store Chocolate Chip Cheesecake Bars
These delightful bars are so good, they rarely last long, but here’s how to keep them fresh!
- Refrigeration is a Must: Because of the cream cheese filling, these bars need to be stored in the refrigerator. Place them in an airtight container to keep them fresh and prevent them from absorbing other odors from your fridge.
- Shelf Life: Stored properly in the refrigerator, these chocolate chip cheesecake bars will stay delicious for up to 4-5 days.
- Freezing for Later: You can also freeze these bars! Once completely cooled, cut them into individual servings. Wrap each bar tightly in plastic wrap, then place them in a freezer-safe airtight container or a heavy-duty freezer bag. They can be frozen for up to 2-3 months. Thaw individual bars in the refrigerator overnight or on the counter for a quicker treat.
FAQs
Can I use homemade cookie dough for these bars?
Absolutely! If you have a favorite homemade chocolate chip cookie dough recipe, feel free to use it. Just make sure it’s chilled, and use roughly the same amount (about 16 ounces or 2 cups) for the base and topping.
How do I know when the cheesecake bars are done baking?
Look for the edges to be set and lightly golden. The center should still have a slight jiggle – not liquidy, but a gentle wobble when you gently shake the pan. It will firm up as it cools.
Can I make these chocolate chip cheesecake bars ahead of time?
Yes, these are a fantastic make-ahead dessert! You can bake them a day or two in advance, let them cool completely, and then store them in an airtight container in the refrigerator until you’re ready to serve.
My cheesecake cracked! What happened?
Cracks can sometimes happen if the cheesecake is overbaked or experiences a sudden change in temperature (like going directly from a hot oven to a cold countertop). For bars, a crack is mostly cosmetic and won’t affect the delicious taste or texture. You can always cover it with a dusting of powdered sugar or a dollop of whipped cream!
For more delicious recipes and baking inspiration, be sure to follow us on Pinterest!
Easy & Decadent Chocolate Chip Cheesecake Bars
Ingredients
Equipment
Method
- Step 1: Prep Your Oven & Pan: Preheat your oven to 350°F (175°C). Line a 9-inch square baking dish with parchment paper, leaving an overhang on the sides for easy removal.
- Step 2: Lay the Foundation: Take half of the refrigerated chocolate chip cookie dough and press it firmly onto the bottom of your prepared baking dish, ensuring an even layer. This will be your chewy crust.
- Step 3: Whip the Cream Cheese: In a medium mixing bowl, using either a stand mixer with the paddle attachment or a hand mixer, beat the softened cream cheese until it’s light, fluffy, and lump-free (about 2 minutes).
- Step 4: Sweeten the Deal: Add the sugar to your cream cheese mixture and continue beating until well combined and creamy. Scrape down the sides of the bowl to ensure even mixing.
- Step 5: Add the Essentials: Next, beat in the room temperature egg and the vanilla extract. Mix until the cheesecake filling is perfectly smooth and dreamy.
- Step 6: Assemble the Layers: Carefully pour your cream cheese filling over the cookie dough base in the baking dish. Gently spread it evenly with a spatula, making sure it reaches all the corners.
- Step 7: Crumble On Top: Crumble the remaining half of your chocolate chip cookie dough over the top of the cheesecake layer. Irregular crumbs are fine and add charm.
- Step 8: Bake to Golden Perfection: Pop your baking dish into the preheated oven and bake for 30 to 35 minutes. The top should be lightly golden, and the center should still have a slight jiggle when gently shaken (it will set more as it cools).
- Step 9: Cool Down (The Hard Part!): Remove the bars from the oven and let them cool completely on a wire rack. This is crucial for clean slices. Once fully cooled (ideally 2-3 hours, or in the fridge for an hour), use the parchment paper “handles” to lift the entire slab out of the dish before cutting into neat bars.
Thanks for sharing. I read many of your blog posts, cool, your blog is very good.
Can you be more specific about the content of your article? After reading it, I still have some doubts. Hope you can help me. https://accounts.binance.bh/register/person?ref=QCGZMHR6