
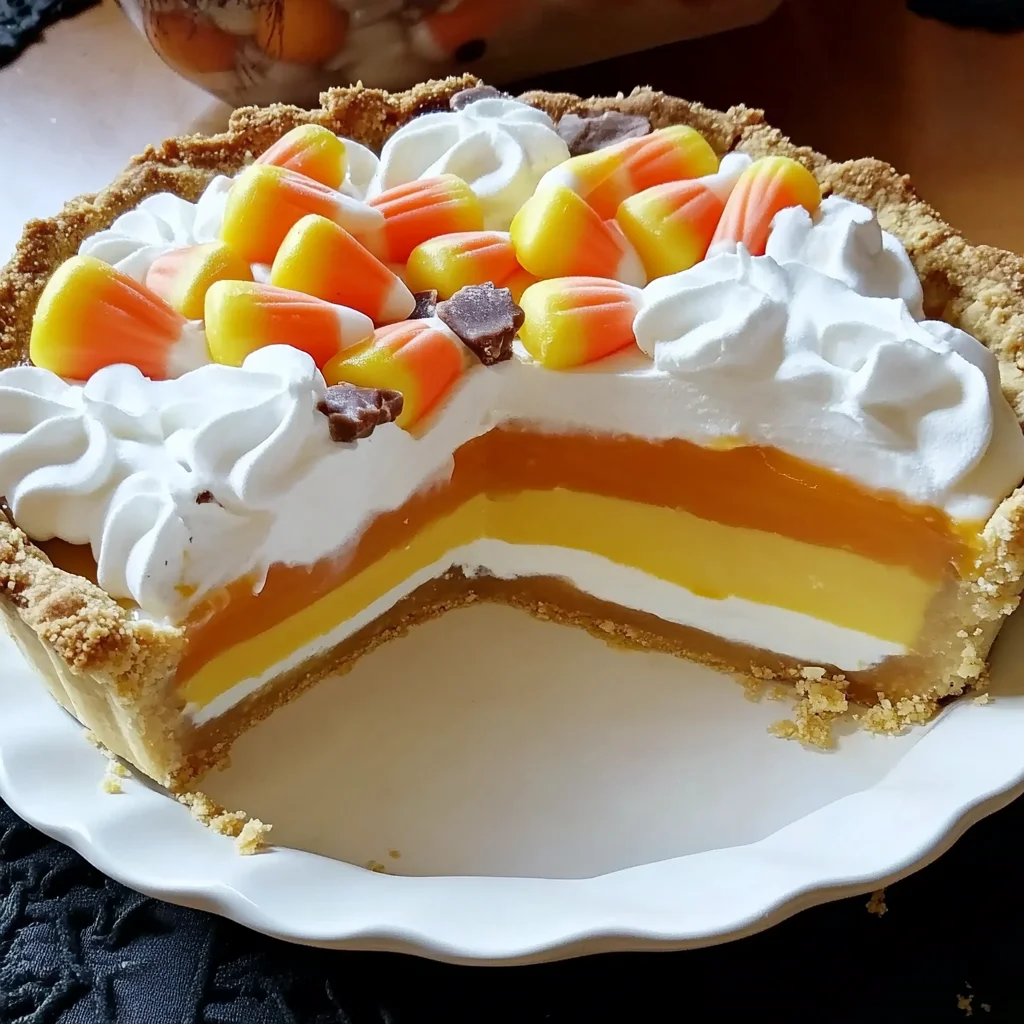
Remember those crisp autumn days, the smell of fallen leaves, and the thrill of trick-or-treating? There’s something so special about the flavors and colors of fall, and this Layered Candy Corn Pie captures all of that magic! It looks like it belongs on a Pinterest board, but I promise you, it’s way easier to make than it looks. Get ready to wow your friends and family with this show-stopping, no-bake dessert!
Why You’ll Love Layered Candy Corn Pie
- Super Fast: Most of the magic happens in the fridge, giving you more time to enjoy the season.
- Incredibly Easy: No fancy baking skills needed here!
- Perfectly Giftable: Imagine showing up to a fall gathering with this beauty – instant dessert hero!
- Guaranteed Crowd-Pleaser: The vibrant layers and sweet, fruity flavors are a hit with everyone.
Ingredients
Let’s gather our goodies for this festive pie. Don’t worry, these are all pretty straightforward!
- For the Cookie Crust:
- 2 cups finely ground vanilla wafer cookies: Think of these as the cozy foundation of our pie.
- 1/4 cup sugar: Just a touch to sweeten things up.
- Pinch kosher salt: Balances the sweetness perfectly.
- 1 stick unsalted butter, melted and cooled slightly: This holds our crumbly base together.
- For the Lemon Filling:
- 1/4 cup freshly squeezed lemon juice: Adds a bright, zesty kick!
- One 1/4-ounce packet unflavored gelatin powder: Our secret ingredient for setting those lovely layers.
- 3/4 cup canned lite coconut milk: For a creamy, dreamy texture.
- 3 tablespoons sugar: Sweetness that complements the lemon.
- 1/4 teaspoon ground turmeric: This is our natural coloring magic for that sunny yellow layer!
- Pinch kosher salt: Enhances all the other flavors.
- For the Mango Filling:
- 1/4 cup plus 1 tablespoon freshly squeezed orange juice: A tropical sunshine boost.
- One 1/4-ounce packet unflavored gelatin powder: To set this vibrant layer.
- 1 cup mango chunks (thawed if frozen; if fresh, from 1 peeled and pitted mango): The star of this sweet, golden layer.
- 1 tablespoon fresh raspberries: Just a few for a hint of color and tartness.
- 3 tablespoons sugar: Sweetens the fruit perfectly.
- Pinch kosher salt: A little flavor enhancer.
- For the Coconut Filling:
- 1 cup canned lite coconut milk: For a smooth, white layer reminiscent of the candy corn center.
- One 1/4-ounce packet unflavored gelatin powder: To get this layer just right.
- 3 tablespoons sugar: For a subtle sweetness.
- 1/4 teaspoon pure coconut extract: To really amp up that delicious coconut flavor.
- Pinch kosher salt: To round out the taste.
- For the Toasted Meringue Topping:
- 3 large egg whites, at room temperature: Make sure they’re room temp for best volume.
- 1/3 cup sugar: For a sweet, fluffy topping.
- 1/2 teaspoon cream of tartar: Helps stabilize the egg whites for gorgeous meringue.
- 1/2 teaspoon cornstarch: For extra fluffy meringue.
- 1/2 teaspoon pure coconut extract: A hint of coconut to tie it all together.
- Candy corn, for decorating: The perfect playful finish!
How to Make Layered Candy Corn Pie
Alright, let’s get down to business! This pie is all about building beautiful layers, and it’s super satisfying to watch it come together.
Cookie Crust:
First things first, let’s get that delicious crust going. Preheat your oven to 350°F. In a bowl, mix together your finely ground vanilla wafer cookie crumbs, sugar, and that pinch of salt. Pour in your melted butter and stir until everything looks like damp sand – it should hold together when you squeeze it. Press this mixture firmly into the bottom and all the way up the sides of a 9-inch deep-dish pie plate. Pop it in the oven for about 12 to 15 minutes, or until it looks set and lightly toasted. If your crust decides to puff up a bit while baking (they can be feisty!), just gently press it down with the bottom of a measuring cup while it’s still warm. Let it cool completely before we move on.
Lemon Filling:
Time for our bright yellow layer! In a microwave-safe bowl, combine the fresh lemon juice and gelatin powder. Let it sit for about 5 minutes to soften. In a blender, combine the lite coconut milk, sugar, turmeric (our secret weapon for color!), and salt. Blend until it’s all nice and smooth. Now, microwave the lemon juice and gelatin mixture until it’s hot and completely liquid – usually around 30 seconds. Give it a good stir to make sure the gelatin is dissolved, then pour it into the blender with your coconut milk mixture. Blend it all up until it’s super smooth. Strain this lovely yellow mixture into your cooled pie crust. Pop it in the fridge for about 45 minutes, or until it’s set. You want it firm enough to hold the next layer!
Mango Filling:
This is where the vibrant orange comes in! In a microwave-safe bowl, mix the 1/4 cup of orange juice with the gelatin and let it soften for 5 minutes. In your blender, combine the mango chunks, fresh raspberries, sugar, salt, and the remaining 1 tablespoon of orange juice. Blend until it’s a smooth puree. Microwave the orange juice-gelatin mixture until it’s hot and liquefied, about 30 seconds. Stir to dissolve the gelatin completely, then add this to your mango mixture in the blender. Blend until perfectly smooth. Carefully strain this luscious mango mixture directly over your set lemon layer. Gently press any solids through to get every bit of that delicious filling. Spread it out evenly and chill for another 45 minutes, or until it’s set. Looking good!
Coconut Filling:
And now for our creamy white middle layer! In a microwave-safe bowl, combine 1/4 cup of the lite coconut milk with the gelatin and let it soften for 5 minutes. In your blender, combine the remaining 3/4 cup coconut milk, sugar, pure coconut extract (hello, tropical flavor!), and salt. Blend until smooth. Microwave the coconut milk-gelatin mixture until hot and liquefied (about 30 seconds). Stir to ensure the gelatin is dissolved, then add it to your coconut milk mixture in the blender. Puree until smooth. Strain this beautiful white mixture directly over your set mango layer. Now, this layer needs to set firmly, so pop it in the fridge for at least 2 hours, or even better, overnight. Patience is key here for those distinct layers!
Toasted Meringue Topping:
This is the showstopper! In a heatproof bowl, combine your room-temperature egg whites, sugar, cream of tartar, and cornstarch. Set this bowl over a saucepan of simmering water (make sure the bottom of the bowl isn’t touching the water). Cook, whisking constantly, until the sugar has dissolved and the egg whites feel warm to the touch, about 3-4 minutes. Remove the bowl from the heat. Now, grab your electric mixer and beat the mixture on medium-high speed until it’s light, fluffy, and forms stiff peaks. This usually takes about 4 minutes. Stir in the pure coconut extract. Transfer this gorgeous meringue to a piping bag fitted with a round pastry tip.
Assemble and Toast!
Get creative with your meringue! Pipe 1-inch dollops of meringue all over the top of your chilled pie, layering them upwards until all your meringue is used. This creates a beautiful fluffy cloud effect. Now for the fun part: grab your kitchen torch and carefully toast the meringue until it’s a deep, golden brown. It’s like giving your pie a little tan! Once it’s perfectly toasted, decorate it with candy corn. It looks so festive and really ties into the candy corn theme. Cut into wedges and serve immediately. Enjoy the applause!
Substitutions & Additions
Feeling inspired to get a little creative? Here are some ideas:
- Crust Swap: Instead of vanilla wafers, you could try finely crushed graham crackers or even shortbread cookies for a different flavor base.
- Fruit Fun: Don’t have mango? Try using pureed peaches, apricots, or even a few strawberries blended with raspberries for the orange layer.
- Citrus Twist: For the yellow layer, you could experiment with a mix of lemon and lime juice for a more complex citrus flavor.
- Extra Crunch: Before topping with meringue, you could sprinkle a layer of toasted coconut flakes over the coconut filling for added texture.
- No Torch? No Problem! If you don’t have a kitchen torch, you can briefly broil the meringue on a low setting, watching it VERY carefully to prevent burning. Or, you can skip toasting altogether – it’s still delicious!
Tips for Success
A few little tricks to make your Layered Candy Corn Pie absolutely perfect:
- Patience is a Virtue: Make sure each layer is set before adding the next. This is key to those distinct, beautiful layers.
- Room Temperature Eggs: For the meringue, make sure your egg whites are at room temperature. They whip up to a much more stable and voluminous foam.
- Finely Ground Cookies: For the crust, really grind those cookies into a fine crumb. This will help it hold together better.
- Gentle Straining: When straining the fruit and custard layers, be gentle. You want to push the smooth filling through without forcing seeds or pulp that could affect the texture.
- Prep Ahead: You can absolutely make this pie a day in advance! The flavors meld beautifully, and it’s one less thing to worry about on the day of your event. Just add the toasted meringue topping closer to serving time if you’re concerned about it weeping.
How to Store Layered Candy Corn Pie
This pie is best enjoyed fresh, but if you have any leftovers (highly unlikely!), here’s how to store them:
- Store any leftover pie in an airtight container in the refrigerator.
- It will keep well for up to 2-3 days.
- The meringue topping might soften a bit over time, but the flavor will still be fantastic.
FAQs
Got questions? I’ve got answers!
- Can I make this pie without a kitchen torch?
Yes! While a torch gives that lovely toasted marshmallow flavor and look, you can skip it or very carefully use your broiler on a low setting, watching it constantly. The flavor is still amazing! - How far in advance can I make this pie?
You can assemble the entire pie (without the meringue topping) up to 24 hours in advance. Add the toasted meringue topping just before serving for the best texture. - What kind of pie plate should I use?
A deep-dish pie plate is ideal because it gives you enough room for all those beautiful layers! A standard 9-inch pie plate will work.
I hope you have as much fun making and eating this Layered Candy Corn Pie as I do! It’s a delightful way to celebrate the season. Don’t forget to follow us on Pinterest for even more delicious recipes and inspiration!
Layered Candy Corn Pie
Ingredients
Equipment
Method
- Step 1: Preheat your oven to 350°F. In a bowl, mix together your finely ground vanilla wafer cookie crumbs, sugar, and that pinch of salt. Pour in your melted butter and stir until everything looks like damp sand – it should hold together when you squeeze it. Press this mixture firmly into the bottom and all the way up the sides of a 9-inch deep-dish pie plate. Pop it in the oven for about 12 to 15 minutes, or until it looks set and lightly toasted. If your crust decides to puff up a bit while baking (they can be feisty!), just gently press it down with the bottom of a measuring cup while it’s still warm. Let it cool completely before we move on.
- Step 2: In a microwave-safe bowl, combine the fresh lemon juice and gelatin powder. Let it sit for about 5 minutes to soften. In a blender, combine the lite coconut milk, sugar, turmeric (our secret weapon for color!), and salt. Blend until it’s all nice and smooth. Now, microwave the lemon juice and gelatin mixture until it’s hot and completely liquid – usually around 30 seconds. Give it a good stir to make sure the gelatin is dissolved, then pour it into the blender with your coconut milk mixture. Blend it all up until it’s super smooth. Strain this lovely yellow mixture into your cooled pie crust. Pop it in the fridge for about 45 minutes, or until it’s set. You want it firm enough to hold the next layer!
- Step 3: In a microwave-safe bowl, mix the 1/4 cup of orange juice with the gelatin and let it soften for 5 minutes. In your blender, combine the mango chunks, fresh raspberries, sugar, salt, and the remaining 1 tablespoon of orange juice. Blend until it’s a smooth puree. Microwave the orange juice-gelatin mixture until it’s hot and liquefied, about 30 seconds. Stir to dissolve the gelatin completely, then add this to your mango mixture in the blender. Blend until perfectly smooth. Carefully strain this luscious mango mixture directly over your set lemon layer. Gently press any solids through to get every bit of that delicious filling. Spread it out evenly and chill for another 45 minutes, or until it’s set. Looking good!
- Step 4: In a microwave-safe bowl, combine 1/4 cup of the lite coconut milk with the gelatin and let it soften for 5 minutes. In your blender, combine the remaining 3/4 cup coconut milk, sugar, pure coconut extract (hello, tropical flavor!), and salt. Blend until smooth. Microwave the coconut milk-gelatin mixture until hot and liquefied (about 30 seconds). Stir to ensure the gelatin is dissolved, then add it to your coconut milk mixture in the blender. Puree until smooth. Strain this beautiful white mixture directly over your set mango layer. Now, this layer needs to set firmly, so pop it in the fridge for at least 2 hours, or even better, overnight. Patience is key here for those distinct layers!
- Step 5: In a heatproof bowl, combine your room-temperature egg whites, sugar, cream of tartar, and cornstarch. Set this bowl over a saucepan of simmering water (make sure the bottom of the bowl isn’t touching the water). Cook, whisking constantly, until the sugar has dissolved and the egg whites feel warm to the touch, about 3-4 minutes. Remove the bowl from the heat. Now, grab your electric mixer and beat the mixture on medium-high speed until it’s light, fluffy, and forms stiff peaks. This usually takes about 4 minutes. Stir in the pure coconut extract. Transfer this gorgeous meringue to a piping bag fitted with a round pastry tip.
- Step 6: Get creative with your meringue! Pipe 1-inch dollops of meringue all over the top of your chilled pie, layering them upwards until all your meringue is used. This creates a beautiful fluffy cloud effect. Now for the fun part: grab your kitchen torch and carefully toast the meringue until it’s a deep, golden brown. It’s like giving your pie a little tan! Once it’s perfectly toasted, decorate it with candy corn. It looks so festive and really ties into the candy corn theme. Cut into wedges and serve immediately. Enjoy the applause!
Notes
- Crust Swap: Instead of vanilla wafers, you could try finely crushed graham crackers or even shortbread cookies for a different flavor base.
- Fruit Fun: Don’t have mango? Try using pureed peaches, apricots, or even a few strawberries blended with raspberries for the orange layer.
- Citrus Twist: For the yellow layer, you could experiment with a mix of lemon and lime juice for a more complex citrus flavor.
- Extra Crunch: Before topping with meringue, you could sprinkle a layer of toasted coconut flakes over the coconut filling for added texture.
- No Torch? No Problem! If you don’t have a kitchen torch, you can briefly broil the meringue on a low setting, watching it VERY carefully to prevent burning. Or, you can skip toasting altogether – it’s still delicious!
- Patience is a Virtue: Make sure each layer is set before adding the next. This is key to those distinct, beautiful layers.
- Room Temperature Eggs: For the meringue, make sure your egg whites are at room temperature. They whip up to a much more stable and voluminous foam.
- Finely Ground Cookies: For the crust, really grind those cookies into a fine crumb. This will help it hold together better.
- Gentle Straining: When straining the fruit and custard layers, be gentle. You want to push the smooth filling through without forcing seeds or pulp that could affect the texture.
- Prep Ahead: You can absolutely make this pie a day in advance! The flavors meld beautifully, and it’s one less thing to worry about on the day of your event. Just add the toasted meringue topping closer to serving time if you’re concerned about it weeping.
- Store any leftover pie in an airtight container in the refrigerator.
- It will keep well for up to 2-3 days.
- The meringue topping might soften a bit over time, but the flavor will still be fantastic.
Thank you for your sharing. I am worried that I lack creative ideas. It is your article that makes me full of hope. Thank you. But, I have a question, can you help me? https://www.binance.com/register?ref=IXBIAFVY