There’s something so magical about Halloween, isn’t there? The crisp autumn air, the vibrant leaves, the excitement buzzing as little ghosts and goblins prepare for trick-or-treating. For me, some of the fondest memories are made right in the kitchen, with flour dusting the counters and the sweet scent of baking filling the air. This year, let’s skip the store-bought spooky treats and whip up something truly special and surprisingly simple: these adorable Halloween Skeleton Cookies! They’re the kind of treat that looks elaborate but comes together like a dream, leaving you with plenty of time to enjoy the festivities. Trust me, these cookies are not only bone-chillingly cute but also incredibly easy and quick to make, perfect for creating memorable moments with your family.
Why You’ll Love Halloween Skeleton Cookies
- Fast: Don’t let the detailed look fool you; these come together quicker than you’d think!
- Easy: Simple ingredients and straightforward steps mean success for every baker.
- Giftable: Pack them up in cute cellophane bags for a delightful Halloween party favor or neighborly treat.
- Crowd-pleasing: Kids and adults alike will get a kick out of these charmingly spooky cookies.
Ingredients
Gathering your ingredients is the first step to any baking adventure! Here’s what you’ll need for our skeleton friends:
- White sugar: Just your standard granulated sugar to give our cookies that perfect sweetness.
- Butter, softened: Make sure it’s truly softened to room temperature for that creamy, fluffy texture when you mix.
- Eggs: Our binding agents, giving structure and richness.
- Vanilla extract: A classic flavor enhancer that makes everything taste better.
- Almond flavoring: This is a secret weapon! It adds a wonderful, subtle depth that makes these cookies irresistible.
- All-purpose flour: The foundation of our cookie dough.
- Baking powder: Gives our cookies a little lift, making them perfectly soft.
- Salt: Balances out the sweetness and enhances all the other flavors.
- Confectioners’ sugar (for dusting): Essential for rolling out your dough without sticking and for that professional finish.
For the Icing:
- Confectioners’ sugar: The base for our smooth, pipeable white icing.
- Milk: Helps achieve the perfect consistency for piping.
- Light corn syrup: This gives the icing a lovely sheen and helps it set nicely.
- Vanilla extract: A little flavor boost for our icing.
- Black decorating gel: The easiest way to add those spooky skeleton details!
How to Make Halloween Skeleton Cookies
Ready to get started? Grab your apron and let’s make some magic!
- Cream it up: In a large bowl, take your electric mixer and cream together the white sugar and that lovely softened butter until it’s light and fluffy. This step is key for a tender cookie! Then, beat in your eggs, 1 ½ teaspoons of vanilla extract, and the almond flavoring until everything is beautifully combined.
- Combine dry and wet: In a separate bowl, whisk together your all-purpose flour, baking powder, and salt. Now, gradually add this dry mixture to your wet ingredients, mixing until everything is just combined. Be careful not to overmix; we want tender cookies, not tough ones!
- Chill out: Divide your dough into two portions, wrap each snugly in plastic wrap, and pop them into the refrigerator. Let them chill for at least 3 to 4 hours, or even better, let them hang out overnight. This chilling time is super important for firm dough that’s easy to roll and cut, preventing your cookies from spreading too much in the oven.
- Get ready to bake: When you’re ready to bake, preheat your oven to a cozy 350°F (175°C). Line two baking sheets with parchment paper – this makes for easy cleanup and prevents sticking.
- Roll and cut: On a clean work surface, dust generously with 2 tablespoons of confectioners’ sugar. Take one portion of your chilled dough and roll it out to about ¼ inch thickness. Now for the fun part! Grab your gingerbread man cookie cutter and start cutting out your little skeleton bodies. Carefully transfer them to your prepared baking sheets.
- Bake to perfection: Slide those baking sheets into the oven and bake for 8 to 10 minutes, or until the edges are just lightly golden. Once they’re done, carefully transfer the hot cookies from the baking sheets to wire racks to cool completely. This usually takes around 20 minutes. Repeat with your remaining dough!
- Whip up the icing: While your cookies are cooling, let’s make the white icing. In a small bowl, stir together 1 cup of confectioners’ sugar and 2 teaspoons of milk until you have a smooth consistency. Beat in 2 teaspoons of light corn syrup and ¼ teaspoon of vanilla extract until the icing is beautifully smooth and glossy. If it feels a little too thick to pipe easily, add a few more drops of milk or corn syrup until it’s just right.
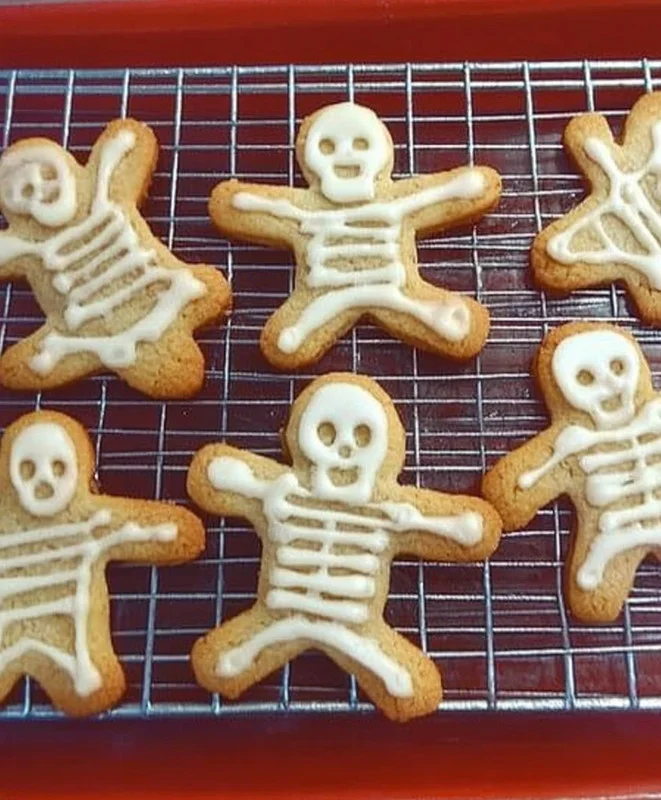
- Decorate the bones: Transfer your prepared white icing into a piping bag fitted with a small, plain tip. Now, for the artistic touch! Pipe a filled-out circle inside the head portion of each cookie to form the skull base. Then, draw your skeleton design on the body, including three neat horizontal lines for the ribs. Patience is a virtue here! Allow this white icing to dry completely. This can take about 2 hours, or for best results, let it dry overnight.
- Add the final spooky touches: Once the white icing is completely dry and set, grab your trusty tube of black decorating gel. Draw eyes, a nose, and a mouth on each skull to bring your skeletons to life! Let these final details dry again for about 1 hour before you serve them up or tuck them away.
Substitutions & Additions
One of the best things about baking is making a recipe your own! Here are a few ideas to customize your skeleton cookies:
- Flavor Swaps: Not a fan of almond? You can swap the almond flavoring for an extra ½ teaspoon of vanilla extract, or even try a splash of orange or lemon extract for a brighter cookie.
- Chocolatey Skeletons: For a darker, spookier cookie base, you could try adding 2-3 tablespoons of cocoa powder to your dry ingredients. You might need to add a tiny bit more milk to the dough to maintain consistency.
- Icing Colors: Want a different vibe? You could divide your white icing and add a drop of orange or green food coloring to some portions for extra Halloween flair. Just be sure to let each color dry before adding another if they touch! If you’re looking for other frosting ideas, sometimes I like to experiment with different types of frostings on various cookies, like a delicious strawberry cream cheese frosting for a fruitier treat.
- Spooky Sprinkles: Before the white icing dries completely, you could sprinkle some black or orange nonpareils on the “body” for a fun, textured effect.
- Cookie Cutter Fun: Don’t have a gingerbread man cutter? Any generic “person” shaped cutter will work! You could also use ghost, pumpkin, or cat cutters and adapt the skeleton design or create entirely new Halloween-themed cookies. If you’re enjoying the fall baking, you might also love making some easy pumpkin whoopie pies!
Tips for Success
Baking is a science and an art, but a few simple tricks can make all the difference:
- Don’t Skimp on Chilling: Seriously, that dough chilling time is crucial! It helps the butter firm up, preventing your cookies from spreading into blobs and ensuring those crisp gingerbread-man shapes. If you find your dough getting sticky while rolling, pop it back into the fridge for 15-20 minutes.
- Confectioners’ Sugar is Your Friend: Using confectioners’ sugar (powdered sugar) for dusting your rolling surface instead of regular flour will give your cookies a slightly sweeter edge and a wonderfully smooth finish. It also helps prevent a floury taste.
- Icing Consistency is Key: When mixing your icing, aim for a consistency that flows smoothly from the piping bag but isn’t so thin it runs off the cookie. It should hold a line when piped but settle a little to fill the shape. If it’s too thick, add milk a few drops at a time. Too thin? Add a little more confectioners’ sugar.
- Patience, Young Grasshopper: Allowing the white icing to dry completely before adding the black details is probably the most important tip. If you rush this, the black gel will bleed into the white, and your skeletons might look a little, well, messy!
- Prep Ahead: You can make the cookie dough up to 3 days in advance and keep it wrapped tightly in the refrigerator. You can also bake the cookies ahead of time and store them undecorated in an airtight container for up to 5 days, then ice them closer to your event. For more general advice on creating perfectly baked delights, check out our comprehensive guide to mastering the art of perfect cookies.
How to Store Halloween Skeleton Cookies
Once your spooky creations are complete and fully dry, you’ll want to store them properly to keep them fresh and delicious.
Store your Halloween Skeleton Cookies in an airtight container at room temperature for up to 3-5 days. If you stack them, place a piece of parchment paper between layers to prevent the icing from sticking or smudging. For longer storage, you can also freeze the decorated cookies (once completely dry) in a single layer in an airtight container for up to 1 month. Thaw them at room temperature before serving.
FAQs
Q: Can I use store-bought sugar cookie dough for this recipe?
A: Absolutely! If you’re short on time, using a good quality store-bought sugar cookie dough is a fantastic shortcut. Just make sure to chill it thoroughly as directed in the recipe for best results when cutting shapes.
Q: How can I make sure my icing lines are neat?
A: Practice makes perfect! Start by piping on a piece of parchment paper to get a feel for the consistency and pressure. Hold the piping bag perpendicular to the cookie and let the icing fall onto the surface rather than pressing the tip directly onto it. Move steadily and confidently!
Q: Can kids help decorate these?
A: Yes, absolutely! Kids love decorating. They can definitely help with piping the white outline (it doesn’t have to be perfect!), and they’ll have a blast adding the black facial features. It’s a fun family activity!
Q: My icing is too runny! What do I do?
A: Don’t panic! Simply add more confectioners’ sugar, a tablespoon at a time, and stir well until you reach your desired consistency. Be sure to mix thoroughly to avoid lumps.
For more delicious recipes and baking inspiration, be sure to follow us on Pinterest!
Halloween Skeleton Cookies
Ingredients
Equipment
Method
- Step 1: Cream it up: In a large bowl, cream together the white sugar and softened butter with an electric mixer until light and fluffy. Beat in the eggs, 1 ½ teaspoons of vanilla extract, and the almond flavoring until beautifully combined.
- Step 2: Combine dry and wet: In a separate bowl, whisk together the all-purpose flour, baking powder, and salt. Gradually add this dry mixture to the wet ingredients, mixing until just combined. Be careful not to overmix.
- Step 3: Chill out: Divide the dough into two portions, wrap each snugly in plastic wrap, and refrigerate for at least 3 to 4 hours, or overnight.
- Step 4: Get ready to bake: When ready to bake, preheat your oven to 350°F (175°C). Line two baking sheets with parchment paper.
- Step 5: Roll and cut: On a work surface generously dusted with 2 tablespoons of confectioners’ sugar, roll out one portion of chilled dough to about ¼ inch thickness. Use a gingerbread man cookie cutter to cut out shapes and carefully transfer them to the prepared baking sheets.
- Step 6: Bake to perfection: Bake for 8 to 10 minutes, or until the edges are just lightly golden. Carefully transfer the hot cookies to wire racks to cool completely (around 20 minutes). Repeat with the remaining dough.
- Step 7: Whip up the icing: While cookies cool, make the white icing. In a small bowl, stir together 1 cup of confectioners’ sugar and 2 teaspoons of milk until smooth. Beat in 2 teaspoons of light corn syrup and ¼ teaspoon of vanilla extract until smooth and glossy. Adjust consistency with more milk or corn syrup if needed.
- Step 8: Decorate the bones: Transfer the white icing to a piping bag fitted with a small, plain tip. Pipe a filled-out circle inside the head portion of each cookie for the skull base, then draw three horizontal lines for the ribs on the body. Allow this white icing to dry completely (about 2 hours, or overnight).
- Step 9: Add the final spooky touches: Once the white icing is completely dry, use black decorating gel to draw eyes, a nose, and a mouth on each skull. Let these details dry for about 1 hour before serving.