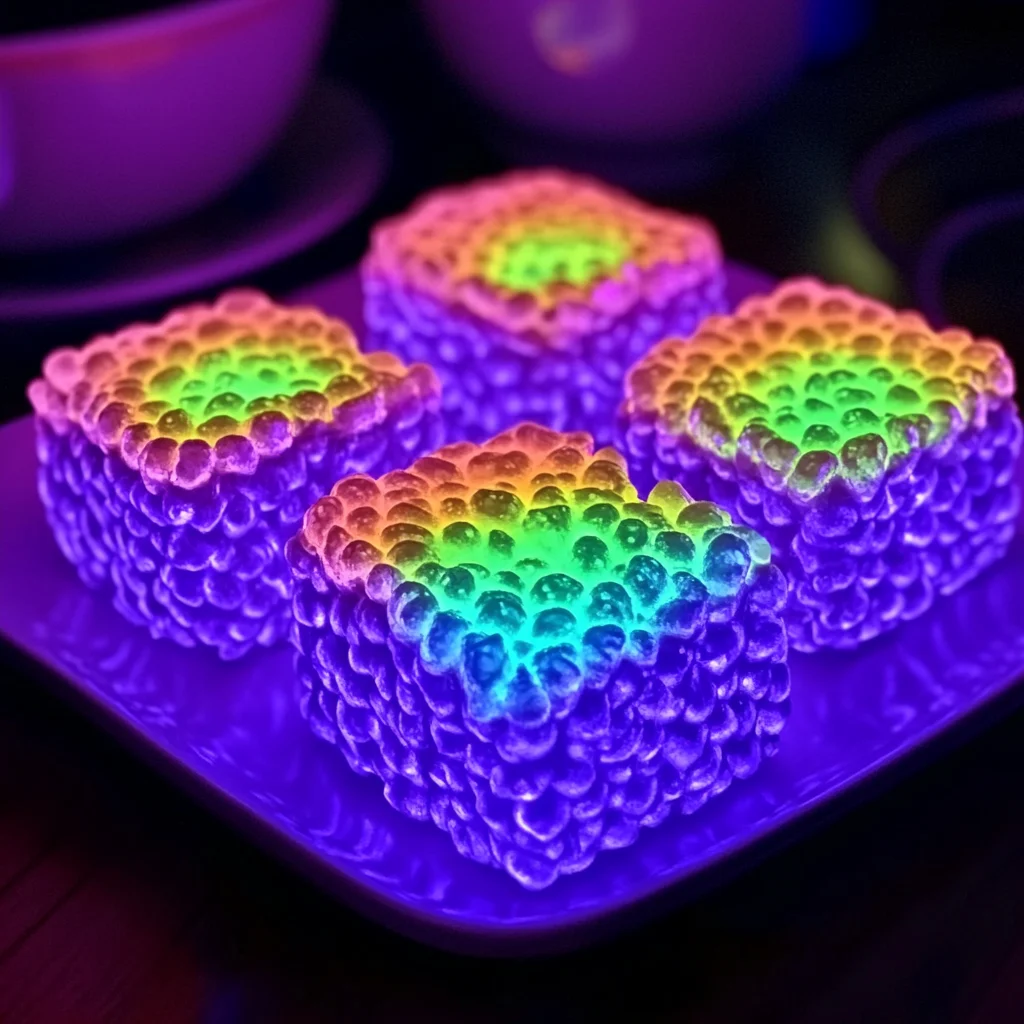
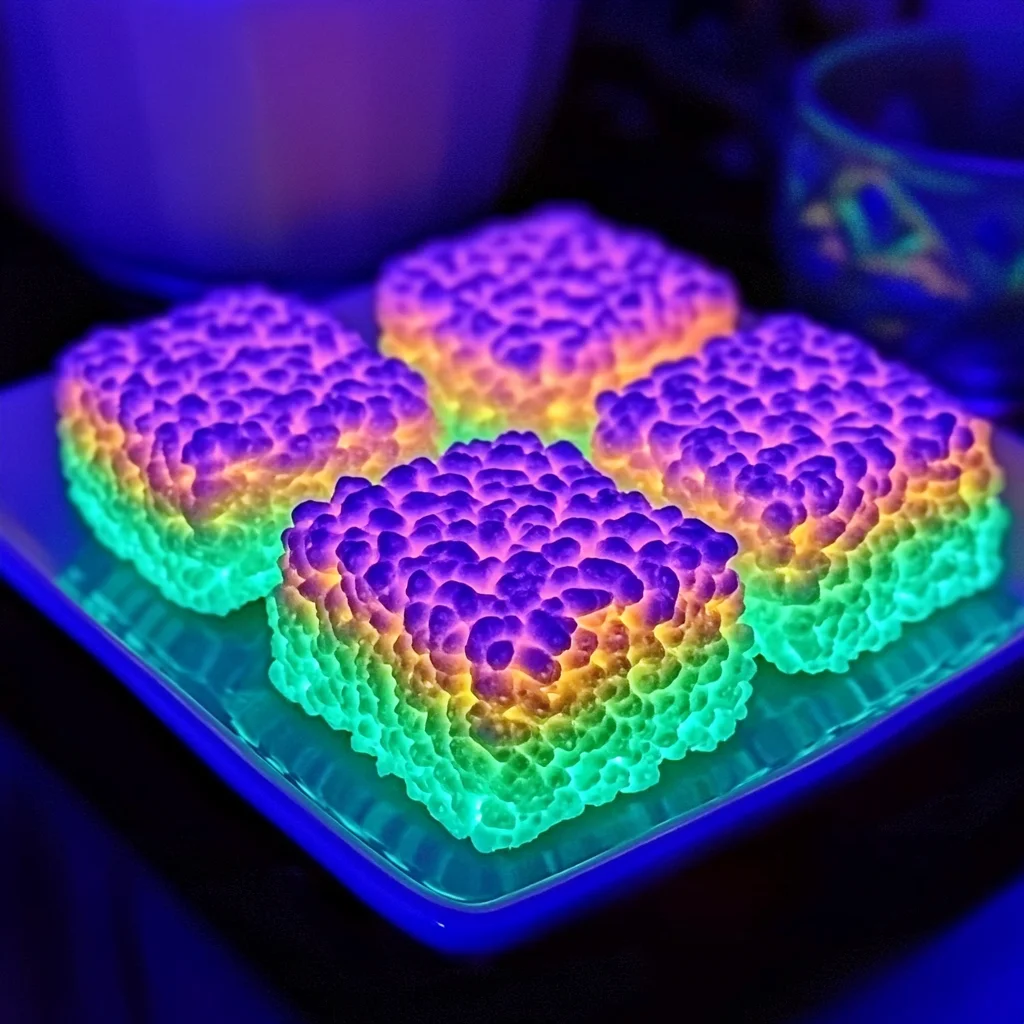
Remember those carefree days of childhood, making edible magic in the kitchen? There’s something so incredibly nostalgic about Rice Krispies Treats. They’re the ultimate comfort food, easy to whip up, and always bring a smile to everyone’s face. Well, get ready to add a whole new level of wonder to this classic with a recipe that’s truly out of this world – Glow-in-the-Dark Rice Krispies Treats! These aren’t just a snack; they’re a dazzling experience that will make any occasion feel extra special, from birthday parties to movie nights.
Why You’ll Love Glow-in-the-Dark Rice Krispies Treats
- Fast: Ready in under an hour!
- Easy: Perfect for bakers of all ages and skill levels.
- Giftable: Package them up for a fun, edible surprise.
- Crowd-pleasing: Who can resist a classic with a magical twist?
Ingredients
- 6 cups Rice Krispies cereal: The crispy, airy base that gives these treats their signature crunch.
- 4 cups mini marshmallows: The sticky, sweet binder that holds everything together.
- 1/4 cup unsalted butter: Adds richness and helps everything melt smoothly.
- 2 tablespoons tonic water: This is the secret ingredient that makes them glow under a blacklight!
- 1/2 teaspoon vanilla extract: For that classic, comforting vanilla flavor.
- Neon food coloring (green, blue, pink, or yellow): To give your treats vibrant colors that pop.
How to Make Glow-in-the-Dark Rice Krispies Treats
Let’s get this magical show on the road! Making these is super simple, and the results are truly dazzling.
-
First things first, grab a large saucepan. Melt your unsalted butter over low heat. We want it nice and melted, but definitely not browned. Low and slow is the way to go!
-
Once your butter is all liquid gold, it’s time to add the stars of the show: the mini marshmallows and the secret glow-up ingredient, tonic water! Keep stirring gently over low heat. You’ll see the marshmallows start to puff up and melt into a smooth, gooey mass. Keep stirring until it’s wonderfully smooth and there are no pesky lumps left.
-
Carefully remove the saucepan from the heat. Now, stir in the vanilla extract. This is where that cozy, familiar aroma really starts to fill your kitchen. Make sure it’s all mixed in evenly.
-
This is the fun part! Add a few drops of your chosen neon food coloring to the melted marshmallow mixture. Start with a little and add more if you want a bolder glow. Stir gently until the color is distributed evenly. You can even make a few batches with different colors for a rainbow effect!
-
Now, gently fold in your Rice Krispies cereal. The key here is to be gentle so you don’t crush those precious cereal pieces. Make sure every single crispy bit is coated in that glorious, colorful marshmallow goo.
-
Grease a 9×13-inch baking dish. This is important to prevent sticking! Spoon the cereal mixture into the dish. I like to use a piece of parchment paper over the top and gently press it down to smooth out the surface. This makes for nice, even squares.
-
Let your creations cool at room temperature for about 30 minutes, or until they’re firm enough to slice. Patience, my friend!
-
Once they’ve set, slice them into squares. Now you’re ready for the best part – seeing them glow!
Substitutions & Additions
Want to jazz things up even more? You’ve got options!
- Different Cereals: While Rice Krispies are classic, you could try crispy rice or even a puffed wheat cereal for a slightly different texture.
- Add-ins: Sprinkle in some colorful candy melts or even white chocolate chips right after pressing them into the pan.
- Flavor Boost: A little bit of citrus zest (like lemon or lime) can add a lovely brightness to the flavor.
- For a Stronger Glow: Ensure your blacklight is powerful enough and that the tonic water is fresh!
Tips for Success
A few little secrets to make your glow-in-the-dark treats absolutely perfect:
- Low Heat is Key: Melting the marshmallows slowly prevents them from burning and keeps the mixture smooth.
- Don’t Overmix: Once the cereal is added, gentle folding is best to maintain that perfect crispy texture.
- Butter Your Hands (or Spoon): If the mixture is sticking to your hands when pressing, lightly grease them with butter or cooking spray.
- Prep Ahead: You can melt the butter and marshmallows (step 2) a little in advance, but stir in the cereal and color just before pressing to keep them from getting too hard. These are also fantastic for making a day ahead for parties! If you’re looking for other easy no-bake treats, you might enjoy our no-bake marshmallow slice or our no-bake orange creamsicle cheesecake.
How to Store Glow-in-the-Dark Rice Krispies Treats
To keep these glowing goodies fresh and delicious, store them in an airtight container at room temperature. They’ll stay wonderfully chewy and delightful for up to 3 days. If you need to stack them, placing a piece of parchment paper between layers can help prevent them from sticking.
FAQs
Q: Will these glow without a blacklight?
A: No, the glow effect comes from the quinine in the tonic water, which fluoresces under ultraviolet (black) light. They’ll still taste amazing without it, though!
Q: Can I use regular marshmallows?
A: Yes, but mini marshmallows melt more evenly and quickly. If you use large marshmallows, you might need to melt them a little longer.
Q: What if I don’t have tonic water?
A: Unfortunately, tonic water is essential for the glow effect. If you don’t have it, you’ll have delicious, colorful Rice Krispies Treats, but they won’t glow.
Hope you have a blast making and enjoying these magical treats! Be sure to follow us on Pinterest for more fun and delicious recipes!
Easy & Magical Glow-in-the-Dark Rice Krispies Treats
Ingredients
Equipment
Method
- First things first, grab a large saucepan. Melt your unsalted butter over low heat. We want it nice and melted, but definitely not browned. Low and slow is the way to go!
- Once your butter is all liquid gold, it’s time to add the stars of the show: the mini marshmallows and the secret glow-up ingredient, tonic water! Keep stirring gently over low heat. You'll see the marshmallows start to puff up and melt into a smooth, gooey mass. Keep stirring until it's wonderfully smooth and there are no pesky lumps left.
- Carefully remove the saucepan from the heat. Now, stir in the vanilla extract. This is where that cozy, familiar aroma really starts to fill your kitchen. Make sure it’s all mixed in evenly.
- This is the fun part! Add a few drops of your chosen neon food coloring to the melted marshmallow mixture. Start with a little and add more if you want a bolder glow. Stir gently until the color is distributed evenly. You can even make a few batches with different colors for a rainbow effect!
- Now, gently fold in your Rice Krispies cereal. The key here is to be gentle so you don’t crush those precious cereal pieces. Make sure every single crispy bit is coated in that glorious, colorful marshmallow goo.
- Grease a 9x13-inch baking dish. This is important to prevent sticking! Spoon the cereal mixture into the dish. I like to use a piece of parchment paper over the top and gently press it down to smooth out the surface. This makes for nice, even squares.
- Let your creations cool at room temperature for about 30 minutes, or until they’re firm enough to slice. Patience, my friend!
- Once they’ve set, slice them into squares. Now you’re ready for the best part – seeing them glow!