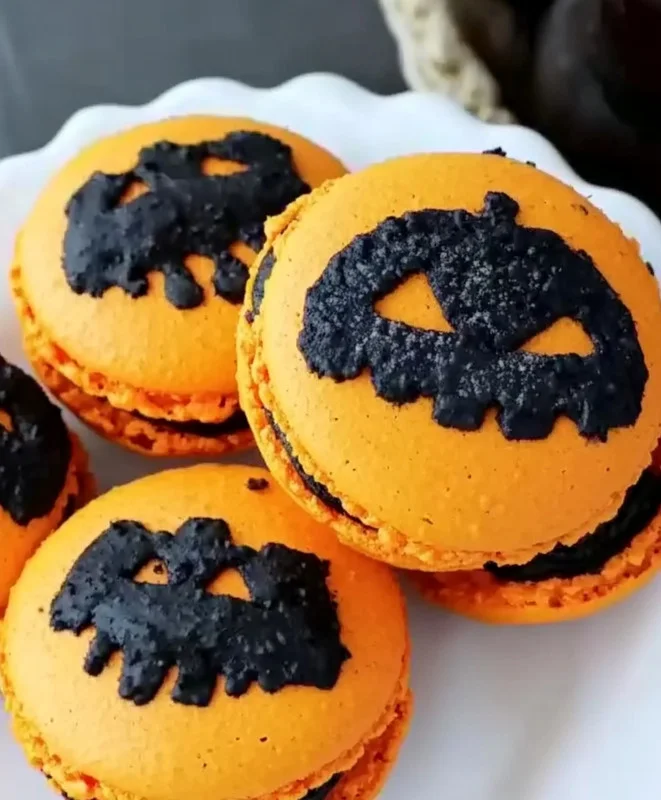
Oh, Halloween! There’s just something magical about those crisp autumn evenings, the rustle of leaves, and the sheer delight of transforming ordinary things into something wonderfully spooky. Growing up, I remember the thrill of planning costumes, carving pumpkins, and, of course, the mountains of candy. But as an adult, I’ve discovered an even deeper joy in creating homemade treats that capture the spirit of the season. And let me tell you, if you’ve ever thought macarons were too intimidating for a home baker, you are in for a treat! These Halloween macarons might look fancy, but they’re surprisingly straightforward to make, wonderfully memorable, and a truly fun way to bring some homemade magic to your celebrations. Forget boring sugar cookies, this year we’re whipping up something truly special!
Why You’ll Love Halloween Macarons
- Fast: Once you get the hang of it, the active prep time flies by!
- Easy: No, really! With a few simple tricks, you’ll be a macaron master.
- Giftable: Wrap these up for friends, neighbors, or as party favors.
- Crowd-pleasing: Who can resist a delicate, delicious macaron, especially in festive colors?
Ingredients
Gathering your ingredients is the first step to any baking adventure! Here’s what you’ll need for these ghoulishly good macarons:
- ⅔ cup fine ground almond flour (scant measure): This is crucial for that classic smooth macaron shell. Make sure it’s super fine and not almond meal, which can be too coarse.
- ⅔ cup confectioners’ sugar (scant measure): Also known as powdered sugar or icing sugar, this helps create the delicate texture.
- 1 tablespoon powdered orange food coloring: Powdered is key for macarons! Liquid food coloring can add too much moisture and ruin your batter. This will give us that vibrant Halloween orange.
- 2 medium egg whites, at room temperature: Room temperature egg whites whip up with more volume and stability. I often let mine sit out for an hour or two, or you can place the whole eggs in a bowl of warm (not hot!) water for 10-15 minutes.
- 1 pinch cream of tartar: This little helper stabilizes your egg whites, helping them reach stiff peaks.
- ¼ cup superfine sugar: Granulated sugar works, but superfine sugar dissolves more quickly into the egg whites, creating a smoother meringue.
For the Spooky Caramel Filling:
- 6 ounces mascarpone cheese, at room temperature: This rich, creamy Italian cheese makes for an incredibly decadent filling. Let it soften a bit on the counter. If you don’t have mascarpone, full-fat cream cheese can be a good substitute, but mascarpone truly takes it up a notch! For another creamy, sweet treat, consider trying my strawberry cream cheese frosting recipe!
- 2 tablespoons caramel sauce: Use your favorite store-bought sauce or a homemade one for extra pizzazz.
- 1 tablespoon confectioners’ sugar: Just a touch more for sweetness and texture in our filling.
- 1 teaspoon powdered black food coloring: This is for that eerie, striking black filling. Again, powdered is best!
How to Make Halloween Macarons
Alright, let’s get those oven mitts on and dive into making these amazing Halloween treats! Follow these steps, and you’ll be piping like a pro in no time.
- First things first, let’s get our baking stations ready. Line two baking sheets with silicone mats or parchment paper. Silicone mats are my absolute favorite for macarons, as they help with even heat distribution and easy removal.
- Time to prep our dry ingredients! Sift your almond flour and ⅔ cup of confectioners’ sugar into a bowl. Sifting is non-negotiable for smooth macaron shells, so don’t skip it! Then, sift this mixture again into a second bowl, adding your vibrant powdered orange food coloring. Give it a really good whisk to ensure that color is perfectly distributed throughout. Set this spooky orange blend aside.
- Now for the meringue, the heart of our macarons! Place your room temperature egg whites in the bowl of a stand mixer that’s fitted with the whisk attachment. Whisk on medium speed until they start to get foamy, which usually takes about 1 to 3 minutes.
- Once you see those beautiful bubbles, add your pinch of cream of tartar. Continue whisking for another 1 to 3 minutes until the mixture looks creamy and the whisk starts to leave faint traces.
- Now, crank up the speed to medium-high. With the whisk still in motion, gradually add half of your superfine sugar. Once it’s fully dissolved, add the rest of the sugar. Keep whipping until you achieve gorgeous, stiff, glossy peaks. This means when you lift the whisk, the meringue stands up firm and doesn’t droop. This usually takes an additional 1 to 3 minutes. Achieving the right meringue consistency is one of the key steps to mastering the art of perfect cookies, no matter the type!
- Here comes the macaronage – the art of folding! Using a rubber spatula, gently fold in about one-third of your orange almond flour mixture into the meringue. Don’t be too aggressive; we want to keep all that lovely air you just whipped in. Just fold until it’s barely combined. Then, gently fold in the remaining flour mixture until your batter flows like lava – thick but able to slowly drip off your spatula in a continuous ribbon. I’ve found that usually means about 50-60 folds for me, but it’s all about feel!
- Carefully pour your perfectly colored batter into a piping bag (or a sturdy resealable plastic bag with a corner snipped off). Pipe 32 small circles onto your prepared baking sheets, making sure to leave about 2 inches between each cookie for spreading.
- Once all your shells are piped, lightly rap the baking sheets on your counter a few times. This helps release any trapped air bubbles, which can cause hollow macarons. You might even see tiny bubbles pop!
- This next step is super important: let your piped cookies sit at room temperature for at least 30 minutes. You’ll know they’re ready when the tops become opaque and no longer look glossy, and when you can gently touch one without batter sticking to your finger. This forms a “skin” that helps create those signature “feet.”
- Preheat your oven to 325 degrees F (165 degrees C).
- Bake one baking sheet in the preheated oven for 12 to 15 minutes. You’ll see those beautiful crinkly “feet” form around the base, and the bottoms should feel firm. Remove them from the oven and let them cool completely on the baking sheet. It’s important to let your oven return to temperature before baking the second batch to ensure even cooking.
- While your orange shells are baking and cooling, let’s whip up that spooky filling! In a clean bowl, combine your room temperature mascarpone cheese, caramel sauce, 1 tablespoon confectioners’ sugar, and the powdered black food coloring. Whip everything together until it’s light and fluffy. Once it’s ready, pop the filling into the refrigerator to chill until you’re ready to assemble.
- Patience is a virtue, especially with macarons! Ensure your cookie shells are completely cool before you try to fill them. If they’re warm, the filling will melt.
- Transfer your chilled filling to a clean piping bag. Pipe a dollop of the black caramel filling onto the flat side of one orange cookie base, then gently top with another orange cookie to create a sandwich. If you have any leftover filling, you can get creative and decorate the tops of your macarons with a spooky drizzle or design!
Substitutions & Additions
Macarons are a fantastic canvas for creativity! Here are some ideas to switch things up:
- Color Swap: Instead of orange and black, try purple and green, or classic ghost white with a hint of shimmer. Just remember to use powdered food coloring for the shells!
- Filling Fun: Not a fan of caramel? You could easily swap it for a rich chocolate ganache, a pumpkin spice buttercream, or even a tangy raspberry jam. Thinking about more cookie creations? My easy peach cobbler cookies are another delightful recipe to try!
- Flavor Boosters: Add a tiny drop of vanilla extract or almond extract to your egg whites for an extra layer of flavor in the shells. A pinch of cinnamon in the filling could also be delicious!
- Spooky Details: Before baking, you can gently sprinkle a tiny bit of edible glitter or black sanding sugar on the shells for an extra magical touch. After filling, use edible markers to draw little ghost faces or spiderwebs!
Tips for Success
Macarons have a reputation for being finicky, but with these tips, you’ll nail them every time!
- Accuracy is Key: Baking is a science, especially with macarons. Measure your ingredients precisely, preferably using a kitchen scale for the best results.
- Don’t Overmix (or Undermix) the Batter: This is the tricky part, “macaronage.” You want the batter to flow slowly like lava, not too runny and not too stiff. Practice makes perfect!
- Room Temperature Egg Whites: I can’t stress this enough! Cold egg whites won’t whip up as effectively.
- Let Them Rest: The “skin” that forms during the resting period is vital for those iconic “feet” to develop. Don’t rush this step.
- Humidity is the Enemy: Macarons are sensitive to moisture. Try to bake them on a dry day, if possible.
- Bake One Tray at a Time: This ensures even baking and allows your oven to recover its temperature between batches.
- Cool Completely: Trying to remove or fill warm macarons will result in sticky, broken shells. Let them cool down fully!
How to Store Halloween Macarons
Once you’ve made these beauties, you’ll want to keep them fresh!
- Countertop: While not ideal for long-term storage, they can be kept in an airtight container at room temperature for up to 1-2 days, though they’re best chilled.
- Refrigerator: Store your filled macarons in an airtight container in the fridge for up to 5-7 days. The flavors actually meld and often improve after a day or two in the fridge, so don’t be afraid to make them ahead!
- Freezer: For longer storage, you can freeze unfilled shells in an airtight container for up to 1 month. Thaw them at room temperature before filling. Filled macarons can also be frozen for about 2-3 weeks, but the filling texture might change slightly upon thawing.
FAQs
Got questions? I’ve got answers!
Can I use liquid food coloring?
I highly recommend sticking to powdered or gel food coloring for macarons. Liquid food coloring adds too much moisture to the batter, which can prevent the shells from drying properly and forming feet.
Why didn’t my macarons get “feet”?
This is a common issue! It’s usually due to undermixed or overmixed batter, not letting them rest long enough to form a skin, or issues with oven temperature. Double-check your macaronage technique and ensure your shells are completely dry to the touch before baking.
Can I make these ahead of time for a party?
Absolutely! Macarons actually “mature” beautifully in the fridge. Making them a day or two in advance allows the filling to soften the shell slightly, leading to that perfect tender-chewy texture. Just store them in an airtight container.
My macarons cracked. What happened?
Cracking can be caused by air bubbles trapped in the batter (which is why we rap the trays!), too much heat in the oven, or insufficient drying time. Try rapping your trays more vigorously and ensure the shells have a firm skin before baking.
For more delicious recipes and baking inspiration, be sure to follow us on Pinterest!
Halloween Macarons with Black Caramel Mascarpone Filling
Ingredients
Equipment
Method
- Prep pans: Line two baking sheets with silicone mats (preferred) or parchment for even baking and easy release.
- Sift dry mix twice: Sift almond flour and confectioners’ sugar into a bowl. Sift again into a second bowl, whisking in the powdered orange coloring until evenly distributed. Set aside.
- Whip meringue: In a stand mixer bowl, beat room-temperature egg whites on medium until foamy (1–3 min). Add cream of tartar; continue until slightly creamy. Increase to medium-high and gradually add superfine sugar in two additions. Beat to stiff, glossy peaks (1–3 min more).
- Macaronage: Fold one-third of the orange almond mixture into the meringue gently. Add the rest and fold until the batter flows slowly like lava and falls from the spatula in a continuous ribbon (about 50–60 folds; go by feel).
- Pipe shells: Transfer batter to a piping bag. Pipe 32 even circles, leaving ~2 inches between. Rap trays on the counter several times to release air bubbles.
- Dry: Let piped shells rest at room temperature until a dry skin forms (about 30 minutes); the tops should be matte and not sticky to the touch.
- Bake: Heat oven to 325°F (165°C). Bake one tray at a time for 12–15 minutes until feet form and shells are set. Cool completely on the tray. Return oven to temperature before the second tray.
- Make filling: Beat mascarpone with caramel sauce, 1 tbsp confectioners’ sugar, and powdered black coloring until smooth and fluffy. Chill until assembly time.
- Assemble: Pair similar-sized shells. Pipe a dollop of black caramel filling onto the flat side of one shell and sandwich with its pair. Optionally decorate tops with a spooky drizzle or designs.