
Remember those fun nights out at your favorite casual restaurant? The table is buzzing, everyone’s chatting, and then it arrives. That giant, golden, ridiculously shareable blooming onion with its irresistible dipping sauce! Well, get ready, because I’m about to show you how to capture that magic right in your own kitchen, with way less mess and oil thanks to your trusty air fryer. Seriously, making a blooming onion at home feels like a special occasion, but this recipe is so surprisingly simple, you might just make it ‘just because’. It’s crispy, flavorful, and a total blast to pull apart and share (or not share, no judgment here!).
Why You’ll Love This Recipe
- Fast: Forget waiting at a restaurant! This gets crispy in your air fryer in no time.
- Easy: The steps are straightforward, even the cutting part is simpler than it looks!
- Giftable: Okay, maybe not wrapped in a box, but bringing this to a party or making it for friends is a delicious gift of snacky goodness!
- Crowd-pleasing: This is a guaranteed showstopper that everyone will devour.
Ingredients
Gather up these simple goodies – you probably have most of them already!
- 1 large sweet onion: Like a Vidalia or Walla Walla. The star of the show! Pick one that’s nice and round and sits flat.
- 2 ½ cups all-purpose flour: The base for our wonderfully crispy coating.
- 1 tablespoon paprika: Adds beautiful color and a touch of sweet pepper flavor to the crust.
- 1 teaspoon cayenne pepper: For a little kick! Adjust this amount to your spice preference – omit for no heat.
- ½ teaspoon ground cumin: Adds a warm, earthy depth that pairs so well with the other spices.
- ½ teaspoon dried thyme: Classic savory herb flavor.
- ½ teaspoon dried oregano: Another essential aromatic herb for our spice mix.
- 2 large eggs: Helps bind all that dry goodness to the onion.
- 1 cup milk: Part of the liquid bath that preps the onion for its double dredge.
- 1 cup water: Thins out the wet mixture perfectly.
- Salt and pepper: To season the coating and give the finished onion a little extra pop. Don’t forget this!
- Oil in a spray bottle: This is key for getting that golden, crispy air-fried finish without soaking the onion in oil. Avocado or olive oil spray works great.
How to Make It
Alright, let’s turn this humble onion into a crispy masterpiece! Don’t worry, the cutting is the most “technical” part, and you’ve totally got this.
Step 1: Get your onion ready to bloom. Start by slicing off about ½ an inch from the top (the stem end, not the root end!) of your large sweet onion. Peel off the papery skin. Now, place the onion cut-side down on your cutting board. This is where the magic happens! You’re going to make cuts from about ½ inch away from the root straight down to the cutting board. Imagine dividing the onion into quarters, then eighths, then sixteenths. Make 4 evenly spaced cuts first, stopping about ½ inch from the root center. Then, make 3 more cuts between each of those sections. You’ll end up with 16 cuts total, all radiating from the center but still attached at the root. It should look like a flower starting to open.
Step 2: Let it relax. Carefully turn the onion over so the cut side is facing up. Let it just sit there for about 5 minutes. This helps the layers, or “petals,” relax and gently open up. You can help them along a little by gently separating the outer pieces with your fingers if needed. Be careful not to break any off!
Step 3: Set up your coating station. Grab two large bowls. In the first bowl, whisk together your flour, paprika, cayenne pepper (give it that little kick!), cumin, dried thyme, dried oregano, and a good pinch of salt and pepper. Mix it all up so the spices are evenly distributed. In the second bowl, whisk together your eggs, milk, and water until well combined. You’ve got your dry mix and your wet dip ready to go!
Step 4: The first flour coat. Place the onion, cut-side up, in a clean bowl (or you can just use the bowl you used for the dry mix after you transfer some out). Pour the flour mixture over the onion, letting it get down into all those beautiful petals. Use a spoon to really help coax the flour into every nook and cranny. You want it well coated! Once you think you’ve got it, gently flip the onion over and pat off any excess flour. Save the remaining flour mixture in the bowl – you’ll need it again.
Step 5: The wet dip and final flour coat. Now, carefully lift the onion and dip it into the egg mixture, making sure to get the liquid all over and between the petals. Let any excess drip off for a moment. Immediately transfer the wet onion back into your bowl with the reserved flour mixture. Coat it thoroughly again, using your spoon to help, and tapping off any excess flour. This double-dredge is key to getting that crispy coating that will stand up to the air fryer!
Step 6: Chill out & preheat. Place the coated onion on a plate or in a container and pop it in the refrigerator for at least 15-30 minutes. This helps the coating adhere firmly to the onion before it hits the heat. While it’s chilling, preheat your air fryer to 350°F (175°C). Get it nice and hot!
Step 7: Into the air fryer! Carefully remove the chilled onion from the fridge. Give it a generous spray all over with your oil spray. Don’t be shy – this is what helps with crisping and browning! To easily get the onion into the air fryer basket without the coating rubbing off, I like to make a little sling out of aluminum foil. Just tear off a strip, fold it into a thick band, and place the onion on top. Use the ends of the foil sling to carefully lower the onion into the air fryer basket, cut-side up. Then, gently pull the foil sling out from under it.
Step 8: Air fry to perfection! Air fry the blooming onion for about 25 minutes. During the cooking time, open the air fryer basket a couple of times (maybe around the 10 and 20-minute mark) and spray the onion generously with oil again, especially if you see any dry, floury spots. You want it to get beautifully golden brown and wonderfully crispy!
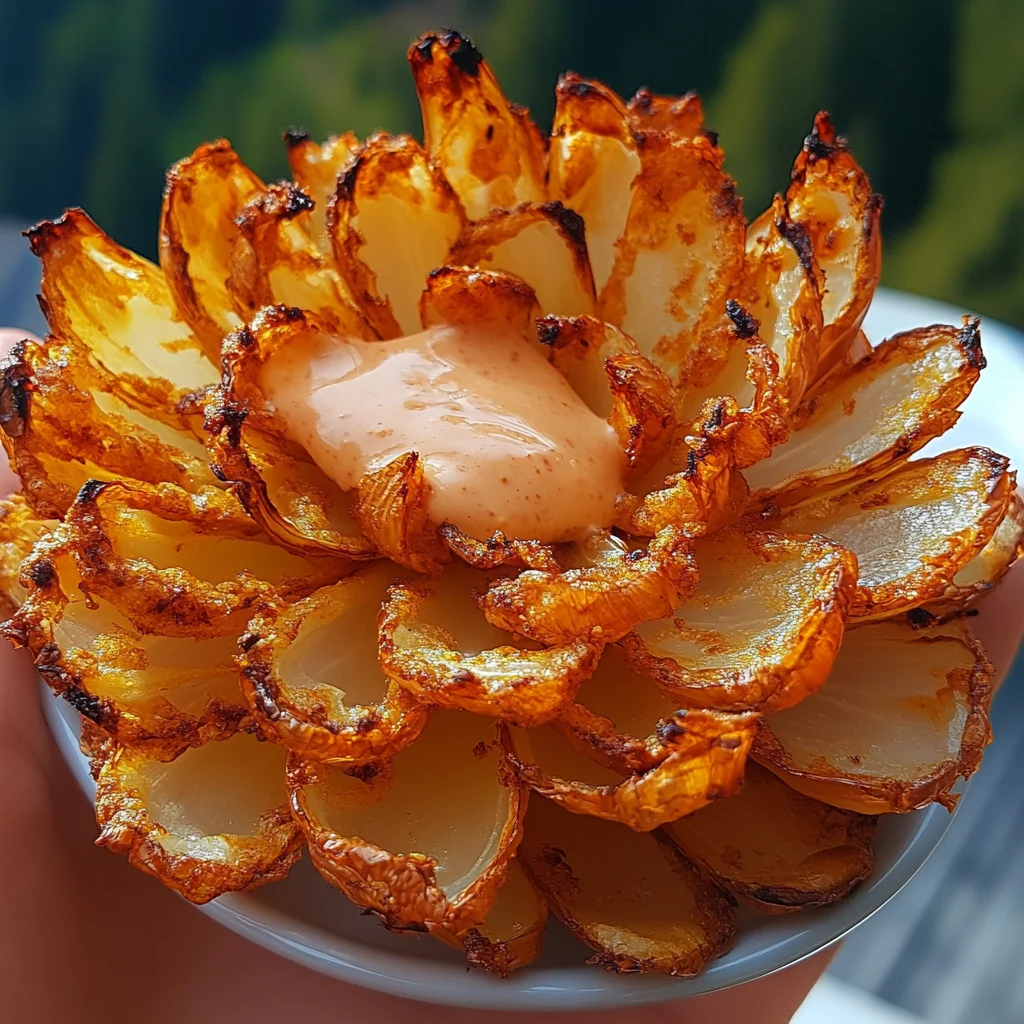
Step 9: Finish and serve! Once it’s beautifully golden and crispy, carefully lift the onion out using your foil sling (or a spatula if you’re careful). Place it on a serving plate, season it right away with a little extra salt and pepper if you like. The absolute best part? Serving it with your favorite blooming onion dip! Ranch, spicy mayo, a classic remoulade, or even a sriracha ranch – whatever makes your taste buds happy! Get ready to pull those petals off and enjoy every single bite!
Substitutions & Additions
Want to mix things up or tailor it to your pantry? Here are a few ideas to customize your blooming onion:
- Different Onions: While sweet onions are classic for their mildness, you could try a standard yellow onion for a sharper flavor. Just note they might not open quite as perfectly as sweet varieties.
- Spice Level: The cayenne gives it warmth. Use more for extra heat, or leave it out entirely if you prefer no spice. A pinch of chili powder could also add a different kind of warmth.
- Herb Swap: You could use a pre-mixed Italian seasoning blend in place of the dried thyme and oregano, or add other flavors like garlic powder or onion powder to the flour mix. Smoked paprika is also a great addition!
- Gluten-Free: While I haven’t tested it myself, you could experiment with a gluten-free all-purpose flour blend. Results may vary slightly in crispness and texture.
- Dairy-Free: Use your favorite unsweetened plant-based milk (like almond or soy) instead of dairy milk in the wet mixture.
- Cheesy Boost: Some folks like to mix a tablespoon or two of finely grated Parmesan cheese into the flour mixture for an extra layer of flavor!
Tips for Success
A few little pointers to make sure your blooming onion turns out perfectly crispy and delicious every single time:
- Sharp Knife is Your Friend: Seriously, using a sharp knife makes cutting the bloom so much easier, cleaner, and safer.
- Don’t Sever the Root: Make sure you leave that ½ inch at the root intact! That’s what holds the entire onion together in its “bloom” shape. Cutting through the root center means your onion will fall apart.
- Coat, Coat, Coat! Be thorough when dredging. Really work the flour and wet mixtures down into and all over every petal. This ensures maximum coverage and maximum crispiness.
- Don’t Skip the Chill Time: Refrigerating the coated onion is an important step! It gives the coating time to adhere firmly to the onion before it hits the hot air, preventing it from falling off.
- Spray Generously (and Re-Spray): Oil spray is absolutely essential for getting that golden, crispy exterior in the air fryer. Don’t be shy with the initial spray, and make sure to re-spray a couple of times during cooking, especially any spots that still look powdery or pale.
- Give it Space: This recipe is designed for one large onion in a standard air fryer. Make sure your onion fits comfortably in the basket with room for the air to circulate around it. Air fryers work best when not overcrowded.
How to Store It
Honestly? This is one of those magical snacks that is best enjoyed immediately, fresh out of the air fryer. The coating is at its ultimate crispness!
However, if by some miracle you do happen to have leftovers (impressive!), you can store them in an airtight container in the refrigerator for 1-2 days.
To Reheat: The absolute best way to bring back some of that glorious crispness is to pop it back in the air fryer! Reheat at 350°F (175°C) for 5-8 minutes, or until heated through and the coating feels crisp again. Microwaving will make it soggy, so avoid that if you can help it!
FAQs
Got questions? I’ve got answers!
- Q: Can I make this ahead of time?
A: You can do the cutting and even the coating steps (including the chilling step) a few hours ahead of time. Just make sure it’s well-wrapped in the fridge so the coating doesn’t dry out. Air frying is best done right before serving for maximum crispness. - Q: What’s the best onion variety for blooming?
A: Sweet onions like Vidalia or Walla Walla are generally preferred because of their mild flavor and they tend to open up nicely when cut. - Q: My onion didn’t “bloom” perfectly, what went wrong?
A: This usually happens if you accidentally cut too close to or through the root center, which is what holds the whole thing together. Using a dull knife can also make the cuts less clean. Don’t worry, even if it’s not picture-perfect, it will still taste amazing! - Q: What kind of dip should I use?
A: A classic creamy sauce is traditional and highly recommended! Think spicy mayonnaise (often called “bloom sauce”), remoulade, or just good old ranch dressing. Get creative and use your favorite!
Easy Air Fryer Blooming Onion Recipe
Ingredients
Equipment
Method
- Step 1: Prepare the onion. Slice off about ½ an inch from the top (stem end) of the onion. Peel off the papery skin. Place the onion cut-side down. Make cuts from about ½ inch away from the root straight down to the cutting board, creating 16 evenly spaced cuts that radiate from the center but remain attached at the root.
- Step 2: Let the onion relax. Carefully turn the onion over so the cut side is facing up. Let it sit for about 5 minutes to help the layers open up. Gently separate outer petals if needed.
- Step 3: Set up coating station. In the first large bowl, whisk together the flour, paprika, cayenne pepper, cumin, dried thyme, dried oregano, and salt and pepper. In the second large bowl, whisk together eggs, milk, and water.
- Step 4: First flour coat. Place the onion, cut-side up, in a clean bowl or use the dry mix bowl. Pour the flour mixture over the onion, using a spoon to get it into the petals. Gently flip the onion over and pat off excess flour. Reserve remaining flour mixture.
- Step 5: Wet dip and final flour coat. Carefully lift the onion and dip it into the egg mixture, ensuring it gets all over and between the petals. Let excess drip off. Transfer the wet onion back into the bowl with the reserved flour mixture. Coat thoroughly again, using a spoon to help, and tapping off excess flour.
- Step 6: Chill & preheat. Place the coated onion on a plate or container and refrigerate for at least 15-30 minutes. Preheat your air fryer to 350°F (175°C) while it chills.
- Step 7: Into the air fryer. Remove the chilled onion. Generously spray it all over with oil spray. Use an aluminum foil sling to carefully lower the onion into the air fryer basket, cut-side up. Gently pull the foil out.
- Step 8: Air fry. Air fry for about 25 minutes. Open the basket around the 10 and 20-minute marks and spray the onion generously with oil again, especially on any dry spots. Cook until golden brown and crispy.
- Step 9: Serve. Carefully lift the onion out. Place on a serving plate, season immediately with extra salt and pepper if desired. Serve right away with your favorite blooming onion dip (like ranch, spicy mayo, or remoulade).