
As the leaves turn golden and the air gets a crisp chill, our kitchens tend to get a lot cozier. And what better way to embrace the season of spooky fun than with a dessert that’s as delightful to make as it is to eat? These Spiderweb Dirt Cups are an absolute crowd-pleaser, perfect for parties, school treats, or just a fun afternoon activity with the kids. They bring back those sweet, innocent childhood memories, and the best part? They’re incredibly easy and quick to whip up, meaning less time in the kitchen and more time for Halloween frights!
Why You’ll Love Spiderweb Dirt Cups
- Fast: Ready in under an hour (plus chilling time)!
- Easy: No complicated techniques, just simple steps.
- Giftable: Package them up for a spooktacular surprise.
- Crowd-pleasing: Everyone, from little goblins to grown-ups, adores these.
Ingredients
- 1 (3.4-ounce) box instant chocolate pudding mix: The base of our delicious “dirt”!
- 1 1/2 cups milk: To bring that pudding to life.
- 1 1/2 cups heavy whipping cream: For that wonderfully light and airy texture.
- 3 tablespoons black cocoa powder or Dutch-process cocoa powder: This is key for that deep, dark “dirt” color and rich flavor.
- 26 chocolate sandwich cookies, crushed: The perfect crunchy “dirt” texture.
- 15 gummy worms: Because what’s dirt without a few wiggly inhabitants?
- 20 candy eyeballs: To give our little creepy crawlies a spooky stare.
- 1/2 cup white candy melting wafers, melted: To create our delicate spiderwebs.
- Crushed ice: Our secret weapon for perfectly formed webs!
- 6 sugar-coated gummy bears: The most adorable (and edible!) spiders you’ll ever see.
How to Make Spiderweb Dirt Cups
Ready to get your hands (a little) dirty? Let’s dive in!
First things first, let’s make our pudding base. In a large bowl, whisk together the instant pudding mix and the milk until everything is nice and smooth. Let it sit for about 5 minutes to thicken up.
Now for the fluffy cream! In another large bowl, whip the heavy cream with your electric mixer on medium-high speed until you see soft peaks forming. Think of it like gentle waves. Then, add in your black cocoa powder and whip on high speed until you have stiff peaks – this means the cream holds its shape firmly.
It’s time to bring our pudding and cream together. Gently fold one-third of the whipped cream mixture into the pudding. This lightens up the pudding. Then, carefully fold in the rest of the whipped cream until it’s just combined. We want to keep that airy texture!
Let’s build our cups! Divide about half of your creamy pudding mixture among 6 clear cups. Using clear cups really lets you see all those fun layers.
Now for the dirt! Top each cup with a heaping tablespoon of your crushed chocolate sandwich cookies.
Time to add some guests! Nestle 2-3 gummy worms and 3-4 candy eyeballs into the “dirt” layer. Try to position them against the side of the cup so they peek out – it’s so fun to see them!
Let’s add more layers of goodness. Top each cup with another heaping tablespoon of crushed cookies, followed by about 1/3 cup of the remaining pudding mixture. It’s like building a mini dessert landscape!
Finish off the dirt layer by topping each cup with 2 more heaping tablespoons of crushed cookies.
Pop these beauties in the refrigerator for at least 1 hour. This gives them time to chill and set beautifully.
While our cups are chilling, let’s make those spooky spiderwebs! Line a baking sheet with some kitchen towels – this will help keep things stable. Fill a large bowl with crushed ice and just a little bit of water. Press the ice down to create a nice, flat surface for our webs.
Melt your white candy wafers according to package directions. Transfer the melted wafers to a piping bag fitted with a medium round tip, or if you don’t have one, a resealable plastic bag with one corner snipped off will work perfectly.
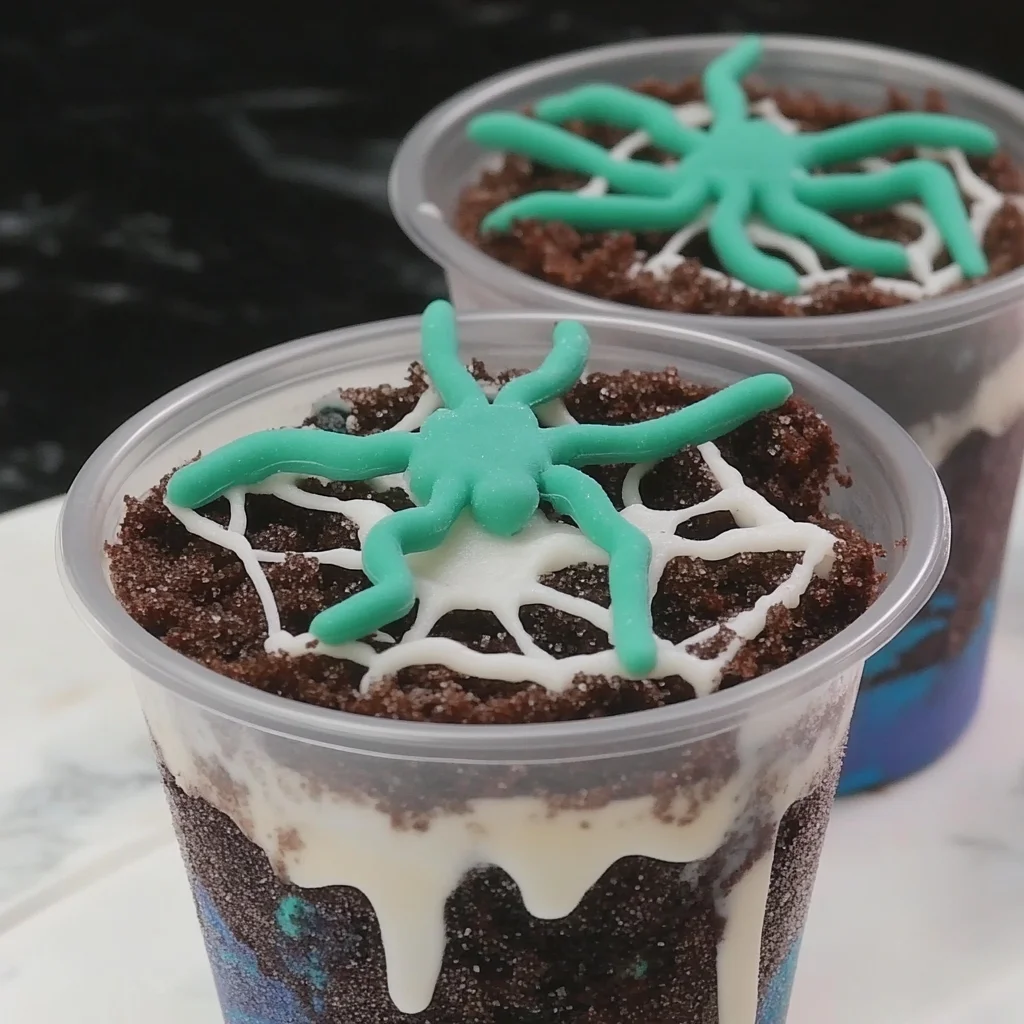
Now for the magic! Pipe 4 intersecting lines onto the ice bath, forming a 3-inch asterisk. Then, pipe a circle just inside the asterisk, and a smaller circle inside that first one. Ta-da! You’ve got a spiderweb shape.
Let the spiderwebs set for about 10-15 seconds. They’ll firm up quickly in the cold. Gently transfer them to your prepared baking sheet. Repeat this process to make 8 spiderwebs so you have extras!
Let’s prepare our little gummy spiders. Arrange the sugar-coated gummy bears flat-side up. Using kitchen shears, carefully snip 3 narrow triangles from each short end of the gummy bears. This will create their little legs!
It’s time for the grand finale! Place one spiderweb on top of each of your chilled dirt cups.
Finally, top each dirt cup with a gummy spider. Serve them cold and watch the delight on everyone’s faces!
Substitutions & Additions
Want to get a little creative? Here are some ideas:
- Chocolate Pudding: If you don’t have instant, you can use regular chocolate pudding made according to package directions, just make sure it’s completely cooled.
- Cookies: Any chocolate cookie will work! Oreos are classic, but chocolate wafers or even crushed chocolate chip cookies can be fun.
- Gummy Creatures: Swap gummy worms and spiders for gummy bats, spiders, or even candy skeletons for a different kind of spooky!
- Frosting Webs: If you don’t want to use candy melts, you can use a simple cream cheese frosting colored white and pipe on your webs.
- Extra Sparkle: A sprinkle of edible glitter on the webs can add a magical touch.
- For the Grown-Ups: A tiny splash of chocolate liqueur or coffee liqueur in the pudding can be a fun grown-up twist.
Tips for Success
Here are a few little secrets to make your Spiderweb Dirt Cups absolutely perfect:
- Don’t Overmix: When folding the whipped cream into the pudding, be gentle! You want to keep that light, airy texture.
- Chill Time is Key: Letting the dirt cups chill for at least an hour is important for them to set properly.
- Ice Bath Patience: The ice bath is crucial for getting those delicate spiderwebs to set. Don’t rush the process! If your ice melts too much, just add more.
- Web Precision: For the cleanest spiderweb look, ensure your white chocolate is smooth and free-flowing before piping.
- Prep Ahead: You can make the dirt cups up to a day in advance and store them in the refrigerator. The spiderwebs and spiders are best made closer to serving time for the freshest look.
How to Store Spiderweb Dirt Cups
These delightful treats are best enjoyed fresh, but you can store them if needed.
- Refrigeration: Store any leftover dirt cups in an airtight container in the refrigerator for up to 2 days. The cookies might soften a bit over time, but they’ll still be delicious.
- Spiderwebs: The spiderwebs can be made a few hours ahead of time and kept at cool room temperature, or in the fridge if your kitchen is warm.
FAQs
Q: Can I make these dairy-free?
A: Absolutely! You can use a dairy-free chocolate pudding mix and dairy-free milk alternative. For the whipped cream, opt for a coconut-based whipping cream or a dairy-free alternative. Ensure your candy melts and gummy candies are also dairy-free.
Q: Can I use regular cocoa powder instead of black or Dutch-process?
A: Yes, you can! Regular cocoa powder will still give you a delicious chocolate flavor, but the “dirt” won’t be quite as dark and intensely colored. If you want a darker color, you can add a tiny bit more regular cocoa powder.
Q: How many servings do these make?
A: This recipe makes 6 individual Spiderweb Dirt Cups.
Q: Can kids help make these?
A: Yes! Kids absolutely love helping with these. They can crush the cookies, help mix the pudding, and decorate the cups with the worms, eyeballs, and spiders. It’s a fantastic family-friendly activity!
Enjoy your spooky, delicious, and totally homemade Spiderweb Dirt Cups! Don’t forget to follow us on Pinterest for more delightful recipes!
Spooky Spiderweb Dirt Cups
Ingredients
Equipment
Method
- Step 1: In a large bowl, whisk together the instant pudding mix and the milk until everything is nice and smooth. Let it sit for about 5 minutes to thicken up.
- Step 2: In another large bowl, whip the heavy cream with your electric mixer on medium-high speed until you see soft peaks forming. Then, add in your black cocoa powder and whip on high speed until you have stiff peaks.
- Step 3: Gently fold one-third of the whipped cream mixture into the pudding. Then, carefully fold in the rest of the whipped cream until it’s just combined.
- Step 4: Divide about half of your creamy pudding mixture among 6 clear cups.
- Step 5: Top each cup with a heaping tablespoon of your crushed chocolate sandwich cookies.
- Step 6: Nestle 2-3 gummy worms and 3-4 candy eyeballs into the “dirt” layer, positioning them against the side of the cup so they peek out.
- Step 7: Top each cup with another heaping tablespoon of crushed cookies, followed by about 1/3 cup of the remaining pudding mixture.
- Step 8: Finish off the dirt layer by topping each cup with 2 more heaping tablespoons of crushed cookies.
- Step 9: Refrigerate for at least 1 hour to chill and set.
- Step 10: Line a baking sheet with kitchen towels. Fill a large bowl with crushed ice and a little water. Press the ice down to create a flat surface.
- Step 11: Melt white candy wafers according to package directions. Transfer to a piping bag fitted with a medium round tip, or a resealable plastic bag with a corner snipped off.
- Step 12: Pipe 4 intersecting lines onto the ice bath, forming an asterisk. Pipe a circle just inside the asterisk, and a smaller circle inside that. This creates a spiderweb shape.
- Step 13: Let the spiderwebs set for about 10-15 seconds. Gently transfer them to your prepared baking sheet. Repeat to make 8 spiderwebs.
- Step 14: Arrange the sugar-coated gummy bears flat-side up. Using kitchen shears, carefully snip 3 narrow triangles from each short end to create legs.
- Step 15: Place one spiderweb on top of each of your chilled dirt cups.
- Step 16: Top each dirt cup with a gummy spider. Serve cold.