
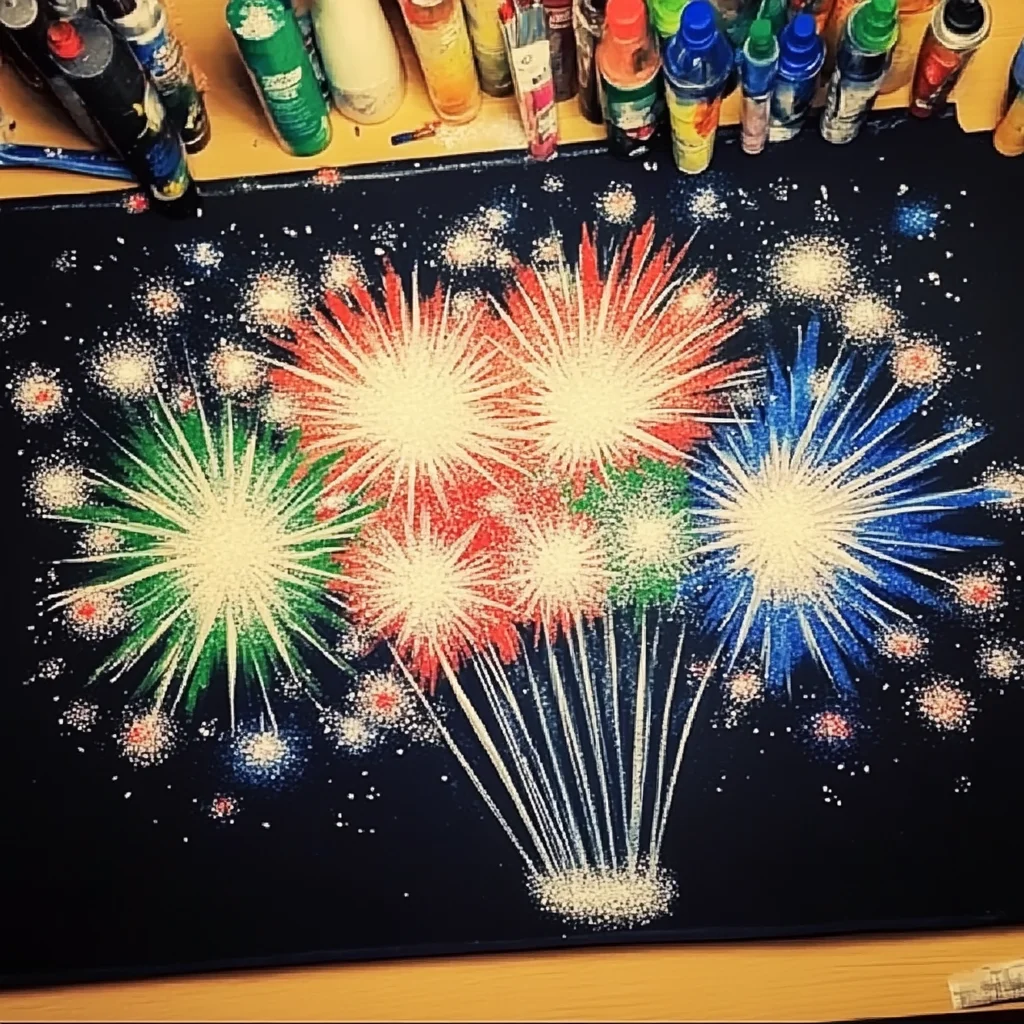
Remember those magical summer nights, watching the sky explode with color? There’s something so captivating about fireworks, isn’t there? They bring a sense of wonder and celebration. Well, today we’re going to capture that excitement right in our craft room with a super fun and easy DIY Firework Salt Painting! It’s a craft that’s perfect for a rainy afternoon, a festive holiday, or just because you want to add a little sparkle to your day. Plus, it’s incredibly simple, making it a fantastic activity to do with kids (or even just for yourself – no judgment here!).
Why You’ll Love DIY Firework Salt Painting
- Fast: You can create a beautiful firework masterpiece in no time.
- Easy: Even the littlest artists can achieve stunning results.
- Giftable: These vibrant paintings make thoughtful, handmade gifts.
- Crowd-pleasing: Everyone loves a little bit of sparkle and color!
Ingredients
Gathering your supplies is a breeze. You probably have most of these lurking in your craft bin already:
- Black construction paper or watercolor paper: Black paper really makes those firework colors pop, but watercolor paper is great too if you want to paint over the whole surface later.
- White school glue: This is our magic binder!
- Table salt: The key ingredient that makes the magic happen. Any kind of table salt will work.
- Watercolors: Grab your favorite colors! Vibrant shades work best for that firework feel.
- Small paintbrushes: For carefully touching the watercolors to the salted glue.
- Water cup: To rinse your brushes and dilute the watercolors.
- Tray or baking sheet: This is optional, but it helps catch any stray salt and makes cleanup a breeze.
How to Make DIY Firework Salt Painting
Alright, let’s get crafting! It’s a simple process that feels like a little bit of science and a whole lot of art.
-
First things first, lay out your black construction paper or watercolor paper on a flat surface. If you’re worried about a little mess (which is part of the fun!), slide it onto a tray or baking sheet. This will be your canvas!
-
Now, grab your white school glue. Get creative and draw out your firework designs! Think about those classic burst shapes, zig-zags, or even little dots. You can make them as simple or as intricate as you like. Don’t worry if your lines aren’t perfectly straight; the salt will add a cool texture that hides any little wobbles.
-
This is where the magic really starts! While the glue is still nice and wet, it’s time to sprinkle on the table salt. Be generous! Cover all those glue lines completely. Once you’ve salted it, gently tilt the paper or tap the back to shake off any excess salt. You want a good coating on the glue, but not a huge pile of loose salt.
-
Let your masterpiece sit for about 10 to 15 minutes. This allows the glue and salt to start to do their thing and set up a little. It doesn’t need to be completely dry, just a bit tacky.
-
Time for the color! Take one of your small paintbrushes and dip it into your water cup. Then, dip the wet brush into your watercolor paints. You don’t need a lot of paint; just a nice, vibrant dab. Now, gently touch the tip of the brush to the salted glue lines. You’ll see the color magically travel and bloom along the salt crystals. It’s so mesmerizing!
-
Repeat step 5 with different watercolor colors. You can use a clean brush for each color, or rinse your brush thoroughly between dips. Try different color combinations to create a dazzling display of fireworks. You can even experiment with layering colors slightly.
-
Once you’re happy with your colorful creation, carefully move the painting to a flat spot where it can dry undisturbed. Let it sit for several hours, or even overnight, to ensure the paint and glue are completely dry. Resist the urge to touch it while it’s drying – patience is key for the best results!
Substitutions & Additions
Feeling adventurous? You can totally play around with this recipe!
- Paper: If you don’t have black paper, any sturdy cardstock will do. You could even try white paper and then paint over the entire surface with a dark color once the salt painting is dry for a different effect.
- Glue: While school glue works best, a glitter glue pen could add an extra layer of sparkle!
- Coloring the Salt: For an even more vibrant effect, you could try coloring the salt beforehand with food coloring or diluted acrylic paints.
- Add Sparkle: After the glue stage, before the salt, you could sprinkle on some fine glitter for an extra festive touch.
- More Texture: Try using different types of salt, like Epsom salt, for a chunkier texture.
Tips for Success
A few little tricks to make your firework painting even more spectacular:
- Don’t let the glue dry completely before adding salt. The salt needs the wet glue to stick to and create the colored lines.
- Use a light touch with the watercolor. You want the color to wick up the salt, not create puddles of watery paint.
- Experiment with brush strokes. Try dabbing, lightly brushing, or even flicking your brush for different effects.
- Prep ahead! You can draw all your glue designs in advance and let them dry slightly before the kids come to add the salt and watercolor. This can make the process a bit smoother.
- Think about framing! Once your artwork is completely dry, you can trim it and pop it into a frame for a beautiful piece of home decor. It’s a great way to display your creations, similar to how you might display a beautifully baked treat after making something special like easy peach cobbler cookies or our no-bake marshmallow slice.
How to Store DIY Firework Salt Painting
Once your masterpiece is completely dry, you can store it flat in a portfolio or a large envelope. If you framed it, it can be displayed proudly on a wall or shelf. The colors should remain vibrant for a long time, much like the lasting memories of a festive celebration.
FAQs
Can I use regular tempera paint instead of watercolors?
While watercolors are best because they are more fluid and easily wick up the salt, you can try very diluted tempera paint. However, thicker paints might not spread as effectively.
How long does it take for the painting to dry completely?
Drying time can vary depending on humidity and how much liquid you used. It typically takes at least 4-6 hours, but overnight is often best to ensure it’s completely dry and ready to handle.
Can I do this craft outdoors?
Yes, doing this craft outdoors can be a great idea, especially if you’re using a tray to catch excess salt. Just make sure it’s not too windy!
My colors aren’t spreading well, what am I doing wrong?
Make sure your paintbrush is damp, not soaking wet. Also, ensure you’re touching the tip of the brush directly to the salted glue lines. If the salt has dried too much, the color won’t spread as easily.
We hope you have as much fun making these DIY Firework Salt Paintings as we do! It’s a wonderful way to bring a little bit of that celebratory sparkle into your home. For more fun and creative ideas, be sure to follow us on Pinterest!
DIY Firework Salt Painting
Ingredients
Equipment
Method
- Lay out your paper on a flat surface, optionally on a tray to catch mess.
- Using white school glue, draw your firework designs onto the paper. Get creative with bursts, zig-zags, or dots.
- While the glue is still wet, generously sprinkle table salt over all the glue lines. Gently tilt or tap the paper to shake off excess salt.
- Let the paper sit for 10-15 minutes to allow the glue and salt to set.
- Dip a small paintbrush in water, then into a watercolor paint. Gently touch the tip of the brush to the salted glue lines. Watch the color spread!
- Repeat with different colors, rinsing the brush between colors or using a clean brush. Experiment with color combinations.
- Once satisfied, move the painting to a flat, undisturbed spot to dry completely. This can take several hours or overnight.
Your article helped me a lot, is there any more related content? Thanks! https://accounts.binance.com/es/register-person?ref=RQUR4BEO
I don’t think the title of your article matches the content lol. Just kidding, mainly because I had some doubts after reading the article.