
Remember those magical afternoons as a kid, covered in glue and glitter, creating something truly special? I sure do! There’s something so wonderfully nostalgic about simple crafts that spark joy and imagination. Today, we’re going to revisit that feeling with a craft that’s not only beautiful but also incredibly easy and satisfying: Flower Salt Painting! It’s a fantastic way to add a splash of color and creativity to your day, perfect for a rainy afternoon or a fun family activity.
Why You’ll Love Flower Salt Painting
- Fast: You can create a beautiful piece of art in no time at all.
- Easy: Even the littlest artists can join in on the fun – minimal supervision needed!
- Giftable: These charming creations make unique, handmade gifts for teachers, friends, or family.
- Crowd-pleasing: Whether you’re hosting a craft party or looking for a screen-free activity, everyone will love this.
Ingredients
Gathering your supplies is half the fun! Here’s what you’ll need to create your own vibrant flower salt paintings:
- White school glue (PVA): The backbone of our design! Any standard white glue will work perfectly.
- Fine grain table salt: This is the magic ingredient that creates the unique texture and allows the colors to bloom.
- Liquid watercolors or diluted food coloring: These are what bring our flowers to life! You can use pre-made liquid watercolors or simply dilute regular food coloring with a little water.
- Paintbrushes, pipettes, or droppers: These are your tools for applying the color. Small paintbrushes work great for outlining, while pipettes or droppers are perfect for creating those beautiful color blooms.
- Heavyweight paper: Think watercolor paper or thick cardstock. This will prevent the paper from getting too soggy and warping.
- Small cups or palette: To hold your watercolors or diluted food coloring.
- Tray or newspaper: To catch any excess salt and protect your workspace.
How to Make Flower Salt Painting
Ready to get creative? Let’s dive in and make some beautiful flower salt paintings!
- Set up your space: First things first, let’s get everything ready. Lay down some newspaper or place your tray on your workspace. Arrange all your ingredients and materials within easy reach. It’s always a good idea to have everything prepped before you start, especially when working with kids!
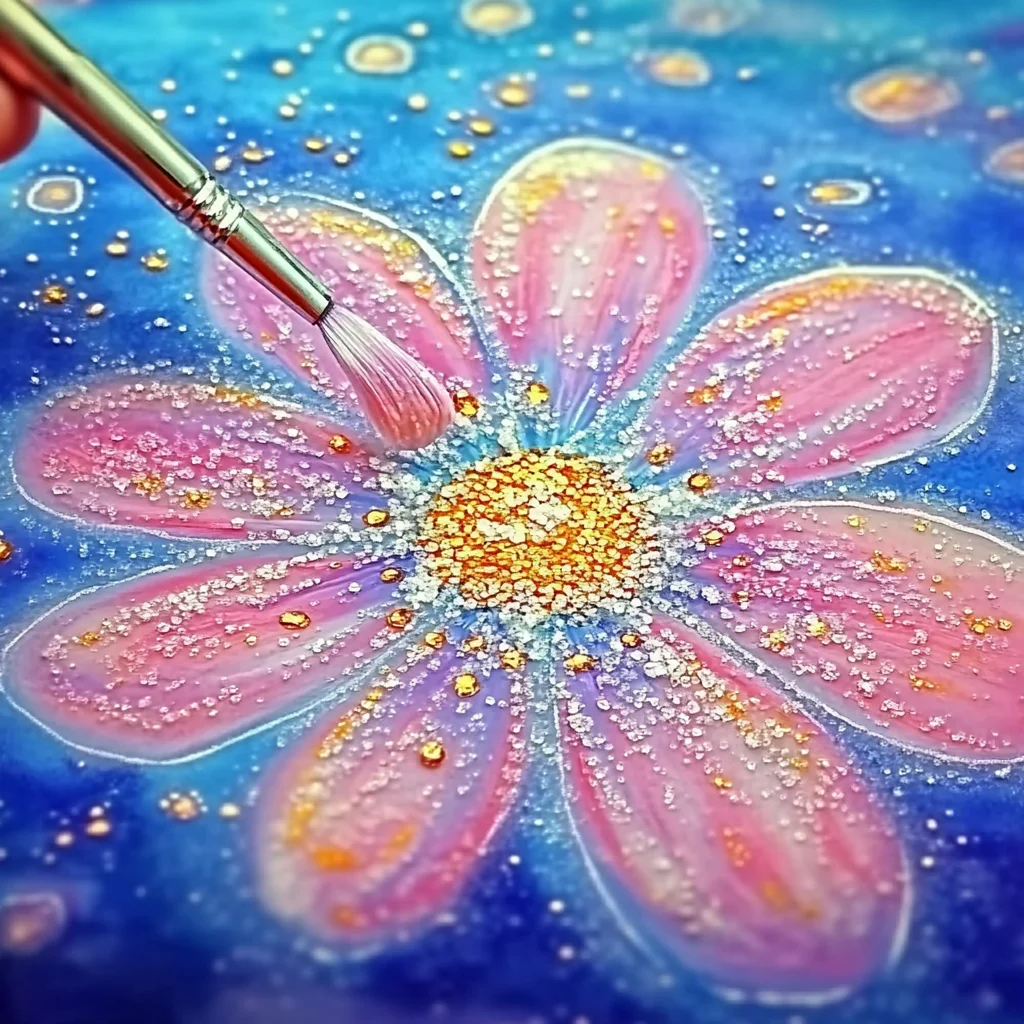
- Draw your flowers: Grab your heavyweight paper and the white glue. You’re going to draw simple flower shapes using the glue. Think about the petals, stems, and leaves. Make sure to apply the glue in lines that are thick enough for the salt to really stick to. You want a nice, solid line of glue for the salt to cling to!
- Sprinkle with salt: While the glue is still nice and wet, generously sprinkle the fine grain table salt all over the glued lines. Make sure to cover every bit of the glue. Don’t be shy with the salt! Once you’ve got it covered, gently tilt your paper over the tray or newspaper to shake off any excess salt. You can even reuse this salt for your next masterpiece!
- Add the color: Now for the really fun part! Take your paintbrushes, pipettes, or droppers and carefully apply your liquid watercolors or diluted food coloring onto the salted lines. You’ll see the magic happen as the color starts to spread and bloom along the salt crystals. It’s mesmerizing to watch! I love using different colors for the petals and stems to make each flower unique.
- Let it dry: This is the part that requires a little patience. You need to let your beautiful flower salt paintings dry completely flat. This usually takes several hours, or even overnight. Try your best not to move them while they’re drying, as this can cause the colors to blend in unexpected ways.
- Admire your work: Once completely dry, you’ll have a stunning, textured piece of art! You can frame them, use them as unique cards, or even create a whole bouquet of salt-painted flowers.
Substitutions & Additions
Feeling inspired to get a little more creative? Here are a few ideas:
- Different shapes: Instead of flowers, try painting butterflies, stars, or even abstract designs!
- Glitter glue: Mix a little fine glitter into your glue for some extra sparkle.
- Salt textures: Experiment with different types of salt, like Epsom salt, for a different texture (though fine table salt works best for color blooming).
- More vibrant colors: For an even more intense color, you can use slightly more concentrated food coloring.
Tips for Success
Here are a few pointers to make your salt painting experience even smoother:
- Use the right paper: As mentioned, heavyweight paper is key. If you don’t have watercolor paper, cardstock or even sturdy construction paper can work.
- Don’t let the glue dry before salting: The salt needs a wet surface to adhere to and create that beautiful color-spreading effect.
- Experiment with color application: Try dabbing the color on with a brush versus using a dropper to see how it affects the final look. For a more controlled look, a fine paintbrush is your best friend. For a more organic, blooming effect, pipettes or droppers are fantastic.
- Prep ahead: If you’re doing this with young children, drawing the glue designs beforehand can make the process much quicker and less messy.
How to Store Flower Salt Painting
Once your beautiful salt paintings are dry, they’re quite delicate due to the salt crystals. To keep them looking their best:
- Store them flat in a portfolio or between sheets of cardboard.
- Avoid stacking anything heavy on top of them.
- If you want to preserve them more permanently, you can lightly spray them with a fixative or hairspray from a distance once completely dry. Test this in an inconspicuous spot first!
FAQs
Can I use regular table salt?
Yes, fine grain table salt is ideal because it creates a good surface for the paint to travel along.
Can I use crayons to draw the shapes instead of glue?
No, this technique relies on the glue to hold the salt and guide the watercolor. You could use crayons as a base for a different type of art, but for salt painting, glue is essential.
How long does it take to dry?
Drying time can vary depending on humidity and the amount of paint used, but typically, it takes several hours to overnight for the painting to dry completely flat.
Want to see more creative ideas? Follow us on Pinterest for endless inspiration!
Flower Salt Painting
Ingredients
Equipment
Method
- Step 1: Set up your space: First things first, let's get everything ready. Lay down some newspaper or place your tray on your workspace. Arrange all your ingredients and materials within easy reach. It’s always a good idea to have everything prepped before you start, especially when working with kids!
- Step 2: Draw your flowers: Grab your heavyweight paper and the white glue. You’re going to draw simple flower shapes using the glue. Think about the petals, stems, and leaves. Make sure to apply the glue in lines that are thick enough for the salt to really stick to. You want a nice, solid line of glue for the salt to cling to!
- Step 3: Sprinkle with salt: While the glue is still nice and wet, generously sprinkle the fine grain table salt all over the glued lines. Make sure to cover every bit of the glue. Don't be shy with the salt! Once you've got it covered, gently tilt your paper over the tray or newspaper to shake off any excess salt. You can even reuse this salt for your next masterpiece!
- Step 4: Add the color: Now for the really fun part! Take your paintbrushes, pipettes, or droppers and carefully apply your liquid watercolors or diluted food coloring onto the salted lines. You'll see the magic happen as the color starts to spread and bloom along the salt crystals. It's mesmerizing to watch! I love using different colors for the petals and stems to make each flower unique.
- Step 5: Let it dry: This is the part that requires a little patience. You need to let your beautiful flower salt paintings dry completely flat. This usually takes several hours, or even overnight. Try your best not to move them while they’re drying, as this can cause the colors to blend in unexpected ways.
- Step 6: Admire your work: Once completely dry, you'll have a stunning, textured piece of art! You can frame them, use them as unique cards, or even create a whole bouquet of salt-painted flowers.
Notes
- Different shapes: Instead of flowers, try painting butterflies, stars, or even abstract designs!
- Glitter glue: Mix a little fine glitter into your glue for some extra sparkle.
- Salt textures: Experiment with different types of salt, like Epsom salt, for a different texture (though fine table salt works best for color blooming).
- More vibrant colors: For an even more intense color, you can use slightly more concentrated food coloring.
- Use the right paper: As mentioned, heavyweight paper is key. If you don't have watercolor paper, cardstock or even sturdy construction paper can work.
- Don't let the glue dry before salting: The salt needs a wet surface to adhere to and create that beautiful color-spreading effect.
- Experiment with color application: Try dabbing the color on with a brush versus using a dropper to see how it affects the final look. For a more controlled look, a fine paintbrush is your best friend. For a more organic, blooming effect, pipettes or droppers are fantastic.
- Prep ahead: If you're doing this with young children, drawing the glue designs beforehand can make the process much quicker and less messy.
Your article helped me a lot, is there any more related content? Thanks!
I don’t think the title of your article matches the content lol. Just kidding, mainly because I had some doubts after reading the article. https://www.binance.com/join?ref=IXBIAFVY
I don’t think the title of your article matches the content lol. Just kidding, mainly because I had some doubts after reading the article.
Your point of view caught my eye and was very interesting. Thanks. I have a question for you. https://accounts.binance.info/register-person?ref=IXBIAFVY
Your point of view caught my eye and was very interesting. Thanks. I have a question for you.