
Remember those magical moments when a simple science trick could fill your whole afternoon with wonder? I sure do! There’s something so special about those easy, hands-on activities that spark curiosity and bring a little bit of magic into our homes. Today, I want to share a classic that never fails to impress: the baking soda and vinegar balloon inflation experiment. It’s incredibly easy, uses common household items, and the result? A perfectly inflated balloon, powered by science! Get ready for some “wow” moments!
Why You’ll Love This Baking Soda Balloon Experiment
- Super Speedy: You can set this up and see the results in just a few minutes!
- Effortlessly Easy: No complicated steps here, making it perfect for all ages.
- Giftable Fun: Assemble a science kit for a friend – it’s a unique and educational present.
- Crowd-Pleaser: Whether it’s a classroom, a birthday party, or just a rainy afternoon, this experiment is always a hit.
Gather Your Supplies
Before we dive into the fun, let’s make sure you have everything you need. It’s all stuff you probably already have lurking in your kitchen!
- 1 Balloon: Any standard balloon will do.
- 1 Small Plastic Bottle (12–16 oz): A water bottle or soda bottle works perfectly.
- 1–2 Tablespoons Baking Soda: This is our magic ingredient!
- 1/2 Cup White Vinegar: The bubbly reaction partner.
- Optional: Food Coloring: For a colorful twist!
- Safety Goggles: Always important to protect those peepers during experiments.
- A Tray to Catch Spills: Because science can sometimes get a little messy, and we like to keep things tidy!
Let’s Get This Experiment Going!
Alright, chef hats on (or rather, safety goggles!) because it’s time for some kitchen science. This is where the magic happens.
-
Safety First! Grab your safety goggles and put them on. It’s always a good idea to protect your eyes when you’re playing with science.
-
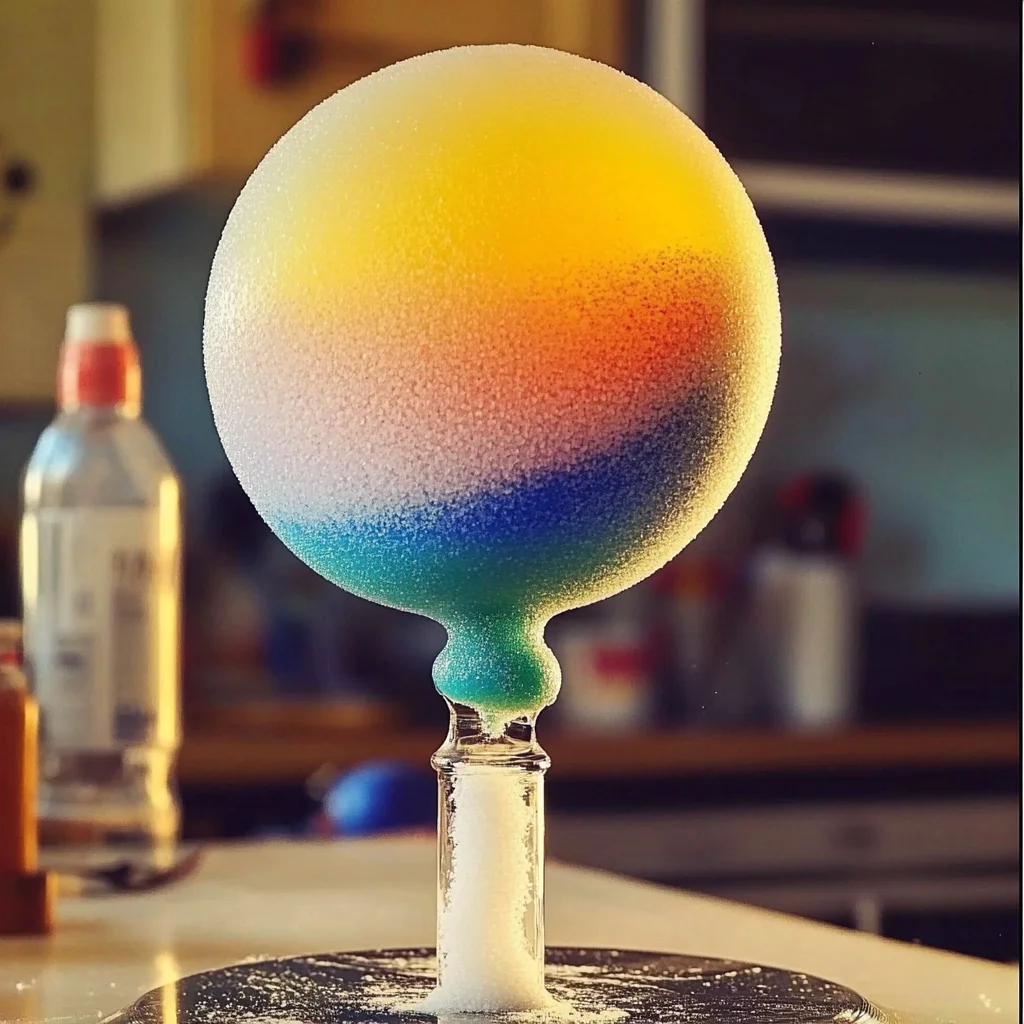
Vinegar Base: Carefully pour about 1/2 cup of white vinegar into your plastic bottle. If you’re feeling fancy and want a colorful balloon, now’s the time to add a few drops of food coloring! Give it a gentle swirl.
-
Baking Soda Cargo: This is where the balloon gets its power. Use a small funnel (or carefully spoon it) to get 1 to 2 tablespoons of baking soda into your balloon. Try to get it all the way into the bulb of the balloon.
-
Seal the Deal: Now, very carefully, stretch the opening of the balloon over the mouth of the bottle. Make sure it’s a good, tight seal so no precious gas escapes! The balloon will be hanging down the side of the bottle for now.
-
The Big Reveal: Ready for the moment of truth? Lift the balloon upright, allowing all the baking soda to tumble down into the vinegar in the bottle.
-
Watch the Magic! As the baking soda meets the vinegar, you’ll see it start to fizz and foam. This reaction creates carbon dioxide gas, which will then inflate your balloon! How cool is that?
I always get a kick out of how quickly the balloon starts to inflate. It’s like a tiny science-powered party in a bottle!
Mix It Up: Substitutions & Additions
This experiment is fantastic as is, but you can totally get creative with it! Here are a few ideas to switch things up:
- Different Acids: While vinegar is classic, you could experiment with other mild acids like lemon juice, though the reaction might be a bit less dramatic.
- Baking Soda Amount: See what happens if you use a little more or a little less baking soda. Does it change how much the balloon inflates?
- Bottle Size: Try using a slightly larger or smaller bottle to see if that makes a difference.
- Color Combinations: Use different food coloring colors for different balloons.
Tips for a Perfect Inflation
Even the simplest experiments can benefit from a few pro tips. Here’s how to ensure your baking soda balloon experiment is a smashing success:
- Funnel is Your Friend: If you don’t have a funnel, you can roll up a piece of paper into a cone. It makes getting the baking soda into the balloon so much easier.
- Don’t Overfill: Be careful not to add too much baking soda. If the reaction is too vigorous, it might overflow the bottle.
- Seal it Tight: The most crucial step! Make sure the balloon opening is really sealed around the bottle’s mouth.
- Ready for Action: Have your balloon ready to go right after you pour the vinegar. The sooner you get the baking soda in, the better the reaction.
- Prep Ahead: You can pre-portion the baking soda into balloons and have them ready to go if you’re doing this with a group. Just make sure they don’t get wet!
Storing Your Balloon Inflation Masterpiece
Once your balloon is inflated, the fun doesn’t have to stop immediately! You can keep the balloon on the bottle for a while. If you want to save your baking soda and vinegar for another time, simply carefully remove the balloon and seal it, then discard the liquid. For the next experiment, consider some of our other fun DIY activities like the DIY Lava Lamp or the DIY Fizzy Painting!
Frequently Asked Questions
Got questions? We’ve got answers!
- Q: Why does the balloon inflate?
A: When baking soda (a base) mixes with vinegar (an acid), a chemical reaction occurs, producing carbon dioxide gas. This gas needs space, so it fills up the balloon! - Q: Can I use something other than a plastic bottle?
A: A glass bottle could work, but plastic is safer and more forgiving if it happens to tip over. - Q: Can I reuse the same balloon?
A: You can rinse and reuse the balloon, but be sure it’s completely dry inside and out before your next experiment.
This baking soda balloon experiment is such a fantastic way to introduce kids to basic chemistry. It’s engaging, visually exciting, and teaches them about chemical reactions in a super fun way. I hope you have as much fun trying it out as I do!
If you enjoyed this fun science experiment, be sure to check out more of our creative DIY projects and delicious recipes! Follow us on Pinterest for daily inspiration!
Baking Soda Balloon Inflation
Ingredients
Equipment
Method
- Safety First! Grab your safety goggles and put them on. It’s always a good idea to protect your eyes when you're playing with science.
- Vinegar Base: Carefully pour about 1/2 cup of white vinegar into your plastic bottle. If you're feeling fancy and want a colorful balloon, now's the time to add a few drops of food coloring! Give it a gentle swirl.
- Baking Soda Cargo: This is where the balloon gets its power. Use a small funnel (or carefully spoon it) to get 1 to 2 tablespoons of baking soda into your balloon. Try to get it all the way into the bulb of the balloon.
- Seal the Deal: Now, very carefully, stretch the opening of the balloon over the mouth of the bottle. Make sure it’s a good, tight seal so no precious gas escapes! The balloon will be hanging down the side of the bottle for now.
- The Big Reveal: Ready for the moment of truth? Lift the balloon upright, allowing all the baking soda to tumble down into the vinegar in the bottle.
- Watch the Magic! As the baking soda meets the vinegar, you'll see it start to fizz and foam. This reaction creates carbon dioxide gas, which will then inflate your balloon! How cool is that?