Remember those magical moments as a kid, the pure joy of creating something messy and wonderful? There’s something so special about hands-on activities that ignite imagination and bring smiles. Today, I’ve got a super fun, sensory art project that’s guaranteed to be a hit with your little ones: Fizzy Painting! It’s incredibly easy to set up, uses common household ingredients, and the “fizz” reaction is pure scientific magic that kids absolutely adore.
This activity is perfect for a rainy afternoon, a homeschool art session, or just a fun weekend project. Plus, the results are so unique and visually captivating!
Why You’ll Love Fizzy Painting for Kids
Fast: You can whip up the paints and get started in minutes!
Easy: Minimal ingredients and simple steps make this accessible for everyone.
Giftable: The finished artwork makes for a charming, handmade gift.
Crowd-pleasing: Guaranteed to entertain a group of kids, from toddlers to older elementary ages.
Ingredients
Gathering your supplies is a breeze! You probably have most of these in your kitchen already:
- Baking Soda: The star of our fizzy show! It’s a pantry staple that creates the magic.
- Water: Just enough to make a nice paste with the baking soda.
- Food Coloring: Grab all your favorite colors to make vibrant creations.
- Small Bowls or Muffin Tin: For mixing and holding your colorful paints.
- Paintbrushes or Droppers: Let your little artists choose their tools for applying the paint.
- White Vinegar: This is what makes the magic happen – the activator for our fizzy art!
- Small Spray Bottles, Pipettes, or Droppers: For adding the vinegar and watching the fizz!
- Thick White Paper, Cardstock, or Watercolor Paper: You want something sturdy to hold up to the moisture.
- Tray or Baking Sheet: Essential for containing any mess and making cleanup a breeze.
How to Make Fizzy Painting for Kids
Ready to unleash some creative fizz? Let’s get started!
Prepare the Fizzy Paint:In each small bowl (or section of your muffin tin), combine about 2 tablespoons of baking soda. Then, add 1–2 teaspoons of water to each. You’re aiming for a thick paste consistency, like frosting or thick paint. If it’s too dry, add a tiny bit more water; if it’s too wet, add a bit more baking soda. Now, add a few drops of your chosen food coloring to each bowl. Stir each mixture until the color is vibrant and evenly distributed. I like to make at least 3-4 different colors to give the kids a good palette to work with.
Set Up the Painting Station:Lay down your thick paper on the tray or baking sheet. Arrange the colorful fizzy paint mixtures within easy reach. Fill your spray bottles, pipettes, or droppers with white vinegar. Having both spray bottles and droppers can be fun – the spray bottles create a broader fizz, while the droppers offer more precise control for little hands.
Paint Away!Now for the fun part! Encourage your child to use the paintbrushes or droppers to apply the fizzy paint mixtures onto their paper. They can create patterns, drawings, or just spread the colors around. This is where their creativity really shines!
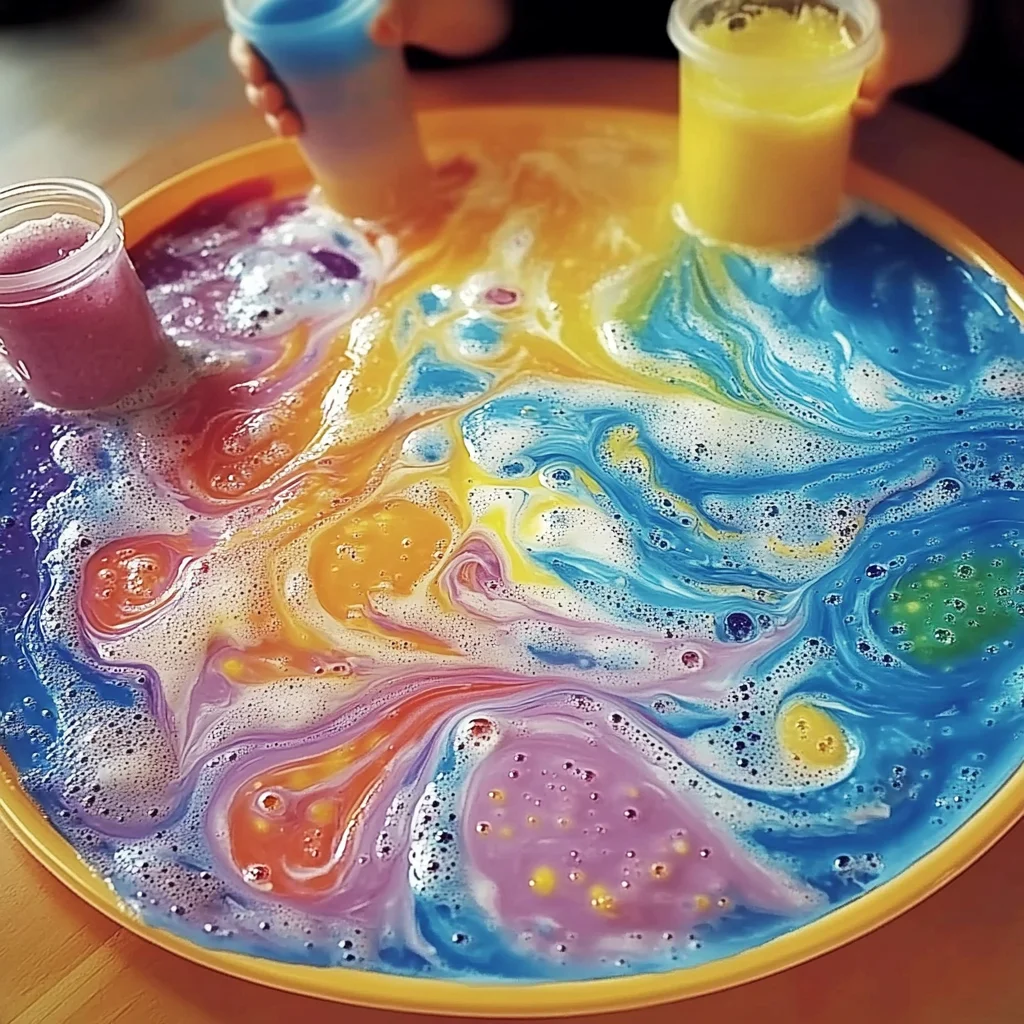
Activate the FizzThis is where the science magic happens! Once they’re happy with their painted designs, it’s time to add the vinegar. Have them use the spray bottles or droppers to apply vinegar to the painted areas. Watch as the baking soda and vinegar react, creating a delightful fizzing and bubbling effect! It’s mesmerizing to watch. If you’re looking for other fun science experiments for kids, you might enjoy our Mini Volcano Jar Science Experiment!
Dry and Display:
Once the fizzing has subsided, let the artwork air dry completely. This can take a few hours, depending on how much vinegar was used. Once dry, you’ll have a beautifully textured and unique piece of art! You can even display it on the fridge or frame it.
Substitutions & Additions
Want to mix things up? Here are a few ideas:
- Glitter: For extra sparkle, mix a little glitter into your baking soda paste before adding the food coloring.
- Shaving Cream: For a fluffier paint texture, try adding a dollop of shaving cream to the baking soda and water mixture.
- Scent: Add a drop or two of essential oil (like lavender or orange) to each color for a lovely scent.
- Textured Additions: Try adding a pinch of salt or sugar to some of the colors for a different tactile experience.
Tips for Success
Baking Soda Paste Consistency: The key is a thick paste. Too watery and it won’t hold its shape, too dry and it’s hard to paint with.
Protect Your Surface: Always use a tray or baking sheet, and consider putting down a plastic tablecloth if you’re working on a table.
Ventilation: While not overwhelming, the vinegar does have a scent. Ensure good airflow in your crafting area.
Prep Ahead: You can mix the baking soda pastes a few hours in advance and cover them. Just give them a quick stir before painting.
How to Store Fizzy Painting for Kids
Once the artwork is dry, it’s a finished piece! You can’t really “store” the fizzy paint mixtures once they’ve been mixed with water, as they can dry out or become moldy over time. It’s best to make only what you need for a single session. If you happen to have a bit of leftover paste that hasn’t been mixed with vinegar, you can cover it tightly with plastic wrap and store it in the refrigerator for a day or two, but freshness is best.
FAQs
- Can kids paint with just the baking soda paste? Yes! They can still create beautiful textured art with just the colored paste before adding the vinegar. The fizz is an added bonus!
- Is this messy? It can be, but the tray and careful supervision help a lot! It’s a different kind of messy than typical paint, more powdery and bubbly.
- What age is this best for? It’s fantastic for toddlers (with supervision) all the way up to around 8-10 years old. Older kids often enjoy the scientific aspect of the reaction.
This fizzy painting activity is a fantastic way to engage your kids in a creative and educational experience. It’s simple, affordable, and incredibly rewarding to see their faces light up with excitement. For more delightful crafts and recipes for your family, be sure to check out our collections! If you’re looking for other engaging activities, you might enjoy our guide to Homemade Playdough or our fun Fizzing Ice Cubes Science Experiment.
Happy crafting, and don’t forget to share your creations! You can find more inspiration on our Pinterest account.

Sparkle and Fizz: Easy DIY Fizzy Painting for Kids
Ingredients
Equipment
Method
- Step 1: Prepare the Fizzy Paint: In each small bowl or section of your muffin tin, combine about 2 tablespoons of baking soda. Add 1–2 teaspoons of water to each to create a thick paste consistency. Stir in a few drops of your chosen food coloring until vibrant and evenly distributed. Aim for 3-4 different colors.
- Step 2: Set Up the Painting Station: Lay down thick paper on a tray or baking sheet. Arrange the colorful fizzy paint mixtures within easy reach. Fill spray bottles, pipettes, or droppers with white vinegar.
- Step 3: Paint Away! Encourage your child to use paintbrushes or droppers to apply the fizzy paint mixtures onto their paper, creating patterns or drawings.
- Step 4: Activate the Fizz! Once happy with their painted designs, have them use the spray bottles or droppers to apply vinegar to the painted areas. Watch the baking soda and vinegar react, creating a fizzing and bubbling effect.
- Step 5: Dry and Display: Let the artwork air dry completely, which can take a few hours. Once dry, display or frame the unique, textured artwork.
Сколько стоит [url=https://kapsulnyj-dom-1.ru]капсульный дом[/url] под ключ в России в 2026 году?
Можно ли доверять бесплатным [url=https://vpn-1.ru]VPN[/url]-расширениям для браузера?
Можно ли использовать [url=https://vpn-1.ru]Впн[/url] для защиты IoT-устройств дома?
[url=https://marketingovoe-agentstvo-1.ru]Маркетинговое агентство[/url] — насколько глубоко оно должно погружаться в специфику бизнеса клиента?
Can you be more specific about the content of your article? After reading it, I still have some doubts. Hope you can help me. https://www.binance.info/register?ref=IHJUI7TF
Почему [url=https://domashnie-zhivotnye-1.ru]домашние животные[/url] иногда кажутся загрустившими без видимой причины?
Can you be more specific about the content of your article? After reading it, I still have some doubts. Hope you can help me. https://www.binance.com/futures/ref?code=IHJUI7TF
Как рассчитывается стоимость, если [url=https://prodvizhenie-sajta-s-garantiej.ru]продвижение сайта с гарантией[/url] не сработало?
[url=https://prodvizhenie-molodyh-sajtov.ru]Продвижение молодых сайтов[/url] — что важнее на старте: технический SEO или контент?
Почему [url=https://domashnie-zhivotnye-1.ru]домашние животные[/url] иногда не признают нового члена семьи?
Стоит ли [url=https://zakazat-prodvizhenie-sajta.ru]заказать продвижение сайта[/url], если уже работает контекстная реклама?
Как [url=https://geo-prodvizhenie-sajta.ru]Гео продвижение сайта[/url] помогает при открытии новой точки?
[url=https://marketingovoe-agentstvo-1.ru]Маркетинговое агентство[/url] — как проверить реальные кейсы, а не нарисованные результаты?
Как выбрать пакет, когда решаешь [url=https://zakazat-prodvizhenie-sajta.ru]заказать продвижение сайта[/url]: базовый или комплексный?
Почему [url=https://domashnie-zhivotnye-1.ru]домашние животные[/url] тащат еду из миски в другое место перед едой?
Поделитесь кейсом, где [url=https://seo-optimizaciya-i-prodvizhenie-sajtov.ru]seo оптимизация и продвижение сайтов[/url] дали синергетический эффект.
Как правильно принять готовый проект после [url=https://sozdanie-sajtov-1.ru]создание сайтов[/url]?
Какой результат реалистично ожидать через год работы по схеме [url=https://seo-pod-klyuch.ru]seo под ключ[/url]?
[url=https://seo-prodvizhenie-molodogo-sajta.ru]SEO продвижение молодого сайта[/url] — нужно ли сразу подключать Яндекс.Вебмастер и GSC?
Как крауд-маркетинг помогает, когда идёт [url=https://seo-prodvizhenie-molodogo-sajta.ru]SEO продвижение молодого сайта[/url] на старте?
[url=https://seo-prodvizhenie-pod-klyuch.ru]SEO продвижение под ключ[/url] — нужен ли на стороне клиента технический специалист?
Как [url=https://prodvizhenie-sajta-v-poiskovyh-sistemah.ru]продвижение сайта в поисковых системах[/url] связано с репутацией бренда?
Сколько стоит профессиональная [url=https://seo-optimizaciya-sajta.ru]seo оптимизация сайта[/url] «под ключ»?
[url=https://seo-prodvizhenie-pod-klyuch.ru]SEO продвижение под ключ[/url] для малого бизнеса — реально ли это при ограниченном бюджете?