
Remember those magical afternoons as a kid, the way sunlight would stream through the window, casting colorful patterns on the floor? There’s something so wonderfully nostalgic and simple about bringing that joy into your home, isn’t there? Today, we’re going to recreate that magic with a super easy, wonderfully creative project: DIY Suncatchers! You might even remember making something similar – I know I do! These little gems are so satisfying to make, and they add a beautiful, vibrant touch to any room. Get ready to catch some rays and bring a burst of color into your life!
Why You’ll Love These DIY Suncatchers
- Fast to Assemble: While they need drying time, the actual hands-on part is super quick!
- Incredibly Easy: Perfect for crafters of all ages, even little ones with supervision.
- Giftable Perfection: These make thoughtful, handmade gifts for friends, teachers, or anyone who needs a little sparkle.
- Crowd-Pleasing Decor: Who doesn’t love a bit of handmade sunshine? They’re sure to brighten any space.
Gather Your Supplies
This recipe is delightfully simple, and the ingredients are likely things you might already have around the house, or can easily pick up. It’s one of the reasons I love this project so much – it’s accessible and fun!
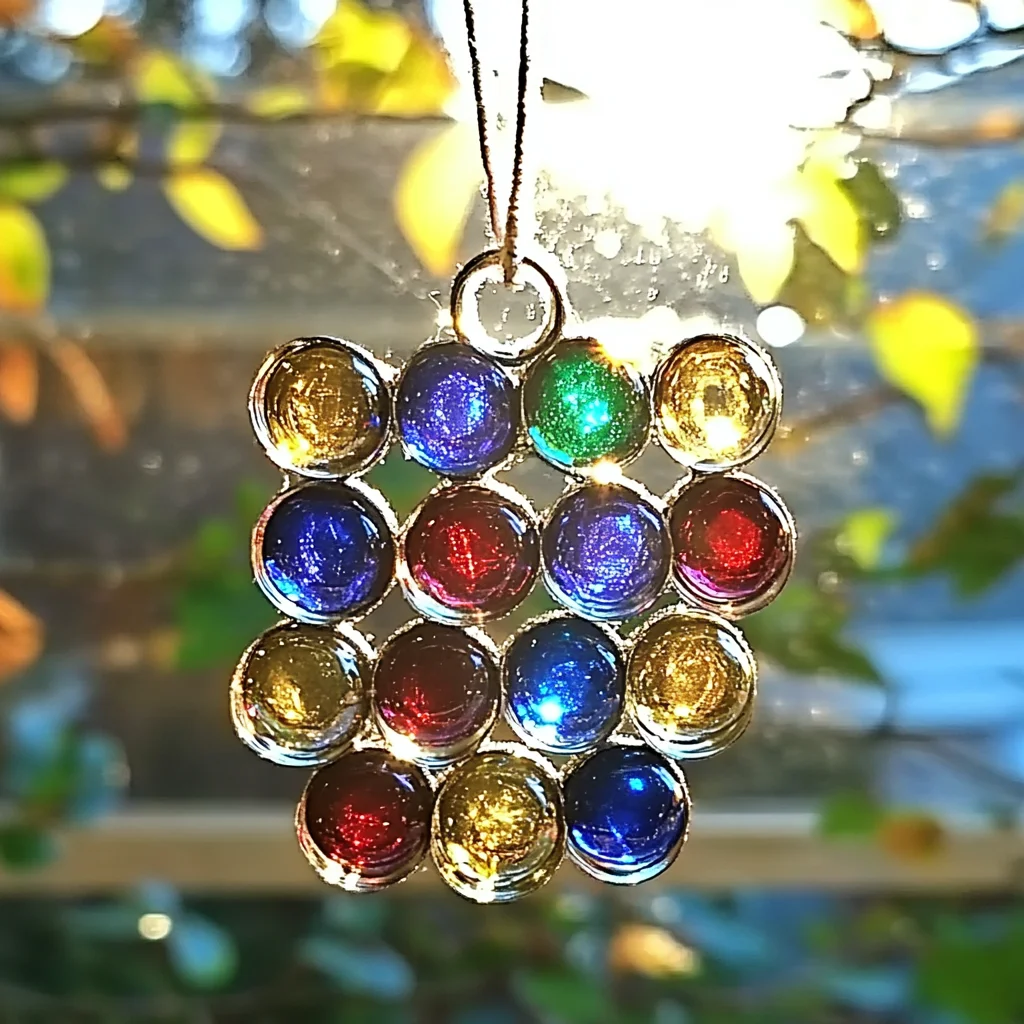
- Colored Glass Gems or Stones: These are the stars of the show! You can find these at craft stores, dollar stores, or even repurpose them from old games or decorations. Look for a variety of colors and shapes for the most interesting results.
- Clean Plastic Lids: Think of those sturdy lids from butter tubs, sour cream containers, or even yogurt cups. Make sure they are thoroughly washed and dried.
- Clear Elmer’s Glue: This is your binder! It dries clear, which is key to letting the light shine through.
- Ribbon or Fishing Line: This is for hanging your beautiful creations.
Let’s Get Crafting: How to Make Your Suncatchers
This is where the magic happens! It’s a straightforward process that’s as enjoyable as the final product.
-
Prep Your Lid:
Grab one of your clean plastic lids. We’re going to work on the flat, inner side. Take your clear Elmer’s Glue and spread a generous, even layer across the entire surface. Don’t be shy with the glue – it needs to be thick enough to hold all our colorful gems!
-
Arrange Your Gems:
Now for the fun part – design! Start placing your colored glass gems or stones onto the glue. Try to get them close together, even touching, to create a solid mosaic. You can make patterns, random swirls, or just fill the space completely. I love experimenting with different color combinations – it’s like creating mini stained-glass windows!
-
Secure Everything:
Once you’re happy with your arrangement, it’s time to secure them. Apply another layer of clear Elmer’s Glue over the top of the gems. This acts like a clear sealant, ensuring everything stays put and giving your suncatcher a nice, smooth finish. Make sure to cover all the edges of the gems.
-
The Waiting Game:
This is the hardest part – waiting for it to dry! Place your suncatchers on a flat surface in a well-ventilated area. Depending on how thick the glue is and the humidity, this can take anywhere from 3 to 4 days, or even a bit longer. Resist the urge to touch them too soon! Patience is key for a sturdy suncatcher. If you’re looking for other projects that require a bit of patience while they set, you might enjoy trying our Caramel Apple Cinnamon Roll Dump Cake or our Sweet Potato Cheesecake Cookies – some recipes are worth the wait!
-
Add the Hanger:
Once your suncatcher is completely dry and hard, it’s time to hang it up! Carefully thread your ribbon or fishing line through any small gaps you might find between the glass gems. If there aren’t any convenient gaps, no worries! You can use a bit of hot glue or more clear glue to attach a loop of ribbon securely to the back of the suncatcher. Just make sure it’s strong enough to hold the weight.
-
Hang and Enjoy!
Find the perfect spot for your new suncatcher – a sunny window is ideal! Watch as the light catches the colorful gems and transforms your space with beautiful, shifting patterns. It’s a little piece of handmade sunshine!
Substitutions & Creative Additions
While the basic recipe is fantastic, here are a few ideas to get your creative juices flowing:
- Different Materials: Instead of glass gems, try small, colorful buttons, smooth sea glass (if you have it!), or even colorful beads. Just ensure they are relatively flat and won’t be too bulky. For a truly unique craft, you could even explore making your own DIY Bioplastic Suncatchers!
- Glitter Galore: Want some extra sparkle? Mix a little fine glitter into the glue before applying it, or sprinkle it over the wet glue before it dries.
- Layering: For a more dimensional look, you could try a thin layer of glue, add some gems, let that dry slightly, and then add another layer of glue and more gems.
- Shapes: If you have plastic lids in different shapes, or can cut your own from larger plastic sheets, you can create all sorts of fun shapes!
Tips for Suncatcher Success
A few little tips to make your crafting experience even smoother:
- Cleanliness is Key: Make sure your plastic lids are super clean and dry. Any residue can affect how well the glue adheres.
- Even Glue Layer: Try to get your glue layer as even as possible. This helps prevent thin spots and ensures all your gems are well-embedded.
- Don’t Rush the Dry Time: I know it’s tempting, but letting the glue dry completely is crucial for durability. If your gems wiggle or the glue is still soft, give it more time.
- Prep Ahead: If you’re crafting with kids or planning a party, you can clean the lids and organize the gem colors ahead of time to make the actual crafting session quicker and more enjoyable.
How to Store Your Suncatchers
These suncatchers are quite durable once fully dry, but it’s best to store them carefully if you’re not hanging them immediately. Lay them flat, perhaps between sheets of parchment paper, or hang them carefully. They should last for a very long time when stored properly, bringing you sunshine year after year!
Frequently Asked Questions
Q: Can I use a different type of glue?
A: Clear Elmer’s Glue is recommended because it dries clear and strong. While other clear craft glues might work, Elmer’s is a reliable choice for this project. Avoid glue sticks or opaque glues, as they won’t let the light through.
Q: My gems are falling off, what did I do wrong?
A: This usually happens if the glue wasn’t applied thickly enough, or if the suncatcher was moved before it was completely dry. Ensure you use a generous amount of glue and let it dry undisturbed for the full recommended time.
Q: Can I make these outdoors?
A: Yes, you can! Just be mindful of wind that could blow your gems away before the glue sets. It’s also a good idea to protect your work surface.
Happy crafting! I hope you enjoy making these beautiful suncatchers as much as I do. For more delightful DIY projects and delicious recipes, be sure to follow us on Pinterest!
DIY Suncatchers
Ingredients
Equipment
Method
- Prep your lid: Spread a generous, even layer of clear Elmer's Glue on the flat, inner side of a clean plastic lid.
- Arrange your gems: Place colored glass gems onto the glue, close together to create a mosaic. Experiment with color combinations.
- Secure everything: Apply another layer of clear Elmer's Glue over the gems to seal them and create a smooth finish. Ensure all edges are covered.
- The waiting game: Place suncatchers on a flat surface in a well-ventilated area. Allow to dry for 3 to 4 days, or longer depending on glue thickness and humidity.
- Add the hanger: Once completely dry and hard, thread ribbon or fishing line through gaps between gems, or use glue to attach a loop to the back.
- Hang and enjoy: Find a sunny window and hang your finished suncatcher to enjoy the colorful patterns it casts.