
Oh, how I love those cozy kitchen moments! You know, the ones where the smell of something sweet fills the air, and you just know you’re about to create a little bit of magic. Today, we’re diving into something truly special that’s going to whisk you back to childhood memories with every single bite: Crispy Cheesecake Cookie Croffles! These little delights are an absolute game-changer, combining the flaky magic of croissants with the irresistible charm of cookies and the creamy bliss of cheesecake. They’re so easy to whip up, you’ll be wondering where they’ve been all your life!
Why You’ll Love Crispy Cheesecake Cookie Croffles
- Fast: Perfect for those spontaneous sweet cravings!
- Easy: Seriously, if you can open a can of dough, you can make these!
- Giftable: Package them up beautifully for a thoughtful homemade present.
- Crowd-pleasing: Everyone, and I mean everyone, will adore these!
Ingredients
Gather ’round, bakers! Here’s what you’ll need to create these delightful treats:
- 1 roll crescent dough or croissant dough (The foundation of our flaky dreams!)
- 4 ounces cream cheese, softened (For that luscious, creamy center.)
- 2 tablespoons powdered sugar (To sweeten our cheesecake filling just right.)
- 1/2 teaspoon vanilla extract (The secret to that irresistible aroma and flavor.)
- 1/4 cup mini chocolate chips (Because what’s better than chocolatey surprises?)
- 1/4 cup crushed chocolate cookies (such as Oreos) (These add a delightful crunch and extra chocolatey goodness.)
- Non-stick spray or butter for waffle iron (To ensure a perfect, golden-brown finish.)
- Extra powdered sugar for dusting (The pretty finishing touch!)
How to Make Crispy Cheesecake Cookie Croffles
Alright, let’s get our hands a little doughy and create some happiness! It’s simpler than you think.
Step 1: Whip Up That Dreamy Cheesecake Filling
First things first, let’s get our star filling ready. In a medium bowl, combine the softened cream cheese, powdered sugar, and vanilla extract. Give it a good mix until it’s super smooth and creamy. No lumps allowed! Now, gently fold in those adorable mini chocolate chips. See? Already smelling like heaven!
Step 2: Dough Prep and Filling Time
Unroll your crescent or croissant dough. I like to lightly flour my surface if the dough is a bit sticky, but usually, it’s pretty cooperative. Cut the dough into squares. The size depends on your waffle iron, but about 3×3 inches usually works great. Now, take a spoonful of your delicious cheesecake filling and place it right in the center of each dough square. It’s like tucking a sweet secret inside! Carefully fold the dough edges up and over the filling to seal them completely. Pinch those seams tight – we don’t want any cheesecake escapees!
Step 3: Get Your Waffle Iron Ready
It’s time to preheat your trusty waffle iron! While it’s getting nice and hot, give it a light coating of non-stick spray or a little brush of butter. This ensures our croffles won’t stick and will get that gorgeous golden crispiness we’re aiming for. If you don’t have a waffle iron, you can adapt this recipe for a pan, but the waffle iron gives them that signature texture. Think of it as a shortcut to deliciousness, similar to how these funnel cake bites are a shortcut to carnival fun!
Step 4: Cook to Golden Perfection
Carefully place your filled dough squares into the preheated waffle iron. Don’t overcrowd it; you might need to do this in batches. Gently press down the lid. Now, just let the magic happen! Cook them for about four to five minutes per batch. You’re looking for that beautiful golden brown color and a wonderfully crispy texture. Keep an eye on them, as waffle irons can vary.
Step 5: The Grand Finale!
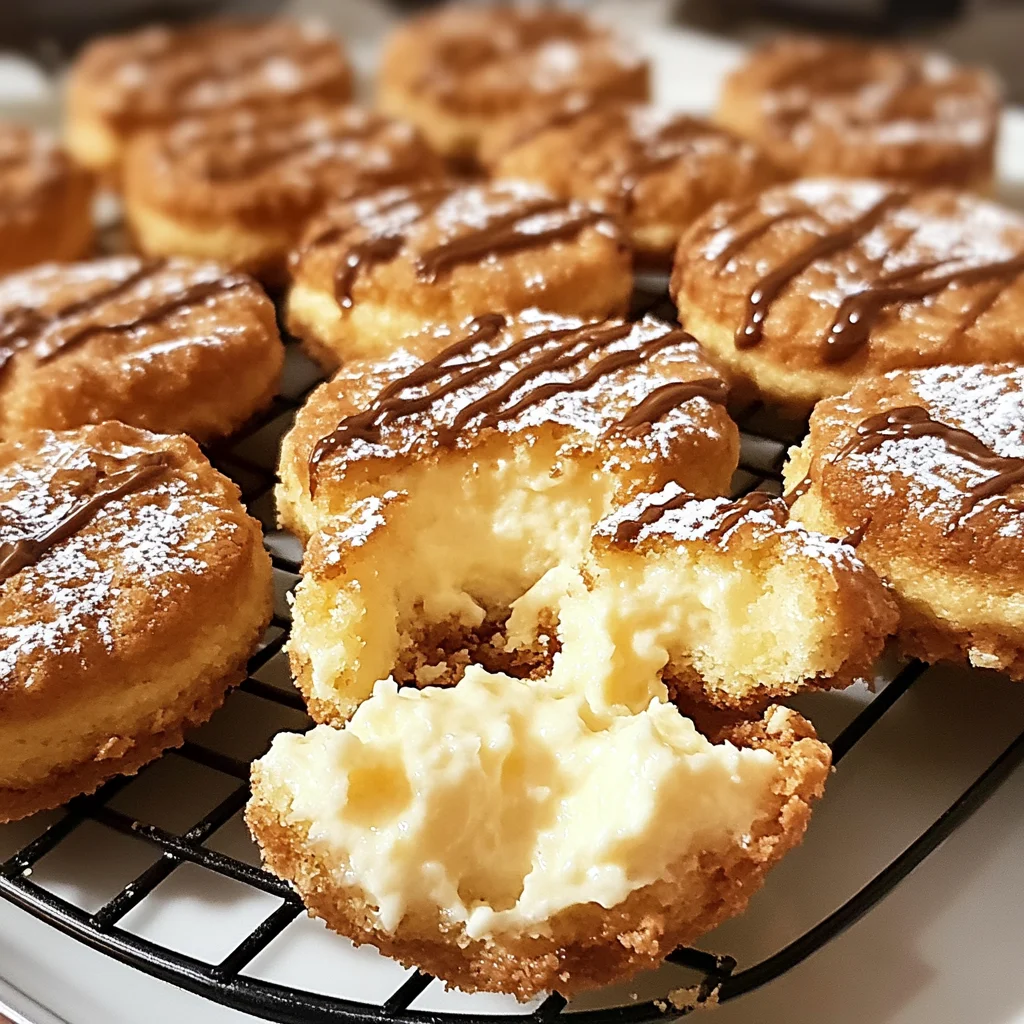
Once they’re perfectly golden and crispy, carefully remove your croffles from the waffle iron. Oh, the aroma! Immediately sprinkle the crushed chocolate cookies over the top while they’re still warm. This helps them adhere beautifully. Finish with a light dusting of powdered sugar, and voilà! You have yourself some absolutely divine Crispy Cheesecake Cookie Croffles. Serve them warm and watch them disappear!
Substitutions & Additions
Feeling adventurous? Let’s jazz these up a bit!
- Berry Bliss: Swap the chocolate chips for fresh or frozen blueberries or raspberries. You could even try a swirl of our apple pie jam in the filling!
- Nutty Goodness: Add a tablespoon of finely chopped pecans or walnuts to the cheesecake filling for an extra layer of texture.
- Citrus Zest: A little bit of lemon or orange zest in the filling can add a bright, refreshing note.
- Cookie Variations: Experiment with different crushed cookies – graham crackers for a graham cracker crust vibe, or even gingersnaps for a spiced twist!
- Caramel Drizzle: A little drizzle of caramel sauce on top is never a bad idea!
Tips for Success
Here are a few little secrets to make your croffles absolutely perfect every time:
- Soften Your Cream Cheese: Make sure your cream cheese is truly softened. This makes it much easier to mix into a smooth filling. If you’re in a pinch, you can briefly microwave it on low power, but watch it closely!
- Don’t Overfill: Too much filling might cause it to leak out during cooking. A tablespoon per square is usually a good amount.
- Seal Well: Really pinch those seams shut to prevent any of that yummy cheesecake filling from escaping during cooking.
- Watch for Burning: Because the dough is thin and the sugar content is there, they can brown quickly. Keep an eye on them to avoid burnt edges.
- Prep Ahead: You can make the cheesecake filling a day in advance and store it in the refrigerator.
How to Store Crispy Cheesecake Cookie Croffles
These are truly best enjoyed fresh and warm, right off the waffle iron. However, if you happen to have any leftovers (which is unlikely, but we can dream!), you can store them in an airtight container at room temperature for up to a day. For longer storage, pop them in the refrigerator for up to 2-3 days. To reheat, a quick warm-up in the toaster oven or air fryer will help bring back some of their crispiness. They also freeze beautifully! Just cool them completely, wrap them well, and freeze for up to a month. Reheat from frozen in your oven or air fryer.
FAQs
Q: Can I make these without a waffle iron?
A: While the waffle iron gives them their signature “croffle” look and texture, you can definitely bake them! Place them on a baking sheet lined with parchment paper and bake at 375°F (190°C) for about 10-12 minutes, or until golden brown and cooked through. They won’t have the waffle grid pattern, but they’ll still be delicious!
Q: Can I use regular chocolate chips instead of mini ones?
A: Yes, you can! If you use regular chocolate chips, they might be a bit larger, so just make sure they’re distributed well within the filling. You could also give them a rough chop.
Q: What kind of dough works best?
A: Both crescent roll dough and croissant dough work wonderfully. Croissant dough might give you a slightly flakier result, but crescent dough is also fantastic and very easy to find!
I hope you absolutely adore these Crispy Cheesecake Cookie Croffles as much as I do! They’re such a fun, easy, and delicious way to bring a little extra joy into your day. If you try them, be sure to share your creations! Happy baking, friends!
For more delicious recipes and baking inspiration, be sure to follow us on Pinterest!
Crispy Cheesecake Cookie Croffles
Ingredients
Equipment
Method
- Step 1: Whip Up That Dreamy Cheesecake Filling. In a medium bowl, combine the softened cream cheese, powdered sugar, and vanilla extract. Give it a good mix until it’s super smooth and creamy. No lumps allowed! Now, gently fold in those adorable mini chocolate chips.
- Step 2: Dough Prep and Filling Time. Unroll your crescent or croissant dough. Lightly flour your surface if the dough is a bit sticky. Cut the dough into squares, about 3x3 inches. Place a spoonful of the cheesecake filling in the center of each dough square. Carefully fold the dough edges up and over the filling to seal them completely. Pinch those seams tight.
- Step 3: Get Your Waffle Iron Ready. Preheat your waffle iron. Lightly coat it with non-stick spray or butter.
- Step 4: Cook to Golden Perfection. Carefully place your filled dough squares into the preheated waffle iron, without overcrowding. Gently press down the lid. Cook for about four to five minutes per batch, until golden brown and crispy.
- Step 5: The Grand Finale! Once golden and crispy, carefully remove your croffles from the waffle iron. Immediately sprinkle the crushed chocolate cookies over the top while they're still warm. Finish with a light dusting of powdered sugar.